Birthday Tag — NSD 2014 Challenges

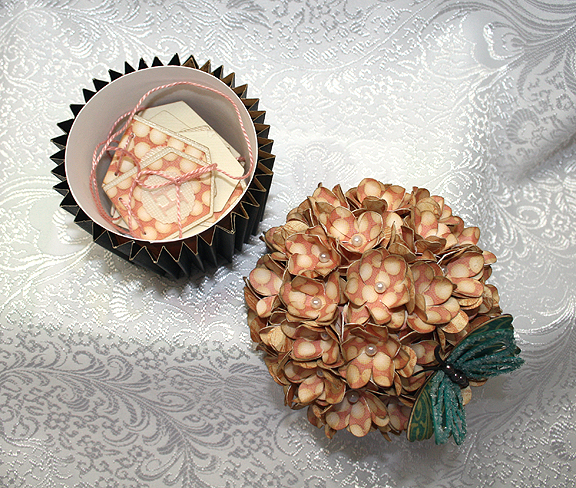
Since time is running out to enter the challenges on the Cricut Circle Message Board, I made this tag to enter into two different categories.  Actually, I think it qualifies for three.  The first is the XO Three in a Row, the second one is Everything’s Coming Up Rosettes, and the third is All Mixed Up.

For Maria’s XO Three in a Row challenge, you have to pick three items from a Tic Tac Toe board and incorporate them into your project. I chose the bottom row, which is Flower, Ribbon (or Twine), and Stamp.

For Colleen’s Everything’s Coming Up Rosettes, you have to make a project and use a rosette on it.

For Di’s All Mixed Up challenge, you need to use a piece of fabric on your project.

3

I covered the tag with sticky back canvas and then inked it using Peacock Feathers Distress Ink.  I stamped the images on the canvas using the same ink.

I used this tutorial from Tammy Tutterow for my tag, because I wanted to make the flower out of crinoline and she has step-by-step instructions.  I used a Tim Holtz rosette die to cut the crinoline and then sprayed them with Lindy’s Stamp Gang’s Starburst Sprays to get the beautiful colors.   The leaves are from a Spellbinders die, also cut from crinoline.  I stamped a butterfly on vellum and added it to the flower.

2

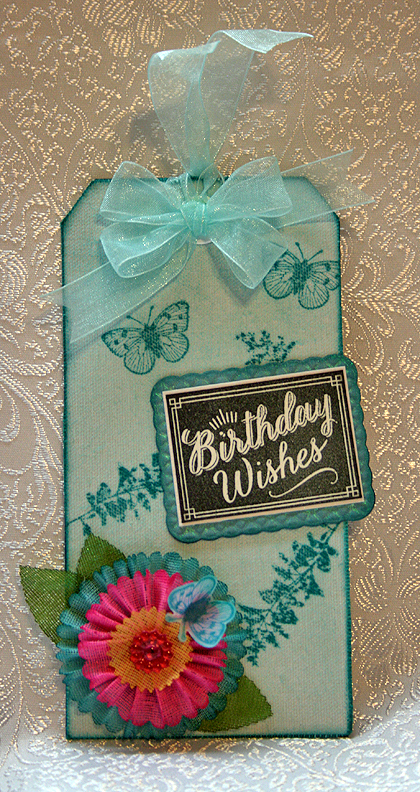
All that was left was the sentiment and bow, which I made using my Bow-it-All.

  • Ranger Sticky Back Canvas
  • Tim Holtz rosette die
  • Crinoline (from Jo-Ann’s)
  • Distress Ink
  • Lindy’s Stamp Gang Starburst Spray

Altered Book Box and Stick Pin Swap

I just participated in an altered book box and stick pin swap on the Cricut Circle Message Board.  I had never altered a paper mache box before, so this was a new adventure for me.  My partner (Maria) let me know some of her likes — I knew she liked bright colors and owls.  Since I like owls too, I decided to use that for my theme.

Front9

The first thing I did was primer the book in gesso.  Then I applied two coats of Martha Stewart  Mother of Pearl paint.  I let the last coat of paint dry overnight and then I brushed on a layer of Tim Holtz Rock Candy Crackle paint on the spine and the inside edges of the book.  When that was thoroughly dry, I sponged on some blue and brown distress ink over the crackled paint.

Spine

The title was printed on the computer and adhered on the spine using Liquitex Gloss Medium & Varnish.  I added a couple coats of the gloss medium over the crackle paint on the spine and on the inside.

Spine2

I used Ranger Sticky Back Canvas for the cover of the book.  Since this was my first time using it, I wasn’t sure if it need to be primed with gesso.  I decided to go ahead and gesso it, but first I stuck the canvas to a piece of cardstock and sewed around the edges. After the gesso dried, I stamped a scene of the moon and some trees using Versamark and heat embossed it using white embossing powder.  The stamp set is by Sheena Douglass and called Lakeside Shore.

Then I sprayed the canvas with several different colors of Starburst spray by Lindy’s Stamp Gang.  As you can see, the colors are nice and bright. Since I had used gesso on the canvas, it acted as a resist to the sprays and I found they would easily wipe off.  So I let them dry and then sprayed a coat of gloss varnish (Krylon) over the canvas to seal it.  I was happy to see that I didn’t lose all the pretty shimmer when I sprayed the canvas with the sealer.

10

I purchased the crocheted owl from Tatiana, who I first found on the Cricut Message Board.  She now sells her beautiful crocheted pieces on her Facebook page, Created  By Tatiana.   I picked the colors for this owl to match the book and also ordered several other owls in different colors.

I added a branch and some leaves that I cut from white cotton crinoline using a Martha Stewart punch. The leaves were sprayed with Starburst spray. The flowers and foliage at the bottom were also cut from crinoline using Martha Stewart punches and colored with Starburst spray.

The book has a ribbon closure.

Front2

The back of the book is my attempt at humor, a pun on the Looney Tunes “That’s All Folks”.  The paper is from Doodlebug Designs and the owl is some clipart I got from the now defunct PC Crafter website. The image at the bottom is stamped and heat embossed using Lindy’s Stamp Gang’s embossing powder.

Back

The inside of the cover is also Doodlebug Design paper and I added a clipart bookplate to it.

Bookplate

This is looking inside the book, showing the fabric book that I made to hold the stick pins.  Since this post is so long, I am going to do a separate post for the stick pin holder.

Inside

I included two extra crocheted owls for my swap partner.  The cards they are on were stamped with the Button Boutique stamp set from Papertrey Ink and cut using the coordinating die.

CrochetOwls


  • Paper mache book box from Hobby Lobby
  • Doodlebug Design paper
  • Ranger Sticky Back Canvas
  • Lindy’s Stamp Gang Starburst sprays and embossing powder
  • Tim Holtz Rock Candy Distress Crackle Paint
  • Tim Holtz Distress Ink
  • Crocheted owls from Created By Tatiana on Facebook
  • Sheena Douglass Lakeside Shore stamp set
  • Button Boutique stamp and die set from Papertrey Ink
  • Martha Stewart craft paint — Mother of Pearl
  • Martha Stewart punches
  • Liquitex Gloss Medium & Varnish
  • Cotton crinoline purchased at Joann.com

Spring Card with Bunnies

I wanted to make a nice spring card to send to my book box swap partner (Maria), so I went looking at some of the cards I have pinned on Pinterest to get some inspiration.  Right away I found one I liked.  It is pinned from KittieKraft’s blog — she makes the most beautiful cards.

I have always wanted to make a wreath card and figured this was the perfect time.  While I didn’t have the dies she used to make the wreath, I did have the die to make the cute bunnies.  So I used two Martha Stewart punches to make the wreath — the branch punch and the medium frond punch and I followed Kittie’s tutorial on making the wreath.  For the flowers, I used another Martha Stewart punch — the 3-in-1 Hydrangea punch.  I used the two smaller blossoms for the flowers.

6

I have been wanting to try my new Anna Griffin Cuttlebug Lace Trimmings embossing folders and dies and thought they would make a nice background for the wreath.  I had no problem cutting the borders, but I did have a bit of a problem trying to emboss them.  The white cardstock embossed fine, but the yellow kept slipping in the folders and the embossing was all over the place.  The yellow cardstock is heavier than the white, so I thought that might be the issue.

I ended up lining the border up inside the folder and taping it (using blue painter’s tape) to the Cuttlebug plate.  I was still having a problem right at the end of the folder, where it opens.  So I turned the folder around and ran it through the Cuttlebug with the open end first and then it embossed nicely.

I cut the bunnies in white cardstock and inked them brown using Walnut Stain Distress Ink.  The flowers have Stickles in the centers and the bow was made using my Zutter Bind-it-All.  I sure love how easy it is to make bows using the Bow-it-All.

4


  • Martha Stewart punches:  Branch, Medium Frond & 3-in-1 Hydrangea
  • Anna Griffin Cuttlebug Lace Trimmings Embossing Folders & Dies
  • Zutter Bow-it-All
  • Stickles

Ornament Christmas Card


I needed a Christmas card and had very little time to create one, so I turned to my Cuttlebug and some Memory Box dies that I had just received.  This was my first time using Memory Box dies and I am very impressed with them.  I will be buying more!

I used a color scheme of aqua and red for this card.  The polka dot paper is from My Mind’s Eye Merry & Bright collection.  The card matches a project that I will be posting soon, made from the same collection.

Card3 

The white cardstock is Stardream Metallic White Gold and I used a Cuttlebug embossing folder called Snow Flurries.  I inked the edges in Tumbled Glass Distress Ink.

Three Memory Box dies were used to create the ornament — the Classic Ornament die, the Snowflake Ornament die and the Crisp Bows die.  I used glitter cardstock for the snowflake part of the ornament and for the bow.  The background of the ornament is Stardream Aquamarine cardstock.  The die cut pieces are very intricate (and delicate), so I ran them through my Xyron to adhere them.

And that’s all I did — this was a very quick card for me.  I’m entering this card in the Cricut Circle Weekly Challenge, which is to make a Christmas project using non-traditional colors.

Card5

  • Cuttlebug Snow Flurries embossing folder
  • Memory Box dies:  Classic Ornament, Snowflake Ornament, Crisp Bows
  • Stardream metallic cardstock
  • My Mind’s Eye Merry & Bright
  • Distress Ink
  • Xyron

Open Book Easel Card


I made this card a while ago to send to a lovely lady on the Cricut Circle Message Board who was celebrating her 65th birthday.  I wanted to create a special card for her and first set out to make one using a Bookatrix Board.  I picked one up on eBay a long time ago and have yet to use it.  It’s basically an embossing board and you emboss the edges of the pages for the book and then cut them out by hand.

As I sat reviewing videos on YouTube on how to use the Bookatrix Board, I couldn’t help but wonder why I couldn’t do something similar with my Cricut and not have to cut everything by hand.   So this is my attempt at “Cricut-izing” a Bookatrix card. And I have to say I am very happy with how it turned out.

Thumb

The solid cardstock is Bazzill and the printed papers are all from Graphic 45’s Secret Garden collection.  And because I want to remember how I made this card, I am posting a little tutorial.

Front4 

The book is from the Summer Celebrations Cricut cartridge and is the card feature.  I put it on my mat in Cricut Craft Room (CCR) and made the measurements 8″ wide by 5.5″ high.  I took two lower case “v”s from Cricut Craft Room Basics, turned them upside down and welded one into each upper corner to hide the notches that are in this particular cut.  I also hid the score marks that are in the center of the book.  This is layer one (the back layer on the card) — I guess you would call it the cover.

Next is the middle layer.  I copied and pasted the first (cover) layer onto another mat and made it 7.75″ wide by 5.25″ high.  I did the top (third) layer the same and it measures 7.5″ wide by 5″ high.  I cut out all three of the layers.

I laid the top and middle layers (the pages) on my scoreboard along the width and found the center.  Then I scored a line 1/4″ on both the left and right side of center.  This enables you to fold the pages up slightly and have them sit away from the cover. It is also the area that you will be gluing to attach the layers together.  I distressed the edges of the pages only (the middle and top layer) and then inked them.  I took a dowel about 1” in diameter (from Lowe’s) and curled the pages under, curling one layer at a time.

Dowel

The base for the easel card is a piece of solid cardstock that measures 7″ wide by 10″ high.  Lay the 10″ side on a scoreboard and score at 2 1/2″ and at 5″.  It should look like this unfolded.

BaseUnfolded

And here is how it looks folded.

BaseFolded2

Cut the remaining pieces.  The frames on the pages (for the owl and verse) are from Elegant Edges and cut at 3″.  The label where I heat embossed “Happy Birthday” is from Cricut Craft Room Basics and I fiddled with the dimensions to get something that would fit in the area I had to work with on the base of the card.  The bottom layer measures 5″ wide by 2.75″ high.  The middle layer is 4.75″ wide by 2.5″ high.  And the top layer is 4.5″ wide by 2.25″ high.

The mat for the easel card base is 6 3/4″ wide by 4 3/4″ wide.  I used a corner punch on the front two edges.  This is what your pieces should look like.

Pieces

To assemble the card, I first attached the book cover (layer one) to the easel base.  I centered it across the width and had the bottom edge of the book even with the edge of the base.

Adhere the middle and top layer together, putting the adhesive in the 1/2″ center area created by the two score marks. Before attaching the pages to the cover, lay ribbon down the middle and attach it on the back of the pages at the top and bottom. Adhere the pages to the book cover in the center only.

Assemble the frames, using whatever cuts/designs you wish in the middle.   I used the dowel to curve the frames just a little so they would conform to the pages.  The computer-printed verse is a layer of the frame.  I adhered the frames to the pages before adding the owl.  I used the owl from Disney’s Happily Ever After, cut at  2″, and attached it with foam dots.

The daisies are from the Flower Shoppe, cut at 1″.  The roses are from the Paisley cartridge.  I posted a card here where I give the measurements and a link to a tutorial on how to make the roses.  Both are cut from cream-colored cardstock and I inked the edges with distress ink to add color.  The center of the daisies are Stickles.

This is what it looks like up to this point, lying flat and minus the owl.

Unassembled

The “Happy Birthday” label is popped up on foam dots and is what holds the easel card up.  I added a bow at the top of the ribbon in the center.

The greenery around the flowers is from a Martha Stewart punch, as are the butterflies.  I attached a little gold key charm on the “Happy Birthday” label, which you can barely see in this picture.  Oh, I also added a pearl to each corner in the front.

Front2

This is a side view of the card, so you can see how it stands.

Side

And this is what the completed card looked like folded flat.

FoldedFlat

Because my card would not fit into a standard envelope, I made a little box for it to sit in.

InBox


Boxed

At some point I will probably post this in Cricut’s Project Center and will attach the file.  In the meantime, I hope you enjoy this little tutorial.

Front5

  • Cricut cartridges used:  Cricut Craft Room Basics, Disney’s Happily Ever After, Elegant Edges, Flower Shoppe, Summer Celebrations
  • Bazzill cardstock
  • Graphic 45 Secret Garden collection
  • Martha Stewart punches
  • Ribbon
  • Key charm
  • Stickles

Circleville NSD 2013 — On Pins Challenge


I just completed this cupcake for the On Pins Challenge that was hosted by Sis.  Be sure and check out her blog to see the beautiful mini album she made for her project.

The challenge was to make a pin-inspired project.  I had no trouble deciding which pin I was going to use.  It is the one here.   I wanted to make one of the cupcakes.  Miranda has some gorgeous projects on her blog and I was lucky because she had a video on how to make the cupcake.  You can find the link to her video on her blog here.

CC2

I followed Miranda’s directions, except that I cut the flower petals with my Cricut rather than using a punch.  I used George and Basic Shapes <Flower2>, cut at 1.125″ and I hid the center hole in CCR.  I ended up using more than one 12″ x 12″ sheet full of flowers.  I think I placed mine a little closer together than Miranda did.  I used pearl pins I got at Joann’s to place the pins on the stryofoam.  The paper is all from Graphic 45.

The cupcake opens and inside is a little banner that says “Happy Birthday.”

Open

I cut the banner from Birthday Bash at 1.5″ using the print Graphic 45 paper.  I cut the shadow layer from Bazzil cardstock.  I threaded it together using some DMC pearl cotton.  The letters are from a Cuttlebug Plus Embossing folder, Monogram Seals. I inked the letters with Distress Ink.

Banner2

I also made a box for the cupcake for a different challenge.  I will share a picture here, but will put the details for the box in my next post.

Set

The butterfly is from Martha Stewart Elegant Cake Art and was cut at 2″ from Graphic 45 paper.  I cut several layers and on the top layer I added some coarse crystal glitter.  I put brown pearls on the body.

CC3

  • Cricut cartridges used:  Birthday Bash, George and Basic Shapes, Martha Stewart Elegant Cake Art
  • Cuttlebug Plus Monogram Seals embossing folder
  • Graphic 45 paper
  • Bazzill cardstock
  • Pearl pins
  • Coarse crystal glitter
  • Distress Ink
  • 3″ stryofoam ball
  • 9 oz paper cup
  • Brown adhesive pearls
  • DMC pearl cotton

Circleville NSD 2013 — What’s It Owl About?


Thank you for stopping by my blog.  To celebrate National Scrapbook Day, some of the crafty members of the Cricut Circle are posting projects and activities on the message board all weekend long.

I created a challenge for my project and would like to share it with you.  My theme is owls — and the challenge is pretty simple, just create a project with an owl on it.  I made a layout using a cute owl family from Hoot ‘n’ Holler.

LO3

I laid out my design in Cricut Craft Room.  The patterned paper is printed on my Imagine using the Nursery Tails cartridge.  The solid cardstock is from Bazzill.  I began with Elegant Edges for the scalloped square in the background, cut at 10.5″, using <sclop2-s> and the shadow feature.  I used a white Sharpie poster paint marker to make the “stitch” lines around the square.

Scallop

Next I cut the two wood frames from Pooh & Friends at   5.5″ and 6.5″.  The frames are three layers — the basic feature and then two on the blackout feature.  For the piece cut using the printed paper, I hid the inside cut lines in CCR, so the piece was solid — it did not look like a frame.   Here is a picture of what it looks like in CCR.

FrameMat

I first assembled the basic cut and the blackout frame feature, adhering them together.  Then I prepared to glue the frame to the printed frame piece.  I wanted to leave an edge open so the picture could slide inside, so after deciding which end I wanted to leave open, I glued the frame to the mat on three sides only.  I used a liquid glue, but for the photo I laid some papers on the frame to show you were I put the glue. I did this to both frames.

FrameToMat

You can see in this photo how the pictures will slide into the frames.  I used a piece of scrap cardstock for demonstration purposes.

FramePic

Next was adhering the frames to the layout.  Since I wanted to hide tags behind the frames, I put the adhesive on the back of the frame the same way — gluing only 3 sides.  I marked the back of my frame to indicate which side was open for the photo, so I could be sure and leave the same end open for the tag.  I used the red sticky tape to adhere the frames to the layout.

FrameTape

Before attaching the frames to my background, I laid the cut pieces on it to get an idea where I wanted to place the frames.  I made light pencil marks on the background to guide me in the placement.

FramePlacement

I then checked to make sure the tags slid into the pockets behind the frames.

FramePocket


I made the tags to fit behind the frames, adjusting them in CCR to get the proper fit.  I used Tags, Bags, Boxes & More and the cut is <rndtop2>.  The large tag is 6.5″ x 3.75″ and the small one is 5.5″ x 3.125″.   The lined notebook paper is from  Simply Charmed, cut at 2.75″ x 4.5″ and 3.375″ x 5.375″, with the facial features and holes hidden.  This is a screenshot of the CCR file for the tags.

Tags


I used a punch to round the corners and a ruler and colored pencils to go over the score marks on the paper to make it look like actual notebook paper.  I just lightly held the pencils to the paper.

ColorPencils

I adhered the notebook paper to the tags.

Tags3

Next up was the owl family.  They were cut at 5″ using Hoot ‘n’ Holler.  After I cut all the pieces, I used chalk and ink to shade them.  I went over all the edges with chalk first, using a pom pom and chalk applicator.  Then I inked the edges using Distress Ink.

Chalk

 I assembled each owl first and then glued them onto the branch.  I bought a mustache punch a couple of weeks ago, so I had to try it out on Papa owl.  I think he looks pretty dapper with it.  The bow on Momma owl’s head is from Simply Charmed.  I attached the leaves next.

Owls

After adhering all the owls and leaves onto the branch, I attached the branch to my layout.  The owl cut did not include the flowers.  I used Cricut Essentials, cutting Flower 4 at 1″.  I cut three for the branch and four for the tags.  I used Distress Ink (Squeezed Lemonade) to ink the edges of the flowers and Stickles for the centers.

OwlsCU

 The title is from Hoot ‘n’ Holler, cut at 3″.  The scallop oval is from Francy Frames and the cut is <fram13lr>.  I hid the inside cut so I ended up with a solid piece.  I resized the oval to fit the title and it measures roughly 5.625″ x 3.75″.

TitleCU

Here is a picture of the completed layout with the tags pulled partially out.  Hiding journaling tags behind your photo mats is easy to do.

LoTags

LO7

To top off the fun,  I am offering a prize for comments here on my blog.  All you have to do is leave a comment, but only one per person will go into the drawing.  I will leave it open for a week, until May 12 at 8 p.m. (EDT), when I will randomly draw a name.  I am giving away some Graphic 45 goodies — an 8″ x 8″ Secret Garden paper pad and a small matchbook box.

SecretGardenCover copy

SmMatchbook copy

I am sharing a list of some of the talented members of Circleville who have joined together for the weekend festivities and invite you to visit their blogs and see their wonderful projects:

NSD1_edited-200


Cricut cartridges used:  Elegant Edges, Fancy Frames, Hoot ‘n’ Holler, Nursery Tails (Imagine), Pooh and Friends, Simply Charmed, Tags, Bags, Boxes & More

  • Bazzill cardstock
  • Distress Ink
  • Chalk
  • Stickles