Chalkboard Birthday Card


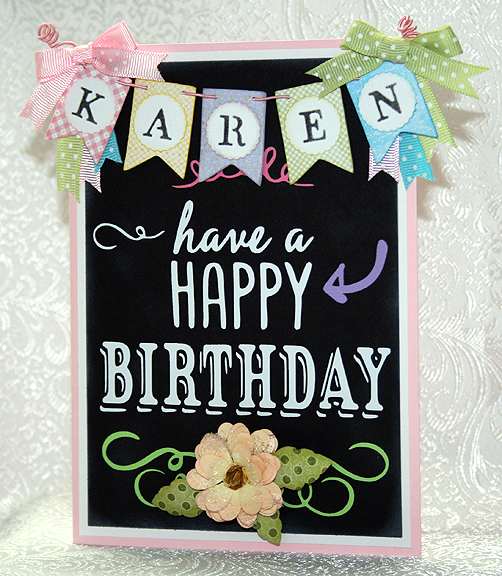
I was inspired by chalkboard art on Pinterest to create this birthday card for my sister-in-law, using Cricut’s new Chalkboard Fonts cartridge. When I first saw this cartridge, I didn’t know that much about chalkboard art or how popular it is right now.  Now it is one of my favorite cartridges.

The solid  cardstock on this card is the Recollection brand from Michaels. The patterned paper on the banner was printed on my Imagine using the Blossom and Imagine More Cards cartridges.  The leaves are from a scrap of Graphic 45 paper.

FrontSm

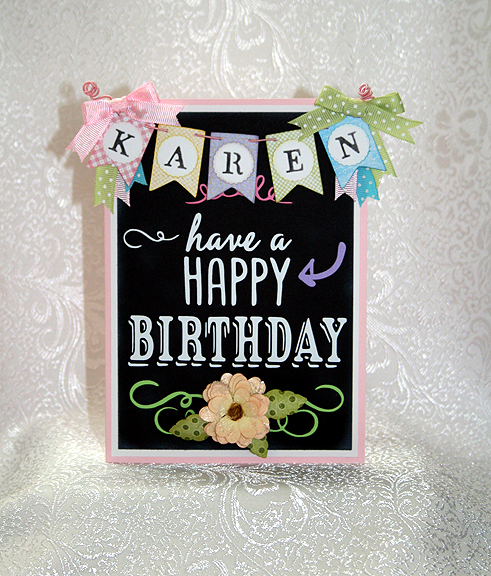
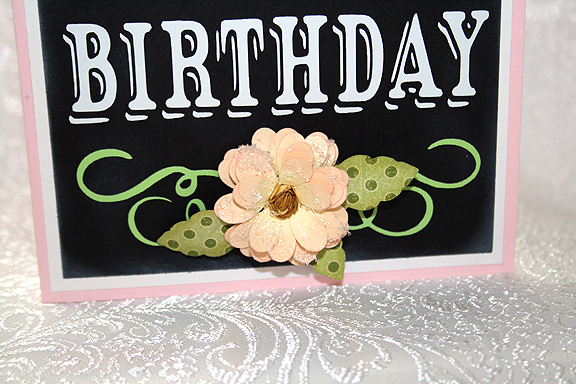
The card is 5″ x 7″, matted with a white layer.  The black (chalkboard) layer is inked with white on the edges.  I also lightly smudged white ink on the front so it looks like an actual blackboard.  The lettering and swirls are all from the Chalkboard Fonts cartridge, cut from vinyl.

Front10

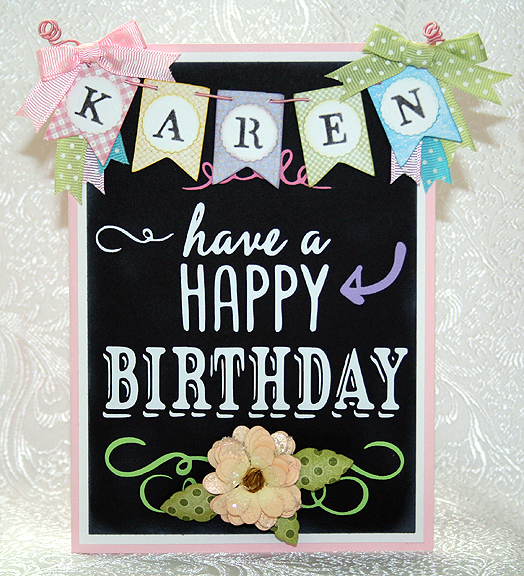
The banner is from the Birthday Bash cartridge, cut at 1.25″.  For the letters on the banner, I used a Cuttlebug Embossing Plus folder called Monogram Seals.  I inked the letters with black ink.  The banner is hung from the card with DMC Memory Thread.  I added some ribbons and bows and curled the ends of the Memory Thread by wrapping them around a chopstick.

Banner

 The flower is also made with the Cuttlebug, using the Daisy quilling kit.  The petals are light yellow, inked with pink on the edges.  I brushed Glossy Accents on the completed flower and sprinkled it with coarse, clear glitter to add some sparkle.

Flower

 I will make a box for this card, since it is a little bulky to place in an envelope, and send it to my sister-in-law.  I hope she likes it.

Front7

  • Cricut cartridges:  Birthday Bash, Chalkboard Fonts, Imagine Blossom and Imagine More Cards
  • Cuttlebug:  Monogram Seals Embossing Plus folder, Daisy quilling kit
  • Vinyl
  • DMC Memory Thread
  • Ink
  • Ribbon

Circleville NSD 2013 — On Pins Challenge


I just completed this cupcake for the On Pins Challenge that was hosted by Sis.  Be sure and check out her blog to see the beautiful mini album she made for her project.

The challenge was to make a pin-inspired project.  I had no trouble deciding which pin I was going to use.  It is the one here.   I wanted to make one of the cupcakes.  Miranda has some gorgeous projects on her blog and I was lucky because she had a video on how to make the cupcake.  You can find the link to her video on her blog here.

CC2

I followed Miranda’s directions, except that I cut the flower petals with my Cricut rather than using a punch.  I used George and Basic Shapes <Flower2>, cut at 1.125″ and I hid the center hole in CCR.  I ended up using more than one 12″ x 12″ sheet full of flowers.  I think I placed mine a little closer together than Miranda did.  I used pearl pins I got at Joann’s to place the pins on the stryofoam.  The paper is all from Graphic 45.

The cupcake opens and inside is a little banner that says “Happy Birthday.”

Open

I cut the banner from Birthday Bash at 1.5″ using the print Graphic 45 paper.  I cut the shadow layer from Bazzil cardstock.  I threaded it together using some DMC pearl cotton.  The letters are from a Cuttlebug Plus Embossing folder, Monogram Seals. I inked the letters with Distress Ink.

Banner2

I also made a box for the cupcake for a different challenge.  I will share a picture here, but will put the details for the box in my next post.

Set

The butterfly is from Martha Stewart Elegant Cake Art and was cut at 2″ from Graphic 45 paper.  I cut several layers and on the top layer I added some coarse crystal glitter.  I put brown pearls on the body.

CC3

  • Cricut cartridges used:  Birthday Bash, George and Basic Shapes, Martha Stewart Elegant Cake Art
  • Cuttlebug Plus Monogram Seals embossing folder
  • Graphic 45 paper
  • Bazzill cardstock
  • Pearl pins
  • Coarse crystal glitter
  • Distress Ink
  • 3″ stryofoam ball
  • 9 oz paper cup
  • Brown adhesive pearls
  • DMC pearl cotton

Elms Bakery Truck Birthday Card


I made this card for the Bakery Challenge at Bitten by the Bug 2.  This is a theme challenge and you have to create a project using something you would find in a bakery.

My inspiration will definitely give away my age, but the bakery theme brought back childhood memories of when the Helms Bakery trucks used to come to neighborhoods in So. California in the 1950’s.  I remember my mom putting the blue Helms placard in the corner of the picture window in our living room.  That told the driver to stop at our house.  The Helms motto was “Daily at Your Door.”

The truck was just like having a bakery parked in front of your house.  The driver would pull out drawers filled with baked goodies — so yummy.  The Helms truck delivered the bread that my brothers and I grew up on.

For my bakery truck, since it delivers to whimsical woodland creatures, I changed the name to Elms Bakery.  I created a shaped card using the milk truck from the Cricut cartridge, Pop-Up Neighborhood.  I tried to keep the colors true to the original Helms trucks.  My cardstock is a mix of both Bazzill and Core’dinations.

For the base of the card, I welded the squirrel from the Birthday Bash cartridge to the truck in Design Studio.  I made the card so it will just squeeze into a #10 envelope.  The lettering on the side of the truck is done in vinyl and the font is from Noah’s ABC Animals cartridge.  I cut the lettering twice, in two colors, so it looks like it has a shadow layer.

For the squirrel, I decided to put a beanie cap on his little head.  I used Baby Steps cartridge to cut the cap portion. To make the propeller on top, I used a number “8” and deleted the inside cuts in Design Studio.  Then I took the sizing handles and squished the “8” close together.  The little post that the propeller attaches to is a small rectangle from George & Basic Shapes.

I cut the cupcake from Birthday Bash and placed it in the squirrels arms.  I used red Stickles on the cherry.

I decided to make this a birthday card, so I cut a sentiment from Birthday Bash to put inside.  I also stamped another sentiment on the opposite side.

  • Cricut Cartridges:  Baby Steps, Birthday Bash, George & Basic Shapes, Noah’s ABC Animals, Pop-Up Neighborhood
  • Cardstock:  Bazzill, Core’dinations
  • Vinyl
  • Stickles

1st Banner for Cricut Expression 2 Design Challenge


On Monday, September 26 at 12:01 a.m. EST, Provo Craft is going to launch their newest machine — the Cricut Expression 2 on HSN.  They posted a challenge to design and make a banner and they are going to give away five new Expression 2’s to some very lucky winners.  You were able to make two banners to enter, so this is the first banner I made.

I knew the competition was going to be tough because there are so many talented Cricut users, so I tried to think a little “outside the box.”  For some reason, hanging a mini banner on a glass block was my first idea.   I originally planned on using etching cream to frost the glass, but because I was using a small string of LED lights I ended up putting glass marbles inside to help hold the lights in place.

The banner is made using Bazzill and Core’dinations cardstock.  I used the Birthday Bash cartridge for my banner base.  The green frame was cut from Lacy Labels, the scalloped circles from Mini Monograms, the regular circles from George and Basic Shapes, and the black valances were cut from Straight from the Nest.  The Cricut lettering is from Cricut Everyday and I cut it out of a glitter cardstock from DCWV.  I used two Swarovski crystals on the antennae.  I added some small flowers punched from a Martha Stewart Punch Around the Page combo called Flower Shower and used lime green Stickles for the centers.

The pieces on the glass were cut from vinyl — the white fancy scroll frame is from Ornamental Iron 2 and the Bug head is from Cricut Everyday.  I was impressed with how well the Cricut cut the vinyl.  Here is a picture of the block all lit up.

FrontLit4

I decided to decorate the back of the block too and I used the same frame that I put on the front, cut from Ornamental Iron 2.  I recently bought this cartridge and I am lovin’ it!  It has some beautiful designs on it and I think they look great cut out of vinyl.

The phrase and Bug head on the back are both cut from Cricut Everyday.  And here is a picture of the back of the block with the lights on.

To hang the banner on the glass block, I glued some black & white dotted ribbon around the edges using Terrifically Tacky Tape.  I strung the banner together using DMC’s Memory Thread.  I sewed and glued the ends of the Memory Thread on the banner.  To cover up my stitches, I punched some more flowers and glued them on top.  I also scattered a few flowers on the front and back of the block.  I tied some wide Cricut green organza ribbon around the entire block and made a big bow using my Bowdabra.

The last picture is of the side of the block.

  • Cricut cartridges used:  Birthday Bash, Cricut Everyday, George and Basic Shapes, Lacy Labels, Mini Monograms, Ornamental Iron 2 and Straight from the Nest
  • Cardstock:  Bazzill, Core’dinations, DCWV
  • Cricut vinyl
  • DMC Memory Thread
  • Terrifically Tacky Tape
  • Martha Stewart Flower Shower punch
  • Lime green Stickles
  • Swarovski crystals

Ice Cream Shop Card for Cricut Circle Weekly Challenge


Weekly Challenge #33 over at the Cricut Circle Blog is called the Sweet Summertime Challenge.  You have to incorporate the shape of your favorite summertime treat and use a stamp somewhere on your project.

My summertime treat is easy — it’s the same treat I love all year long — ice cream!!  That being said, I knew right away what my card was going to have on it.  But I decided that I would not only include an ice cream cone but also the ice cream shop.

The lastest exclusive cartridge for Cricut Circle members is Pop-Up Neighborhood.  I was looking through the handbook and really liked some of the buildings.  While I didn’t use the pop-up feature on this card, I did take the bakery and turned it into an ice cream shop.

In Design Studio, I laid out two of the bakery shadow shapes and welded them together at the top.   I remembered the cute little hippo from Birthday Bash, who is blissfully running with her ice cream cone, and knew I wanted her on my card too.  So I laid out the hippo shape onto my base and welded that also.

I cut the shapes from the Sweet Stack by Die Cuts With A View.  The solid color cardstock is from Bazzill.  I used just the two cartridges — Birthday Bash and Pop-Up Neighborhood.   Oops, I just remembered a third cartridge that I used — the Lite cartridge Twinkle Toes.  I cut the banner for the shop name from it.

For the windows on my ice cream shop, I used graphics from Provo Craft — from their pccrafter.com site.  I thought they were perfect with my design.  I used a stamp to do the name of the shop.  I found a clear stamp in a set that I bought from K & Company that said “The Scoop” and when I saw it I knew that would be the name.

I used the Cuttlebug on the front door, the Distressed Stripes folder, and also on the ice cream cone, the Mesh Texture folder.  I needed something with a small pattern because the ice cream cone on the front of the card is quite small and this folder was great.  It gives the look of a waffle cone.  I used coarse glitter on the ice cream itself and red Stickles for the cherry on top.

Front3

This is a happy and fun creation and when I look at my card I can’t help but think of a book Erin had as a child.  It was called Yummers! and featured Miss Emily (a pig) and Eugene (a turtle).  When I look at the pink hippo, she just looks like she is running along thinking, yummers!!

The patterned paper on the inside of the card is from daisyd’s.  I made another ice cream cone, this time a little larger, to adhere to a corner.

  • Cricut Design Studio
  • Cricut cartridges:  Birthday Bash, Pop-Up Neighborhood, Twinkle Toes
  • Cuttlebug folders:  Distressed Stripes and Mesh Texture
  • DCWV — Sweet Stack
  • Bazzill solid cardstock
  • Coarse glitter
  • Red Stickles

Surprise Birthday Layout — My First Layout


This is my first layout ever — and I really struggled with it.  Up to this point I have just made cards with my Cricut.  I have no trouble deciding and laying out what I want on my card fronts, but doing a 12″ x 12″ page proved to be a challenge. 

I wanted everything on my layout to flow and look like it was put there for a purpose.  I even went to the Cricut Circle Blog and watched their tutorial again on how to do a layout.  After watching the video I felt I had a better grasp of things, but once I started cutting I wasn’t so sure. 

The patterned paper is from SEI — their Happy Day collection.  Since I had the paper pad in my stash and knew I wanted to use it, that is the only thing I was certain about on this project.  Once I got my background paper laid out and the banner done, then the rest sort of came together.   I laid out everything in Design Studio before I started cutting anything. 

The large scallop square background is cut from the Cindy Loo cartridge.  The banner, the cat jumping out of the cake, and the gifts are all from Birthday Bash.  The streamers are from Celebrations and all the circles are from George. 

I think I cut the center circle at 7″.  Then I measured and found the center and started slicing the circle, but didn’t cut it all the way from edge to edge.  I left about 1/2″ intact at each edge of the circumference.  I glued it to the layout right-side down, so that when I pulled back the slices the pattern paper showed.  Before gluing each of the points down, I cut a ring of solid turquoise cardstock to cover the raw edges of my sliced circle.  I added some white rick rack to the ring.  Then I put adhesive on each of the points of the slices and adhered them to my layout. 

Side view so you can see the dimension of the layout

This was my first time making rosettes and I used my Martha Stewart scoreboard to make the pleats.  That was a lot of fun, except that making those score marks every 1/4″ is hard on arthritic hands. 

I used lots of Stickles — I coated all the letters in the banner.  I think the color I used was copper.  I added Stickles to the gifts, the cake, and all the streamers got coated in them.  I used DMC Memory Thread to string up my banner and for the center of the button on the rosette.  I love that stuff — it’s so easy to work with.

Close up of the title banner

Close up of the cat in the cake

Close up of the gifts

The little “birthday bash” tag was cut with my Cuttlebug using the Tiny Tags die.  I did the sentiment on the computer.  Oh, also did lots of inking and doodling and stitched the turquoise cardstock to the pink cardstock with my sewing machine. 

  • SEI Happy Day paper
  • Cricut cartridges:  Birthday Bash, Celebrations, Cindy Loo, George & Basic Shapes
  • Cuttlebug — Tiny Tags die
  • Stickles
  • DMC Memory Thread

Happy Birthday Cupcake Card

Mom and I decided on Monday that we’d try to enter the Jitterbuggin’ sketch challenge this week to motivate me to craft more — and put my now organized room to use!   This has been a busy week work-wise as I just finished up four days of writing non-stop for a special charity travel blogging event that was taking place.  I finished off my last post this morning and while I am exhausted, I am happy I participated.

Unfortunately, I didn’t leave myself much time to get a card done for the challenge so I spent the entire day crafting.  Since my birthday is rolling around again in two weeks, I joked with my husband that since we don’t really know where to get English birthday cards here, I will just make one for myself!

My Birthday Card

Making my own birthday card gave me an opportunity to use another recently purchased Taiwan stamp.  I love these three birds as they seem to coordinate with the 3 Birds on Parade Cricut cartridge!  I colored the birds with Copic Sketch Markers (well, tried anyways).

Close up detail of the Bday card

All the papers for this card were loose stock that I must have picked up at Michael’s or Joann’s at some point.  I ended up using four Cricut cartridges to make all the cuts on this card — it’s been so long since I did this much cutting with the Cricut, it was almost like starting over.

For all the rectangles and squares, I used Plantin Schoolbook again.  On the corners, I used wavy scissors to give one edge some contour.  The green rectangle “birthday present” is embossed with the Cuttlebug.  On each of the corners, I added buttons and green memory thread.  The stripes on the card are made using one of the $1 ribbon spools from Michael’s.

The layered flower cuts at the bottom are from the Sweet Treats cartridge.  The bow on the present is cut from the Birthday Bash cartridge.  I embossed it and then used dark purple ink to make the hearts on the bow stand out.  The small bird with the cupcake in the flower is from 3 Birds on Parade.  I cut several layers of each and used foam dots to pop them up.

Inside of the Bday card

On the inside, the “You Take the Cake” is from 3 Birds on Parade as well.  I added the little birdie letters from 3 Birds on Parade to make it “cupcake”.  The cupcake brad is from Michael’s and is just glued on to the popped up letters.

Inside detail on the card

After completing it and sharing it with Mom on Skype, I found out about several more challenges I could enter with it!  For this card, I am entering:

Jitterbuggin’ — It’s Not Easy Being Green

Fantabulous Cricut – Challenge #52 – Happy Birthday

Cuttlebug Spot — Buttons…Buttons Everywhere

Sunny Snail is Thinking of You!!


Erin is back in Taiwan after a lengthy visit here in the US.  I had lots of fun while she was staying with us.  We attended CHA every day and even managed to get in a scrapbook expo in Anaheim right before she left.  Once she got home to Taipei and settled in, she wanted to do a challenge together.  So we have been busily working,and thanks to Skype, we were able to scrap together.

A member of the Cricut Circle recently had surgery and I wanted to send her a card to wish her a speedy recovery and let her know I am thinking of her.  I thought doing a challenge would be a perfect way to accomplish this.  And here is a little Duffy “spokesbear” model to present my card:

The base of the card is green Bazzill bling cardstock.  The glittery print cardstock is from two different DCWV paper stacks, Blossoms & Butterflies and The Glitter Stack.  I used a yellow bling cardstock from Bazzill for the contrast, sun and snail body. 

I laid out my card in Design Studio and I cut the sun, snail and flowers with my Cricut.  I used Create a Critter for the sun, Birthday Bash for the snail and the Bloom Lite cartridge for the flowers.  I used my Cuttlebug to emboss the sun and the snail.  I embossed the snail with four different embossing folders, Swiss Dots, D’Vine Swirl, Plum Blossom and Mesh Texture.  I inked the edges of all the pieces to give them some depth.  I used Stickles on the center of the flowers and an atyou Spica glitter pen for the cheeks on both the sun and snail.  The sentiment on the envelope the snail has in his mouth is from a $1 clear stamp I purchased at Michaels.  I used lots of pop-dots on the sun and snail, popping up layers and also the completed pieces. 

I am loving all the baker’s twine that is so popular right now, but  I have not purchased any yet.  When I was in Michaels a couple of weeks ago, I found some Lily Sugar ‘n Cream Twists string/thread in the yarn department that reminded me of the twine.  It was on sale so I bought a few different colors to see how it would work.  I wrapped some of the blue around the bottom of this card and I think it looks pretty good.  I attached a charm to the twine with a little hanger that is from Making Memories.  I think they are called garment pins. 

For the inside of the card I added a couple of flowers that I cut out twice so I could layer them together for some dimension.  I used Stickles for the bling on the center of the flowers.

This was a fun card to create and I am happy to say that my card qualifies for the following challenges:

Fantabulous Cricut Challenge Blog – Challenge #51 “Hip to be Square” -green & gold

Cooking With Cricut – It’s A GREEN  SCENE!

The Cuttlebug Spot –  All Tied Up: twine challenge

The Cuttlebug Spot –  Oh so Charming

  • Bazzill bling cardstock
  • Die Cuts With a View paper stacks
  • Cricut cartridges:  Birthday Bash, Bloom (Lite), Create a Critter
  • Cricut Design Studio
  • Cuttlebug Embossing Folders:  D’Vine Swirl, Plum Blossom, Swiss Dots
  • Twine:  Lily Sugar ‘n Cream Twists
  • Making Memories garment pins
  • Charm from my stash
  • Stickles
  • atyou Spica glitter pen

Jitterbuggin’ Gifts Galore Challenge and Fantabulous Cricut Ribbon Challenge


I haven’t been able to make many cards lately because this is my busy time of the year with the embroidery business.  I’ve had two machines running since Thanksgiving.  I’m taking a short break this weekend to go away with hubby to celebrate our 44th anniversay.  I wrapped up a couple of embroidery jobs on Tuesday and found time to make a card. 

I made this card to enter into two challenges.  At Jitterbuggin, Sherri asked us to make a card with a gift theme.  The sketch is not mandatory this week — we just have to add a bow and some bling — and, of course, use our Cricut.

At Fantabulous Cricut we have to use ribbon somewhere on our project and, again, have a Cricut cut on it.

I made a card with a little mouse bearing a gift, which he wrapped up so prettily and tied with a bow.  The designer paper is Christmas Mint from SEI.  I used glitter cardstock from Core’dinations for my bling.  I am really happy with the way it cuts in the Cricut.

The little mouse is from the Winter Frolic Cricut cartridge.  The frame he is mounted on is from Lacy Labels Lite cartridge and I cut the tag from the Very Merry Tags cartridge.  The printing on the tag, “not a creature is stirring”, is a download I got from the Cutting Cafe.  I wanted something small and didn’t have time to try and put text on a circle myself, so I was happy to find the saying I wanted for a very reasonable price — just 99 cents.  The text on the inside of the card is also from this same download.  I cut out the text for the tag using my Cuttlebug and Nestabilities scalloped circles.

I cut the tag, the scarf, the bow on the present as well as mats from the glitter cardstock.  I found a piece of 1 1/2″ wide green satin ribbon in my stash and tied it around the middle of the card.  I attached the tag to the bow with a scrap of ribbon edged in metallic gold. 

The inside of the card has another little mouse and I cut this one from the new Birthday Bash cartridge.  When I laid out my card in Design Studio, I planned on putting this mouse on the front of the card and the mouse with the gift on the inside of the card.  But once I started cutting out the pieces and laying out the actual card, I decided to switch mice.  I thought the mouse carrying the gift looked better on the front of the card.  Oh, I almost forgot — for both mice I used very small pom poms for their noses. 

  • SEI Christmas Mint paper
  • Core’dinations glitter cardstock
  • Cricut cartridges:  Birthday Bash, Lacy Labels, Very Merry Tags and Winter Frolic
  • Cuttlebug
  • Spellbinders Nestabilities
  • Text for tag from Cutting Cafe
  • Ribbon and pom poms from stash