Ornament Christmas Card


I needed a Christmas card and had very little time to create one, so I turned to my Cuttlebug and some Memory Box dies that I had just received.  This was my first time using Memory Box dies and I am very impressed with them.  I will be buying more!

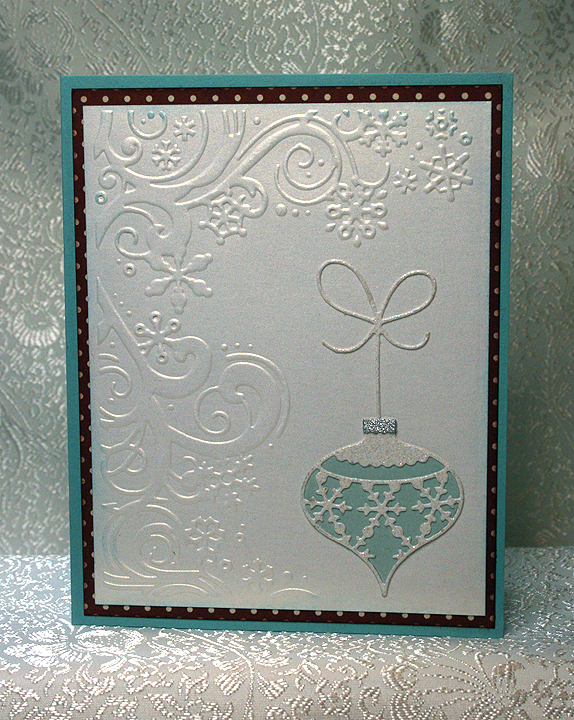
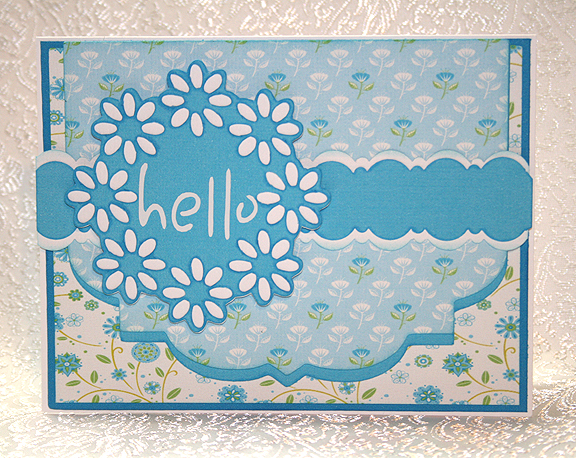
I used a color scheme of aqua and red for this card.  The polka dot paper is from My Mind’s Eye Merry & Bright collection.  The card matches a project that I will be posting soon, made from the same collection.

Card3 

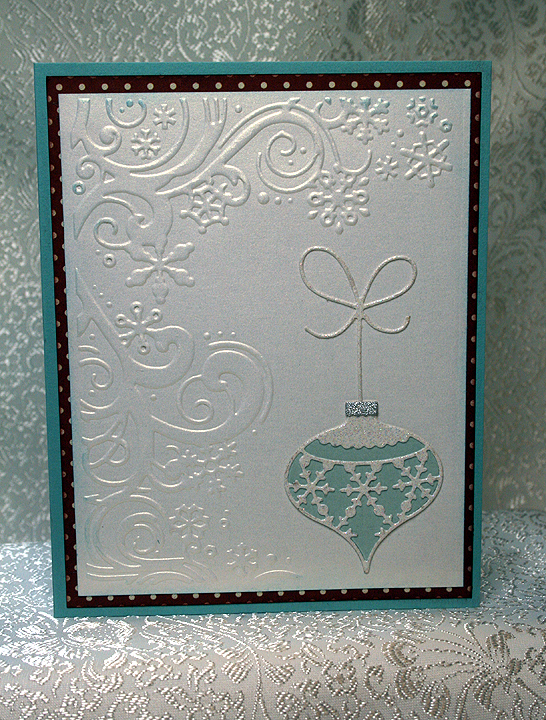
The white cardstock is Stardream Metallic White Gold and I used a Cuttlebug embossing folder called Snow Flurries.  I inked the edges in Tumbled Glass Distress Ink.

Three Memory Box dies were used to create the ornament — the Classic Ornament die, the Snowflake Ornament die and the Crisp Bows die.  I used glitter cardstock for the snowflake part of the ornament and for the bow.  The background of the ornament is Stardream Aquamarine cardstock.  The die cut pieces are very intricate (and delicate), so I ran them through my Xyron to adhere them.

And that’s all I did — this was a very quick card for me.  I’m entering this card in the Cricut Circle Weekly Challenge, which is to make a Christmas project using non-traditional colors.

Card5

  • Cuttlebug Snow Flurries embossing folder
  • Memory Box dies:  Classic Ornament, Snowflake Ornament, Crisp Bows
  • Stardream metallic cardstock
  • My Mind’s Eye Merry & Bright
  • Distress Ink
  • Xyron

Pac-Man Card


Erin asked me to make a birthday card for her to give to one of her friends and she requested something with an 80’s video arcade game on it, like Pac-Man.  I found a print card showing Pac-Man eating dots and heading towards a birthday cake.  So I did my version of that card using my Cricut.

I first printed a maze from the game that I found online.  I thought it would make a neat background for the card.  I designed Pac-Man in Cricut Craft Room, using the George & Basic Shapes cartridge.  I used a circle and laid a triangle over it (not using the weld feature) to make the mouth.  His eye is a black faceted stone from my stash — I think I got them at Joann’s.

Front5

The white dots are from an EK Success punch — I think it’s called Swiss Cheese. The birthday cake is from Life’s A Party and I added orange Stickles for the flames on the candles.  Pac-Man, the white dots, and the birthday cake are all popped up with foam dots.

Front

When I was laying out the card in Cricut Craft Room, I happened upon a really neat sentiment that I thought would be great with this card.  It is from a project cartridge called Space Party.  But wouldn’t you know it, it was one of the few cartridges that I didn’t have.  I looked at other fonts, but nothing grabbed me like the Space Party sentiment.

So I went on eBay, found a Space Party cartridge that wasn’t being bid too high and placed a bid.  I ended up getting it for less than $2.50 — can you believe that?  Still, I hope I use it for more than just the sentiment on this one card!

This was a pretty quick and easy card to make — and Erin was very happy with it.  I even made an envelope for it using my We R Memory Keepers Envelope Punch Board.

I am going to enter this card in the Cricut Circle Challenge, which is to use or try something new.  Since I have never used Space Party before, I figure that will satisfy the requirements.  And I used the Swiss Cheese punch, which I have owned for some time and have never used either.

  • Cricut cartridges used:  George & Basic Shapes, Life’s A Party, Space Party
  • EK Success Swiss Cheese punch
  • Stickles
  • Faceted stone from stash


Greetings From California Card


There is a challenge on the Cricut Circle Message Board to create a project using the new Circle cartridge, Charmed.  And the challenge has turned into a battle between the teddy bear image and the pig image. While the pig  is very cute, I had to do a teddy bear.

Since I am a native Californian, I decided to make a California bear.  We have a bear on our flag — a grizzly bear.  While we no longer have grizzly bears in California, I made this little brown bear greeting everyone from California.

Front


The background is printed from one of my clipart collections I got from PC Crafter.  It was a wonderful site that had lots of great clipart.  Unfortunately, it ceased operating a while ago and the website is no longer available.

The bear is cut from the Charmed cartridge at 2.5″.  I inked and chalked him.  Then I decided to give him a t-shirt, featuring two of my favorite characters — who just happen to be a bear and a pig.  It’s Pooh & Piglet!  I hand cut the t-shirt and inked the edges.

Here is a close up of the graphic on the t-shirt.

ShirtCloseUp

This was a quick and easy card to do — and it was fun.  Now to go post it before the midnight deadline hits.

  • Cricut Charmed cartridge
  • Kraft cardstock for card base, scraps for bear
  • Ink and chalk

Bee Towing Banner Thank You Card


I made this whimsical card for the weekend challenge on the Cricut Circle Message Board.  The challenge is to make a project using a sun.

The card measures 6″ x 6″ and the background is printed from a graphic I purchased when I was a member of the PC Hug Club.   Unfortunately, that site no longer exists — I wish it did because they had some really cute clipart.

FrontSm

The sun is cut from Gypsy Wanderings at 2″ and embellished with some Stickles.   The bee is from Creative Critters 2 and it is cut at 1.75″.  I trimmed the hearts off the ends of the antennae and added pompoms.   I added some Stickles around the edge of the wing.  The bee’s face is a Peachy Keen stamp.   I inked and chalked the face.

The banner is cut from New Arrival (it is the banner with the plane) and it is cut at 1.5″.  I inked the banner and added a stamped sentiment from one of the many Studio G $1 stamps that are in my collection.   I used DMC Memory Thread for the banner’s tow ropes.

Front5

For the inside of the card, I used another graphic from my clipart collection.

Inside

  • Cricut cartridges:  Create a Critter 2, Gypsy Wanderings, New Arrival
  • Provo Craft clipart
  • American Craft cardstock
  • DMC Memory Thread
  • Stickles
  • Ink, chalk
  • Peachy Keen stamp
  • Studio G stamp
  • Pompoms

And The Winner Is……

After numbering the comments, I used random.org to pick a number for the winning comment on the What’s It Owl About? challenge. And the winner is……

#1 — Beth

Congratulations, Beth!!  Please email me at mrstrid@aol.com and I will get your Graphic 45 goodies to you.

Thank you all for your wonderful comments!!

Circleville NSD 2013 – Did-I-Mension? Challenge


Here is my project for the Circleville Did-I-Mension challenge hosted by Renee.  Be sure and check out her blog and see the beautiful boxes she made for this challenge.

Renee challenged us to created a 3D box, bag or some other project.  Since I had just finished making my cupcake for the previous challenge, I thought a box to put the cupcake in would be the ideal project to make.  I used Sweet Tooth Boxes to cut my box, using the Cube Box cut at 11.5″.  All the cardstock used to construct the box is from Bazzill.

Set8

It didn’t take too long until I realized I was faced with a challenge.  I could only make a box that would fit on a 12″ x 12″ piece of paper.  I needed a square box and I could get the size I need (barely) for the cupcake to go inside, but I couldn’t get  it tall enough.  I spent a good two hours going back and forth on what to do.  I was looking at making something completely different for my project, but I kept coming back to the cupcake because I really needed a box.

Box3

I finally decided to see if I could add a separate piece of cardstock to the top of the box without it looking too funky.  I cut 2″ strips and had to piece them together to get four 4″ sides.  I used a Martha Stewart punch on the bottom edge.  I think it is called Laurel Leaf.   This is what the box looks like without the lid.

Box

The added piece gave me the height I needed, but I’m not too sure on the overall appearance.  I think it looks OK.  I made a rosette to put on the lid, using the Graphic 45 paper from the cupcake.  I then added a bow to the rosette.

Set8

  • Cricut Cartridge – Sweet Tooth Boxes
  • Bazzill cardstock
  • Martha Stewart Laurel Leaf punch
  • Ribbon

Circleville NSD 2013 — On Pins Challenge


I just completed this cupcake for the On Pins Challenge that was hosted by Sis.  Be sure and check out her blog to see the beautiful mini album she made for her project.

The challenge was to make a pin-inspired project.  I had no trouble deciding which pin I was going to use.  It is the one here.   I wanted to make one of the cupcakes.  Miranda has some gorgeous projects on her blog and I was lucky because she had a video on how to make the cupcake.  You can find the link to her video on her blog here.

CC2

I followed Miranda’s directions, except that I cut the flower petals with my Cricut rather than using a punch.  I used George and Basic Shapes <Flower2>, cut at 1.125″ and I hid the center hole in CCR.  I ended up using more than one 12″ x 12″ sheet full of flowers.  I think I placed mine a little closer together than Miranda did.  I used pearl pins I got at Joann’s to place the pins on the stryofoam.  The paper is all from Graphic 45.

The cupcake opens and inside is a little banner that says “Happy Birthday.”

Open

I cut the banner from Birthday Bash at 1.5″ using the print Graphic 45 paper.  I cut the shadow layer from Bazzil cardstock.  I threaded it together using some DMC pearl cotton.  The letters are from a Cuttlebug Plus Embossing folder, Monogram Seals. I inked the letters with Distress Ink.

Banner2

I also made a box for the cupcake for a different challenge.  I will share a picture here, but will put the details for the box in my next post.

Set

The butterfly is from Martha Stewart Elegant Cake Art and was cut at 2″ from Graphic 45 paper.  I cut several layers and on the top layer I added some coarse crystal glitter.  I put brown pearls on the body.

CC3

  • Cricut cartridges used:  Birthday Bash, George and Basic Shapes, Martha Stewart Elegant Cake Art
  • Cuttlebug Plus Monogram Seals embossing folder
  • Graphic 45 paper
  • Bazzill cardstock
  • Pearl pins
  • Coarse crystal glitter
  • Distress Ink
  • 3″ stryofoam ball
  • 9 oz paper cup
  • Brown adhesive pearls
  • DMC pearl cotton

Circleville NSD 2013: It’s All About Perspective Challenge and E-I-E-I-O Challenge


On this project, I combined challenges.  I was making a card for the E-I-E-I-O challenge, hosted by Jenny.  She wanted us to make a project using a barnyard animal.  When I took a close look at the cut pieces, a light bulb went off — I thought this would also be a good project to do for Nadia’s challenge.  She has an excellent tutorial on how to add perspective to flat die cuts.  Be sure and check it out on Nadia’s blog.  Her challenge is to make a project using some of the techniques she shows in her tutorial.

So, I would like to present to you the premiere of………………

EXTREME MAKEOVER:  FDC EDITION

A flat die cut (FDC) is just that — flat.  This case presented itself when it landed on my desk after coming off the Cricut mat.  I looked at it and said to myself “this cut could definitely benefit from Nadia’s ideas.”  Something I really enjoyed in Nadia’s tutorial was her before and after photos.  So I took a photo of my die cut (from the County Fair cartridge), without any enhancement, as it went together after coming off the mat.

Before

It’s cute, but it could be so much more.  I began with the fence, which was cut at 2.25″.  I added some grass to it by welding the shapes in Cricut Craft Room.  The grass is also from County Fair, cut at 3″.  I cut several of the same fence shapes so I could cut them apart and use only the pieces I wanted.

FencePieces

 I took extras of the upright pieces and inked them.  Two of them, the second from the left and the far right, I inked darker because I wanted them to look like they are farther away.  I adhered them to the fence.

Then I began working on the cross pieces.  I inked the edges and ran them through the Cuttlebug using the Distress Stripes folder.  Because the paper was not real thick, I doubled the layers on these boards.  I then began attaching them to the fence.  I glued one end with liquid glue and put a piece of foam on the opposite end.  Where the boards attached to the uprights that were farther away, I adhered that edge with the liquid glue.  Where the boards are supposed to be closer to the viewer, I attached that end with the foam.  I ended up with sort of a zigzag effect.  When I finished gluing the boards on,  I inked the edges of the grass and adhered the pieces to the fence.

Fence

Next up was the little chick.  

PlainChic

He is cute as is, but this little guy wanted some major work done.  I began with several layers, as I knew I would be doing some nipping and tucking.  He was very happy when he started getting inked.  I cut a separate head from one of the layers and inked it.

He wanted a  beak job done, but I recommended a little tuck instead.  I creased his beak in the middle and folded it. Then I adhered it to his face  and he ended up with some nice dimension.

The comb (his topknot) was next.  I cut two slightly larger than the original piece and cut those into separate sections.  I then adhered the three layers of the comb.  This was a microscopic procedure, done under my lighted magnifying glass because the pieces were so small.

Now we came to what was perhaps the chick’s biggest issue — his wings.  In the original cut, he has no wings.  Just sort of an outline of wings.  This little guy had more than wing envy, he had a wing obsession.  He wanted me to do wing transplants, but in my opinion that would be too drastic.  Without ruffling his feathers, I explained that wing transplants aren’t what they’re cracked up to be.  I thought wing extensions would be a better solution, especially since the little guy is still a spring chicken.

I found some feathers from Paper Doll Dress Up and cut several of those.  I inked the edges and then attached them to the chick, gluing only the top of each feather.  The only procedure left to perform was attaching his new head.  I glued the head even at the top and popped up the chin area (do chickens have chins?) with a pop dot.

As for his new look, the chick is very pleased.  In fact, he happier than a rooster in a hen house.  So let’s pull those curtains back and take a look at the results………..

Chick

I photographed the chick alongside a ruler so you can see his size.  Altering small cuts and have a big effect.  He ended up being about three layers thick.  Here’s a before and after photo of the entire cut piece.

BeforeAfter2

Since the chick now has something to crow about, I decided to use that as the sentiment on my card.  Nadia explained in her tutorial about atmospheric perspective and how you can lose the effect you create in altering your cut by putting it on a background with a lot of detail.  I decided to go with a plain background.  I thought about embossing the background but decided I didn’t want that distracting from my fence and chick.  I used a pale blue and inked the edges.

Front

The sentiment is from Just Because Cards, cut at 5″.  The sun is from Pooh and Friends, cut at 1.5″ inches.  For the sun, I used another of Nadia’s ideas.  The orange layer was very bright and I thought it was distracting.  It seemed to draw my eye to that corner.  So I cut a piece of vellum and adhered it over the orange.  Although the orange still looks bright in the picture, it is actually more subdued.

Sun

I had a lot of fun with this project and I guess I should apologize for all the chicken puns.  Thank you, Jenny, for your fun challenge!

Front3

  • Cricut cartridges — County Fair, Just Because Cards, Paper Doll Dress Up, Pooh and Friends
  • Ink
  • Foam dots
  • Vellum

Circleville 2013 NSD – Oh The Places You’ll Go! Challenge


I just completed my second project for Circleville’s NSD Challenges.  This one is hosted by Marty (Eyelet on the message board) and she gave us a sketch to follow.  I made a card.

I used my Imagine again, printing the papers from the Floral Emporium cartridge.  It was my first time using this cartridge — it has some really pretty patterns on it.  I printed both the patterned and solid paper.

Front5

Here is the sketch:

card sketch.jpg

The blue flap (don’t know what else to call it) is from Elegant Edges <Eyelt1-s>.  I stretched it some in each direction in CCR to get it to the size of the card.  I then copied that shape and stretched it a bit more to get a shadow.  The circle of flowers is from Paper Trimmings <Flower8><Circle>, cut at 3″.  The sentiment is from Sentimentals <Letter2><Layer>, cut at 2.5″. Because the letters are so thin and small, I cut them from white vinyl.

The band on the card is two strips of cardstock, one 1″ wide, the other 1.25″ wide.  I used an EK Success border punch on them, Deco Scallops.

Front3

  • Cricut cartridges — Elegant Edges, Floral Emporium (Imagine), Paper Trimmings, Sentimentals
  • EK Success Deco Scallops border punch
  • White vinyl

Circleville NSD 2013: Go Big Or Go Home! Challenge


I made this card for one of  Circleville’s NSD Challenges.  The Go Big Or Go Home Challenge was created by Sara.  She challenged us to create a layout or card  using an oversized photo or title.

I made a card, since I needed one for my younger brother’s birthday today — he turned 64.  He recently bought a wood lathe and has been having a blast making some beautiful wood projects, so I wanted to use a wood theme for his card.  I pulled out my Imagine Snapshot: Nature cartridge and printed a bark pattern for the background and a lighter wood grain pattern for the letters.

Front10

The card itself is made from kraft paper.  Happy Birthday is from Something to Celebrate and is cut at 3.5″.  I inked and chalked all the pieces before gluing them together.  This card is simple, but I really like how it turned out.  I put some money inside so my brother can go to the wood store and get something he wants.

Front9

  • Cricut cartridges – Snapshot: Nature (Imagine), Something to Celebrate
  • Chalk
  • Ink
  • Stickles