Birthday Cards

World Card Making Day was Saturday, Oct 4, and I actually got a couple of cards made. Well, I made one card on Saturday and the other one on Sunday, so it was a weekend endeavor.

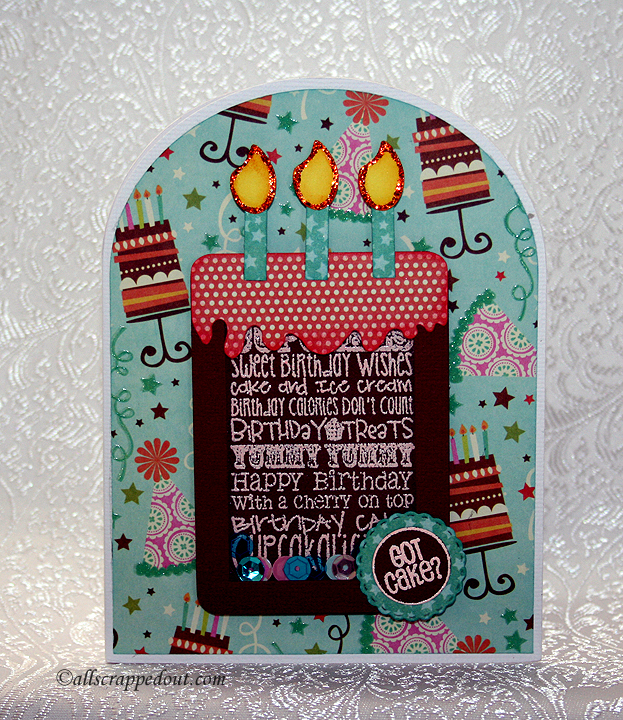
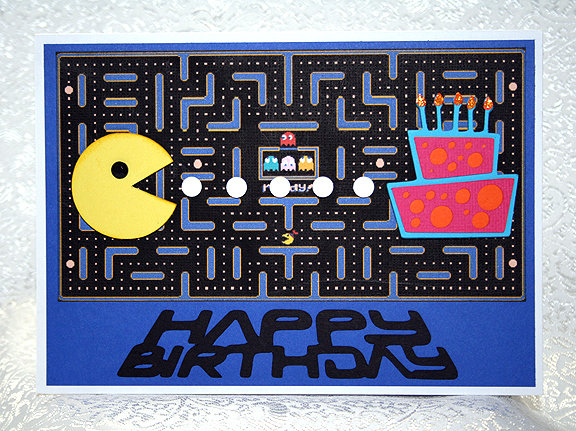
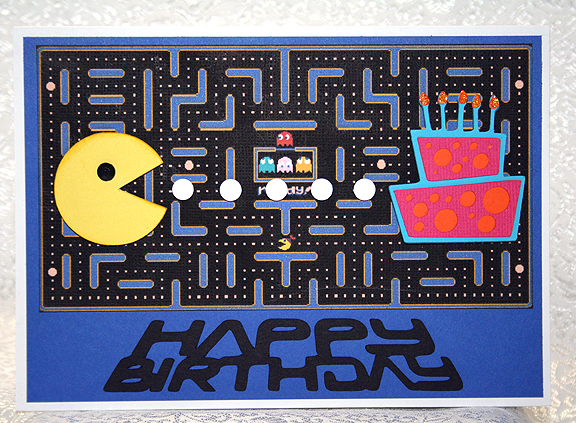
First up is a birthday shaker card.  I love shaker cards and this one has a birthday cake on the front.  I used the Arched Top Card Base and Party Shaker Tags from svgcuttingfiles.com to make this card.  The stamps are from Jaded Blossom — Birthday Treat Tags and Birthday Candies.  I also used one of the  Mini Tag 2 dies to cut the sentiment circle.  I heat embossed the sentiments.

The pattern paper is from SEI and I used Doodlebug Design sequins inside the shaker.  I outlined the candle flames with Stickles.

1

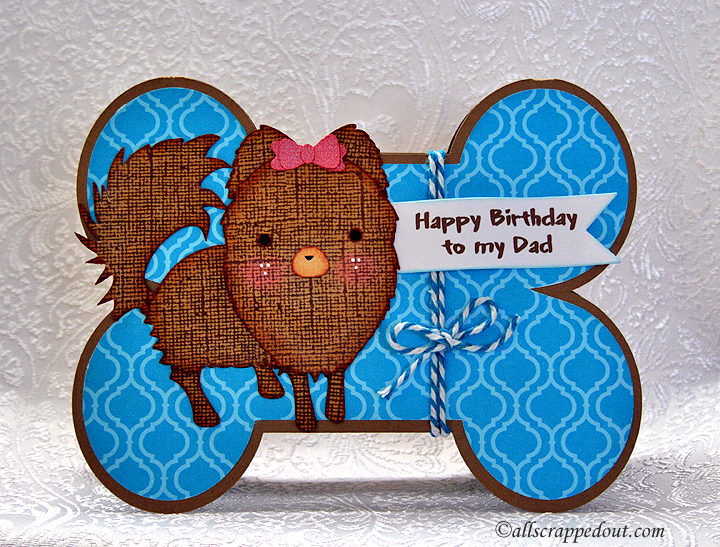
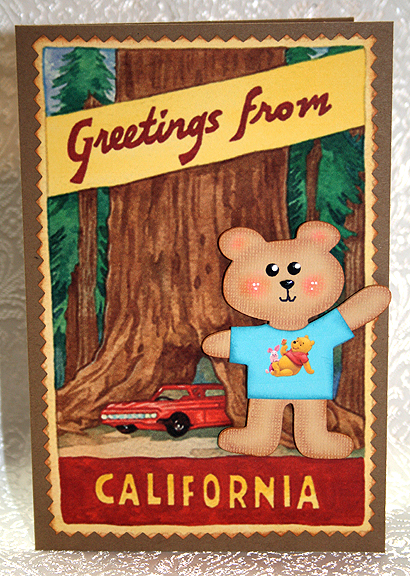
The next card I made for our dog, Fifi, to give to Steve for his birthday in a couple of weeks.  Steve doesn’t look at our blog, so I don’t have to worry about him seeing the card.

I used the Dog Bone Shaped Card and the Pomeranian Pup files for this card.  Fifi is a mix of Pomeranian/Chihuahua, but she looks like a Pom.

I used the computer to generate the sentiment and cut it out with one of the Flag Dies from Jaded Blossom.

3


I am entering both cards in svgcuttingfiles.com’s monthly challenge, which is a Birthday Card Challenge.  I’m also posting them to the Cricut Circle Message Board, where Sara is hosting a challenge for World Card Making Day.

  •  SVG Cutting Files – Arched Top Card Base, Party Shaker Tags, Dog Bone Shaped Card, and Pomeranian Pup
  • Jaded Blossom Stamps – Birthday Treat Tags, Birthday Candies, Mini Tags 2 die and Flag dies
  • SEI paper pad
  • Embossing powder
  • Doodlebug Designs sequins
  • Stickles
  • Baker’s Twine

Ornament Christmas Card


I needed a Christmas card and had very little time to create one, so I turned to my Cuttlebug and some Memory Box dies that I had just received.  This was my first time using Memory Box dies and I am very impressed with them.  I will be buying more!

I used a color scheme of aqua and red for this card.  The polka dot paper is from My Mind’s Eye Merry & Bright collection.  The card matches a project that I will be posting soon, made from the same collection.

Card3 

The white cardstock is Stardream Metallic White Gold and I used a Cuttlebug embossing folder called Snow Flurries.  I inked the edges in Tumbled Glass Distress Ink.

Three Memory Box dies were used to create the ornament — the Classic Ornament die, the Snowflake Ornament die and the Crisp Bows die.  I used glitter cardstock for the snowflake part of the ornament and for the bow.  The background of the ornament is Stardream Aquamarine cardstock.  The die cut pieces are very intricate (and delicate), so I ran them through my Xyron to adhere them.

And that’s all I did — this was a very quick card for me.  I’m entering this card in the Cricut Circle Weekly Challenge, which is to make a Christmas project using non-traditional colors.

Card5

  • Cuttlebug Snow Flurries embossing folder
  • Memory Box dies:  Classic Ornament, Snowflake Ornament, Crisp Bows
  • Stardream metallic cardstock
  • My Mind’s Eye Merry & Bright
  • Distress Ink
  • Xyron

Pac-Man Card


Erin asked me to make a birthday card for her to give to one of her friends and she requested something with an 80’s video arcade game on it, like Pac-Man.  I found a print card showing Pac-Man eating dots and heading towards a birthday cake.  So I did my version of that card using my Cricut.

I first printed a maze from the game that I found online.  I thought it would make a neat background for the card.  I designed Pac-Man in Cricut Craft Room, using the George & Basic Shapes cartridge.  I used a circle and laid a triangle over it (not using the weld feature) to make the mouth.  His eye is a black faceted stone from my stash — I think I got them at Joann’s.

Front5

The white dots are from an EK Success punch — I think it’s called Swiss Cheese. The birthday cake is from Life’s A Party and I added orange Stickles for the flames on the candles.  Pac-Man, the white dots, and the birthday cake are all popped up with foam dots.

Front

When I was laying out the card in Cricut Craft Room, I happened upon a really neat sentiment that I thought would be great with this card.  It is from a project cartridge called Space Party.  But wouldn’t you know it, it was one of the few cartridges that I didn’t have.  I looked at other fonts, but nothing grabbed me like the Space Party sentiment.

So I went on eBay, found a Space Party cartridge that wasn’t being bid too high and placed a bid.  I ended up getting it for less than $2.50 — can you believe that?  Still, I hope I use it for more than just the sentiment on this one card!

This was a pretty quick and easy card to make — and Erin was very happy with it.  I even made an envelope for it using my We R Memory Keepers Envelope Punch Board.

I am going to enter this card in the Cricut Circle Challenge, which is to use or try something new.  Since I have never used Space Party before, I figure that will satisfy the requirements.  And I used the Swiss Cheese punch, which I have owned for some time and have never used either.

  • Cricut cartridges used:  George & Basic Shapes, Life’s A Party, Space Party
  • EK Success Swiss Cheese punch
  • Stickles
  • Faceted stone from stash


Greetings From California Card


There is a challenge on the Cricut Circle Message Board to create a project using the new Circle cartridge, Charmed.  And the challenge has turned into a battle between the teddy bear image and the pig image. While the pig  is very cute, I had to do a teddy bear.

Since I am a native Californian, I decided to make a California bear.  We have a bear on our flag — a grizzly bear.  While we no longer have grizzly bears in California, I made this little brown bear greeting everyone from California.

Front


The background is printed from one of my clipart collections I got from PC Crafter.  It was a wonderful site that had lots of great clipart.  Unfortunately, it ceased operating a while ago and the website is no longer available.

The bear is cut from the Charmed cartridge at 2.5″.  I inked and chalked him.  Then I decided to give him a t-shirt, featuring two of my favorite characters — who just happen to be a bear and a pig.  It’s Pooh & Piglet!  I hand cut the t-shirt and inked the edges.

Here is a close up of the graphic on the t-shirt.

ShirtCloseUp

This was a quick and easy card to do — and it was fun.  Now to go post it before the midnight deadline hits.

  • Cricut Charmed cartridge
  • Kraft cardstock for card base, scraps for bear
  • Ink and chalk

Bee Towing Banner Thank You Card


I made this whimsical card for the weekend challenge on the Cricut Circle Message Board.  The challenge is to make a project using a sun.

The card measures 6″ x 6″ and the background is printed from a graphic I purchased when I was a member of the PC Hug Club.   Unfortunately, that site no longer exists — I wish it did because they had some really cute clipart.

FrontSm

The sun is cut from Gypsy Wanderings at 2″ and embellished with some Stickles.   The bee is from Creative Critters 2 and it is cut at 1.75″.  I trimmed the hearts off the ends of the antennae and added pompoms.   I added some Stickles around the edge of the wing.  The bee’s face is a Peachy Keen stamp.   I inked and chalked the face.

The banner is cut from New Arrival (it is the banner with the plane) and it is cut at 1.5″.  I inked the banner and added a stamped sentiment from one of the many Studio G $1 stamps that are in my collection.   I used DMC Memory Thread for the banner’s tow ropes.

Front5

For the inside of the card, I used another graphic from my clipart collection.

Inside

  • Cricut cartridges:  Create a Critter 2, Gypsy Wanderings, New Arrival
  • Provo Craft clipart
  • American Craft cardstock
  • DMC Memory Thread
  • Stickles
  • Ink, chalk
  • Peachy Keen stamp
  • Studio G stamp
  • Pompoms

Chalkboard Birthday Card


I was inspired by chalkboard art on Pinterest to create this birthday card for my sister-in-law, using Cricut’s new Chalkboard Fonts cartridge. When I first saw this cartridge, I didn’t know that much about chalkboard art or how popular it is right now.  Now it is one of my favorite cartridges.

The solid  cardstock on this card is the Recollection brand from Michaels. The patterned paper on the banner was printed on my Imagine using the Blossom and Imagine More Cards cartridges.  The leaves are from a scrap of Graphic 45 paper.

FrontSm

The card is 5″ x 7″, matted with a white layer.  The black (chalkboard) layer is inked with white on the edges.  I also lightly smudged white ink on the front so it looks like an actual blackboard.  The lettering and swirls are all from the Chalkboard Fonts cartridge, cut from vinyl.

Front10

The banner is from the Birthday Bash cartridge, cut at 1.25″.  For the letters on the banner, I used a Cuttlebug Embossing Plus folder called Monogram Seals.  I inked the letters with black ink.  The banner is hung from the card with DMC Memory Thread.  I added some ribbons and bows and curled the ends of the Memory Thread by wrapping them around a chopstick.

Banner

 The flower is also made with the Cuttlebug, using the Daisy quilling kit.  The petals are light yellow, inked with pink on the edges.  I brushed Glossy Accents on the completed flower and sprinkled it with coarse, clear glitter to add some sparkle.

Flower

 I will make a box for this card, since it is a little bulky to place in an envelope, and send it to my sister-in-law.  I hope she likes it.

Front7

  • Cricut cartridges:  Birthday Bash, Chalkboard Fonts, Imagine Blossom and Imagine More Cards
  • Cuttlebug:  Monogram Seals Embossing Plus folder, Daisy quilling kit
  • Vinyl
  • DMC Memory Thread
  • Ink
  • Ribbon

Chalkboard Father’s Day Card


This is a quick and fun card I created for Father’s Day using the new Cricut Chalkboard Fonts cartridge.  I was inspired by some chalkboard art that I saw on Pinterest.

The card is a standard A2 size (4 1/4″ x 5 1/2″).  On the black cardstock, I inked the edges with white ink.  While doing so, I managed to smear the ink all over myself — and on the front of the cardstock, too.  So I took a sponge and lightly went over the front to make it look like a chalkboard that had recently been erased – which is the look I was going for anyway.


Front

The dad is from the Cricut Car Decals cartridge.  I like the way the Chalkboard Font looks with cuts from the decal cartridges.

The font I picked to use on “Father’s” has lots of very small pieces.  Because I knew I would never be able to glue all those small pieces of cardstock to the front of the card, I chose to cut everything from vinyl.  I still had to be very careful when weeding the vinyl to make sure those small pieces stayed in place.

Front3

  • Cricut cartridges — Car Decals, Chalkboard Fonts
  • Vinyl
  • Ink

And The Winner Is……

After numbering the comments, I used random.org to pick a number for the winning comment on the What’s It Owl About? challenge. And the winner is……

#1 — Beth

Congratulations, Beth!!  Please email me at mrstrid@aol.com and I will get your Graphic 45 goodies to you.

Thank you all for your wonderful comments!!

Circleville NSD 2013 – Did-I-Mension? Challenge


Here is my project for the Circleville Did-I-Mension challenge hosted by Renee.  Be sure and check out her blog and see the beautiful boxes she made for this challenge.

Renee challenged us to created a 3D box, bag or some other project.  Since I had just finished making my cupcake for the previous challenge, I thought a box to put the cupcake in would be the ideal project to make.  I used Sweet Tooth Boxes to cut my box, using the Cube Box cut at 11.5″.  All the cardstock used to construct the box is from Bazzill.

Set8

It didn’t take too long until I realized I was faced with a challenge.  I could only make a box that would fit on a 12″ x 12″ piece of paper.  I needed a square box and I could get the size I need (barely) for the cupcake to go inside, but I couldn’t get  it tall enough.  I spent a good two hours going back and forth on what to do.  I was looking at making something completely different for my project, but I kept coming back to the cupcake because I really needed a box.

Box3

I finally decided to see if I could add a separate piece of cardstock to the top of the box without it looking too funky.  I cut 2″ strips and had to piece them together to get four 4″ sides.  I used a Martha Stewart punch on the bottom edge.  I think it is called Laurel Leaf.   This is what the box looks like without the lid.

Box

The added piece gave me the height I needed, but I’m not too sure on the overall appearance.  I think it looks OK.  I made a rosette to put on the lid, using the Graphic 45 paper from the cupcake.  I then added a bow to the rosette.

Set8

  • Cricut Cartridge – Sweet Tooth Boxes
  • Bazzill cardstock
  • Martha Stewart Laurel Leaf punch
  • Ribbon

Circleville NSD 2013 — On Pins Challenge


I just completed this cupcake for the On Pins Challenge that was hosted by Sis.  Be sure and check out her blog to see the beautiful mini album she made for her project.

The challenge was to make a pin-inspired project.  I had no trouble deciding which pin I was going to use.  It is the one here.   I wanted to make one of the cupcakes.  Miranda has some gorgeous projects on her blog and I was lucky because she had a video on how to make the cupcake.  You can find the link to her video on her blog here.

CC2

I followed Miranda’s directions, except that I cut the flower petals with my Cricut rather than using a punch.  I used George and Basic Shapes <Flower2>, cut at 1.125″ and I hid the center hole in CCR.  I ended up using more than one 12″ x 12″ sheet full of flowers.  I think I placed mine a little closer together than Miranda did.  I used pearl pins I got at Joann’s to place the pins on the stryofoam.  The paper is all from Graphic 45.

The cupcake opens and inside is a little banner that says “Happy Birthday.”

Open

I cut the banner from Birthday Bash at 1.5″ using the print Graphic 45 paper.  I cut the shadow layer from Bazzil cardstock.  I threaded it together using some DMC pearl cotton.  The letters are from a Cuttlebug Plus Embossing folder, Monogram Seals. I inked the letters with Distress Ink.

Banner2

I also made a box for the cupcake for a different challenge.  I will share a picture here, but will put the details for the box in my next post.

Set

The butterfly is from Martha Stewart Elegant Cake Art and was cut at 2″ from Graphic 45 paper.  I cut several layers and on the top layer I added some coarse crystal glitter.  I put brown pearls on the body.

CC3

  • Cricut cartridges used:  Birthday Bash, George and Basic Shapes, Martha Stewart Elegant Cake Art
  • Cuttlebug Plus Monogram Seals embossing folder
  • Graphic 45 paper
  • Bazzill cardstock
  • Pearl pins
  • Coarse crystal glitter
  • Distress Ink
  • 3″ stryofoam ball
  • 9 oz paper cup
  • Brown adhesive pearls
  • DMC pearl cotton