My First Mixed Media Canvas — Cricut Southwest Contest

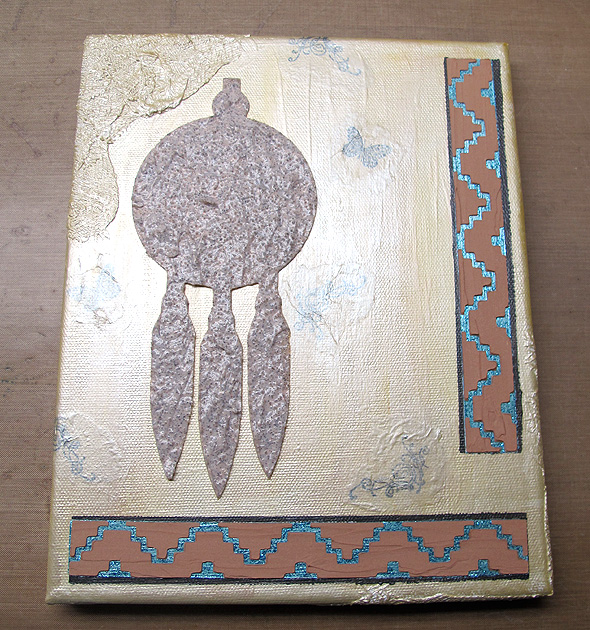
I have been wanting to try my hand at creating a mixed media canvas for a while now.  Cricut’s latest contest for their new Southwest cartridge gave me the push to get started.  The inspiration for my project was a picture I pinned on Pinterest of a gorgeous white dream catcher.

I watched a lot of videos online trying to gather facts on what supplies I needed and how I wanted to proceed.  I made a run to Michaels for supplies before I started.  I needed a canvas and gesso, and I also picked up a few fun items to try.  I think my favorite was the modeling paste.

3


4

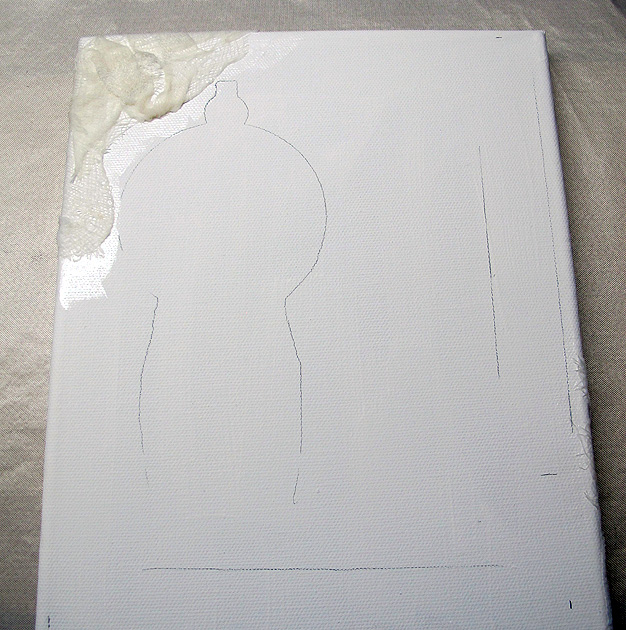
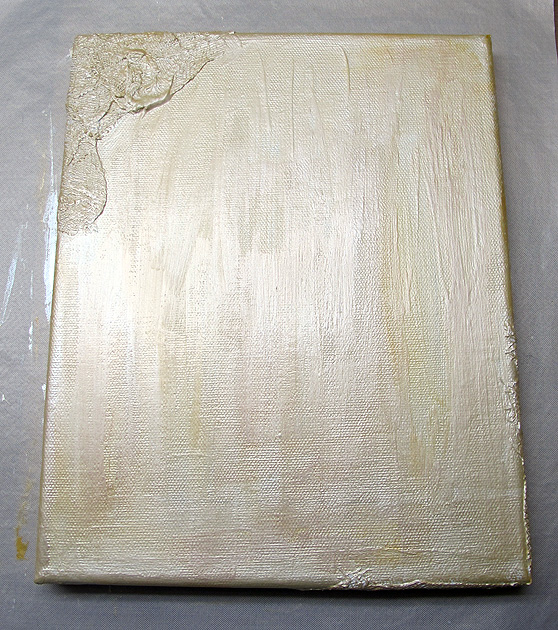
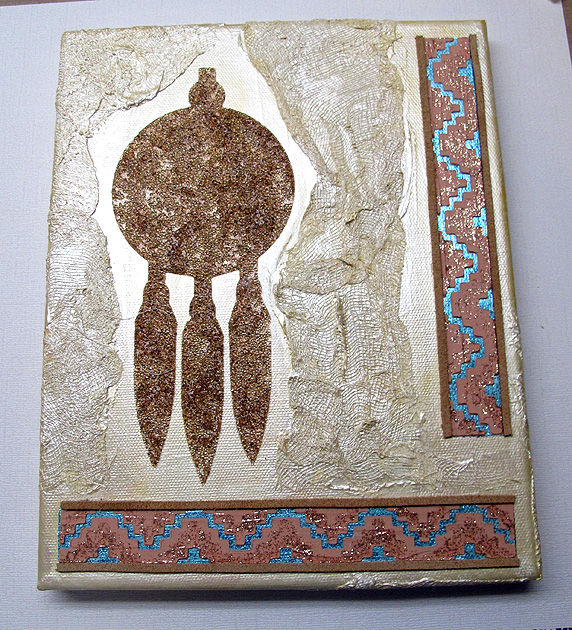
I laid my design out in Cricut Craft Room.  The first step was to paint the 8″ x 10″ canvas with gesso.  After it was dry, I cut out the dream catcher  at 7″ and border strips at .85″ from scrap cardstock so I could gauge where I wanted them on the canvas.  I lightly traced around the cuts with a pencil.

StepCanvasLayout

Then I added some cheesecloth to the canvas using a gloss medium.  When that was dry, I gave everything another coat of gesso.  Then I used two shades of Martha Stewart metallic craft paint to cover it.

StepCanvasPaint

For my borders, I cut the design using repositionable vinyl and made stencils.  I used the negative images for my stencils.  The stencils are the polka dot material in the pictures.  It is some vinyl I picked up on clearance.  Using the first stencil, I laid down some gunmetal metallic paint.  I would skip this step next time because I ended up covering that part of the design with some leather lacing.  I didn’t like the dark paint — it was too much of a contrast.

StepBorderDk1

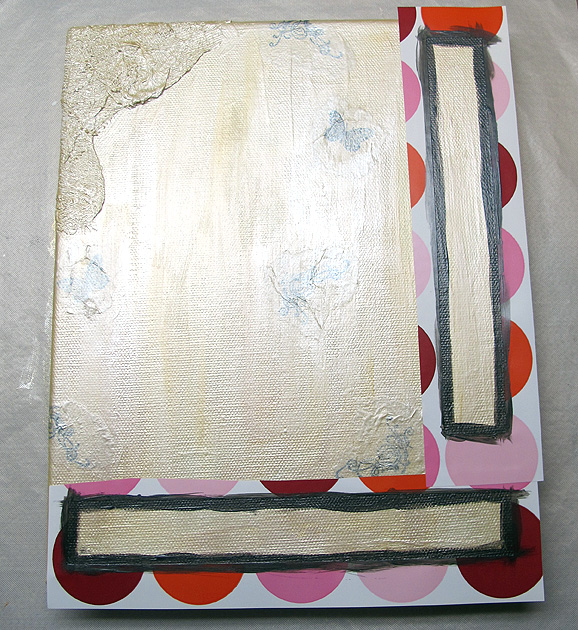
In this picture you will notice the canvas looks different than the finished project. I had stamped some images on it that I decided to delete by covering with gesso and adding some more cheesecloth. I then painted the area to blend in with the background.

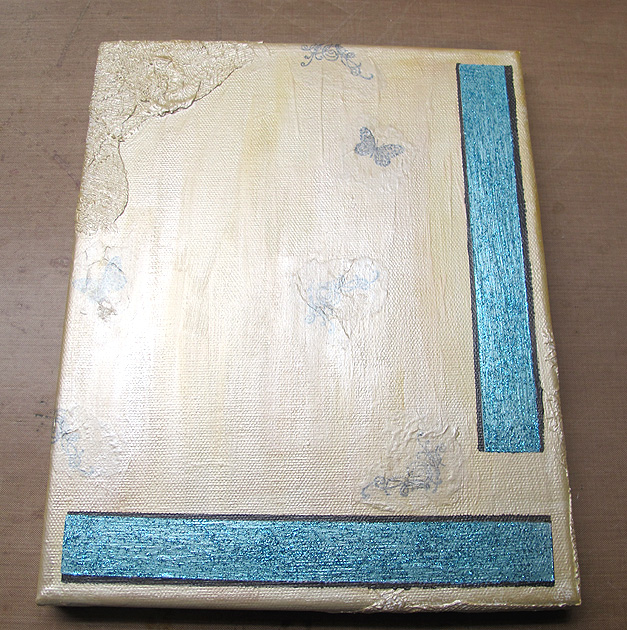
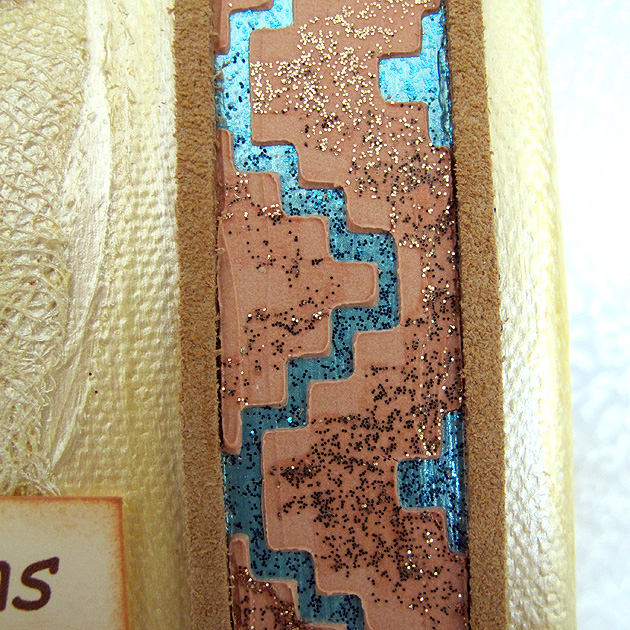
I laid down the turquoise color with the second stencil.  I put a layer of gesso first and then added two layers of color.  The final layer was a coat of Martha Stewart glitter paint.

StepBorderBlue

The third stencil is where I got to try the modeling paste.  I mixed some copper color into the paste and used a craft stick to smooth it over the stencil.

StepModelPaste1

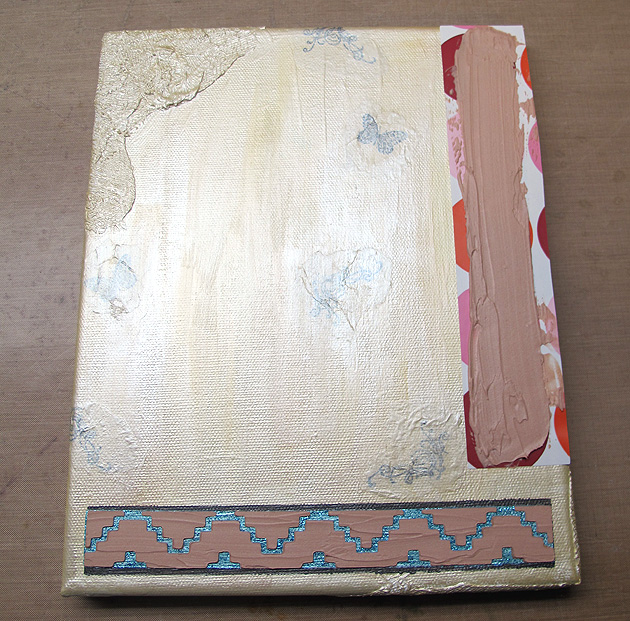
I was so happy with how it turned out — the design is raised and after it dried it reminded me of pottery.

StepModelPaste


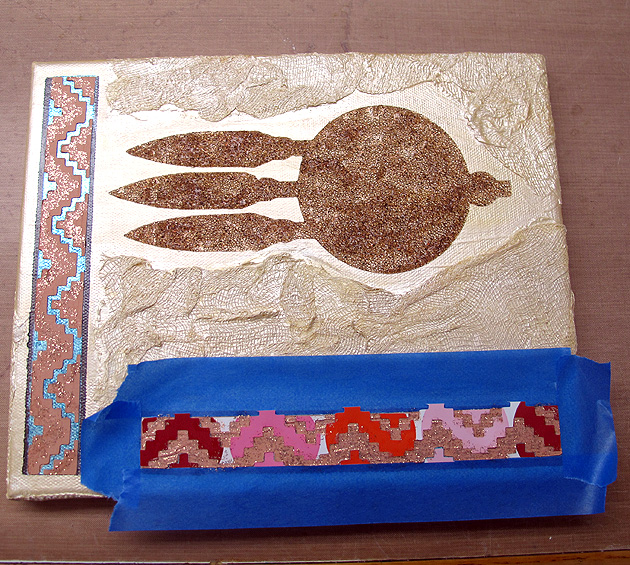
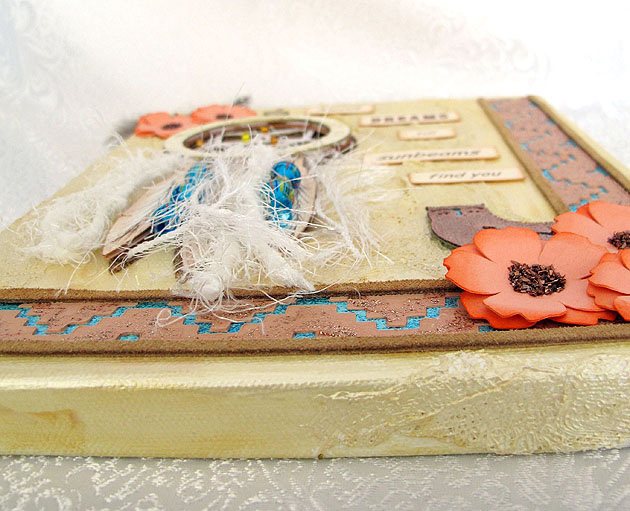
Before doing the last layer of the borders, I cut a stencil of the shadow of the dream catcher and stuck it on the canvas.  I mixed some glass bead gel with some glitter paint and spread it over the canvas.  This layer was pretty wet and it had to dry overnight.

StepGlassBeads


You can see the glass beads behind the web part of the dream catcher.  They give a really neat effect.

DCCloseup2


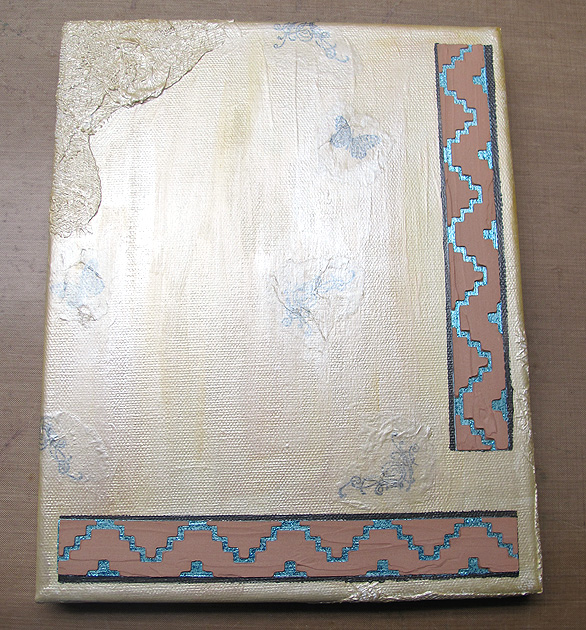
The final border stencil was a little tricky.  My first issue was weeding the correct vinyl — I kept pulling off the wrong areas.  The I had trouble getting it to stick on top of the modeling pasted.  It wanted to lift up, so I opted to add just a coat of copper glitter paint for the final coat, rather than changing colors completely.  I was afraid the paint would bleed and be noticeable if I went for a contrast.

StepBorderTopLayer


I was very pleased with the finished border.  The last layer added a subtle glitter design on the modeling paste.

BorderCloseup2

At this point I decided I did not like the stamped images I placed on the canvas earlier.  I painted over them with gesso and then added some more cheesecloth.  I went over the entire area with the metallic paint and blended the areas into the background.   I also glued some leather lacing along the edges of the border, covering the dark painted layer I had first stenciled on.  I was much happier with this look.

StepCheesecloth2

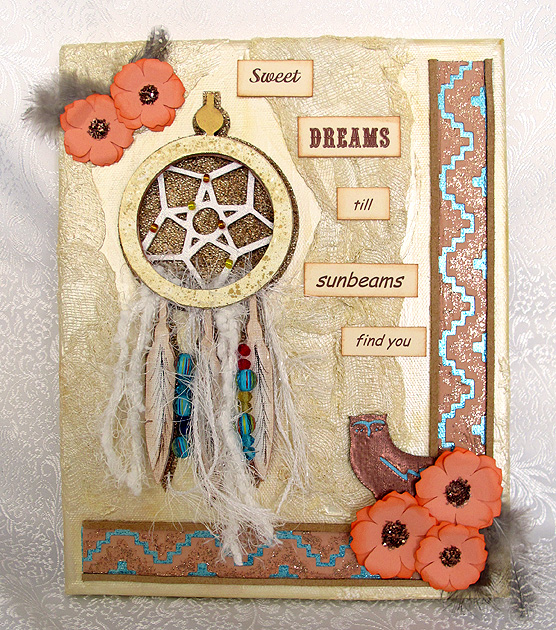
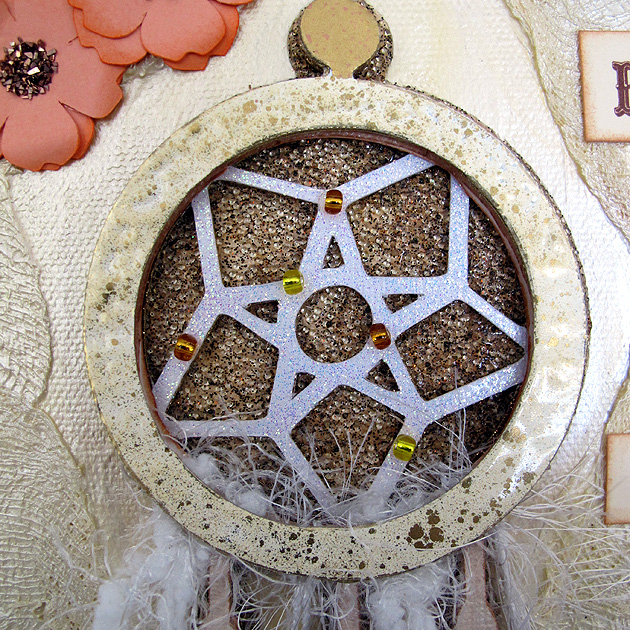
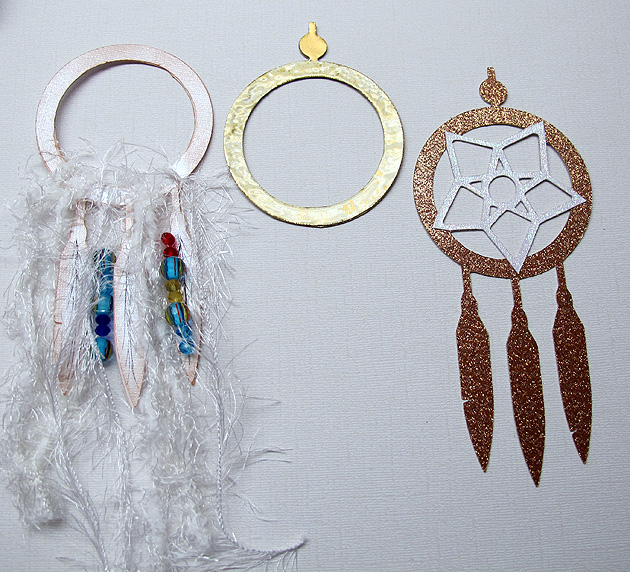
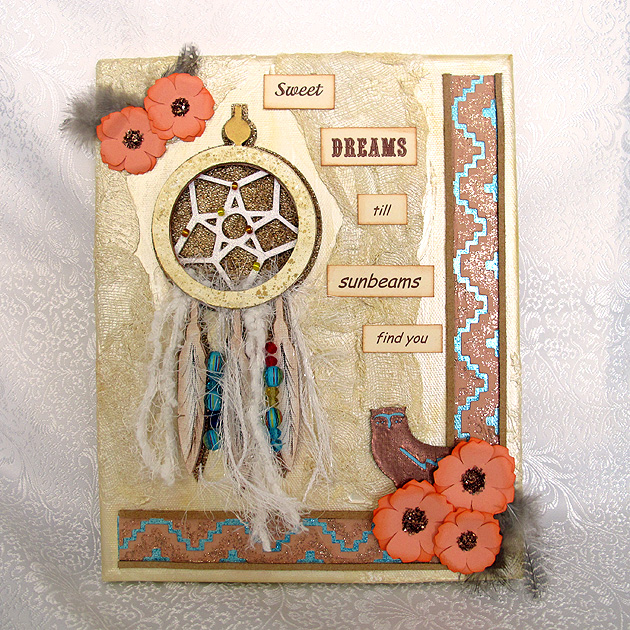
I used several layers to make the dream catcher.  I trimmed one layer so all I had was a circle and used that to tie on the trim and beads.  The top layer is also just the circle and I heat embossed it using a Fran-tage powder from Stampendous.  The web part is also heat embossed using a holographic powder.  I glued some small seed beads to it.  I added several layers of feathers and sketched in some lines using a marker.

StepDCLayers


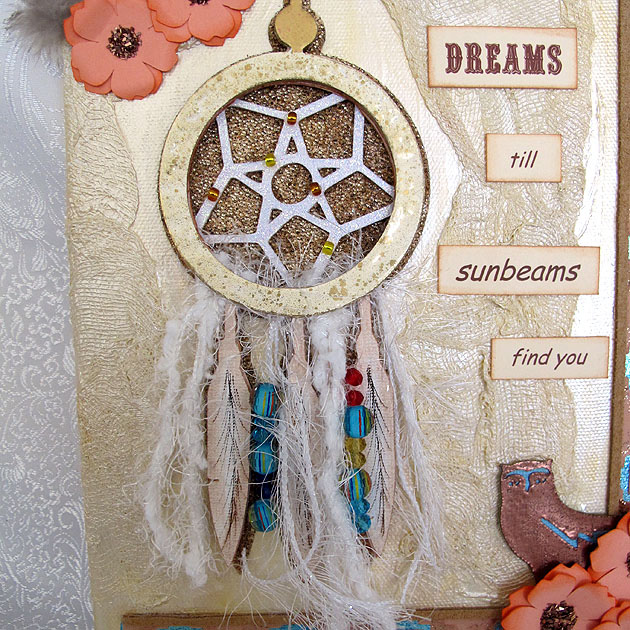
This is what it looks like all put together.


DCCloseup

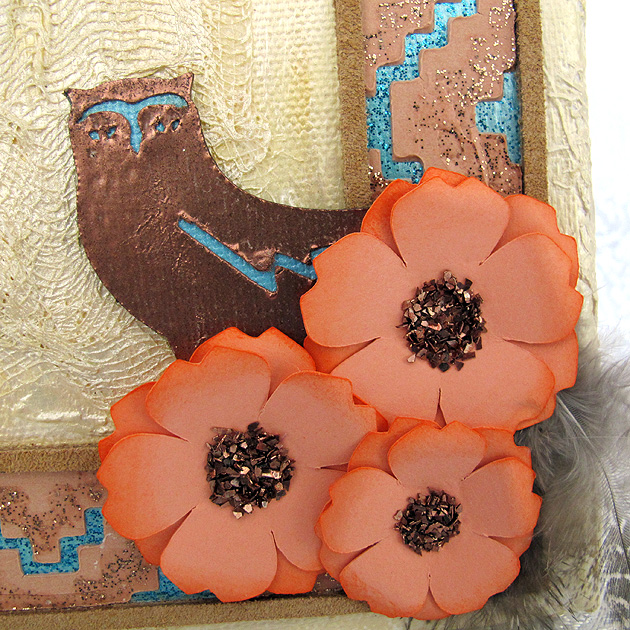
The flowers were cut at two sizes, 1.5″ and 1.25″.  I inked the edges and curled the petals under.  The flower centers are glass glitter from Stampendous.  I glued some feathers behind the flowers.  The owl was cut at 2″ and heat embossed with copper embossing powder.

Owl

The saying was printed using various fonts and cut apart into rectangles.  I inked the edges and glued them on the canvas.  It is actually a song lyric from Dream a Little Dream of Me, sung by Cass Elliott of the Mamas & Papas.

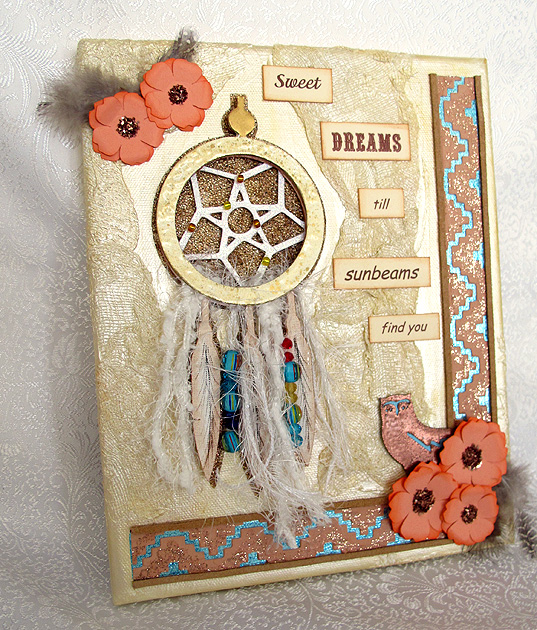
Here is a side view of the canvas, to give you an idea of all the texture and dimension it has.

SideView

While this project was very time consuming, I do want to try doing a canvas again.  With all the supplies I now own, I don’t have an excuse not to.

1

  •  Cricut Southwest cartridge
  • 8″ x 10″ canvas
  • Liquitex Gesso
  • Liquitex Modeling Paste
  • Liquitex Glass Beads
  • Golden Acrylic Glazing Liquid (used to blend background paints)
  • Martha Stewart acrylic craft paints:  Light Gold Metallic, Pale Bronze Metallic, Aquarium Pearl, Turquoise Glitter, Brownstone Glitter, Sunstone Glitter
  • Cheesecloth
  • Stampendous Fran-tage embossing powder
  • Stampendous Glass Glitter
  • Yarn
  • Beads
  • Feathers
  • Leather lacing (from Michaels)

Window Card Using Cricut Creative Cards

There is going to be a new Cricut cartridge available on February 21, 2013 and it is called Creative Cards.   For one week only, from February 14-20, there are seven cards and envelopes from this cartridge available to use for free in Cricut Craft Room.  I was  happy I found time to try one of these cuts — I chose to make the window card.

I really like this card, so much so that I will surely purchase Creative Cards.  I think the window card is called a tri-fold card.  I like this because the inside of the card, where I will write my greeting, is not visible through the window.

A

I made my card using spring colors and the first thing I did was decide what paper was going to show through the window.  I wanted something that looked like wallpaper, so it would look like the inside of a house.  I looked through my Imagine cartridges and found a striped print I liked on the Blossom cartridge.  After picking out my wallpaper, I decided my card would be blue.  All the small pieces were cut from scraps.

The card is cut at 5″ and the finished size is about 3.5″ x 5″.  I cut an extra front panel and ran it through the Cuttlebug using the Distressed Stripes embossing folder so that it would look like siding on a house.  I cut a piece of clear acetate and adhered it between the two front pieces to give the appearance of glass.

The curtain is a piece of vellum run through the Cuttlebug using the Swiss Dots folder, backed by a piece of white cardstock.  The outside window and flower box are white.  I cut an extra window in a darker blue and used it on the inside because I wanted a finished look in there too.

Inside2

The bird and butterflies are from Creative Cards and both were cut at 2.5″.  The only other cartridge I used was A Child’s Year to cut the silhouette of the cat, which was cut at 2″.  I inked and chalked all the pieces before assembling the card.  I used Stickles for the centers of the flowers.

Card6

The sentiment below the flower box is from Whimsy Stamps and it is from their Celebration Circle Pennants set.  I cut it out using the matching die.  This was my first time using both the stamps and die, and I am very happy with how it turned out.

On the inside of the card, I added a white mat to write on.   It is the inside of the window from the card cut — I just hid the outline for the card and cut only the window.  I embellished it with a couple of the same flowers from the window box on the front.

Inside

The last step was making the envelope, and that turned out to be an easy task.  I simply cut the envelope at the same size I cut the card, which was 5″.  I scored along the two side flaps and then at both the top and bottom.  I folded at the score marks and then inked all the edges.  I glued the bottom to the side flaps and the envelope was done.  I’ll seal the top flap when I send the card.

Envelope


  • Cricut cartridges:  Creative Cards, Imagine Blossom, A Child’s Year
  • Ink & Chalk
  • Whimsy Stamps
  • Stickles


Welcome Spring — Cricut Campin’ Critters

This little card is for the Spring is in the Air weekly challenge at Bitten by the Bug 2.   The seasons may be more subtle here in California than in other states, but I always look forward to spring.  I love seeing all the birds and listening as they fill the air with chirping.  Right now we have mockingbirds building nests in the trees outside our kitchen door.   And yesterday I watched a hummingbird in our orange tree as I sat at the dining table.

My card is whimsical — a little fox doing some bird watching on a beautiful spring day.  I printed the papers using my Imagine and the Nursery Tails cartridge.  I love that you can print to fit whatever you are making, as in the background.  I printed this at 5″.

Front2

I made the  “welcome spring” sentiment for the card using Photoshop.  I took the text and put it on an arc.  I printed it out on a piece of plain paper and put the background piece over top.  I held both up to a light so I could see where the sentiment was going to be and when I got it where I wanted it, I held it in place with a few pieces of the blue painter’s tape.  I just lightly pressed the tape down — I didn’t want it sticking too much and removing any of the color.  Then I ran both pieces through the printer.

The fox is from Campin’ Critters and cut at 2.5″.  I used chalk to give his body some definition and used pop-dots to attach him to the front.  I added Glossy Accents to the lenses in his binoculars.

Fox2

I cut an extra bird and layered it on the front.  For the inside I added another bird and a frog, also from Nursery Tails.

Inside

I hope you enjoy my spring card.

  • Cricut cartridges – Campin’ Critters, Imagine Nursery Tails
  • White cardstock – American Crafts
  • Chalk
  • Ranger Glossy Accents

Winter 2012 – 2nd Day of Exhibition


The show was a little more crowded today than it was on Saturday, but it was still easy to navigate through the aisles.   Our first stop was at a booth where a line of people had formed.  I figured there was either a really cool demo going on or a celebrity was in the booth.

The booth was Electic Products and they are the makers of E6000 Craft Adhesive.  They are introducing a new spray version of E6000 that has no odor.  In their booth was author, designer and TV host Mark Montano signing and giving away copies of his newest book, The Big-Ass Book of Bling.  Of course hubby and I had to stand in line, and we both got an autographed copy.

Mark

Mark2

Book

It was funny because when Steve (hubby) first found out what we were standing in line for, he grumbled a tad.  But while we were in line, they handed out some sample tubes of E6000.  Steve started talking to the representatives about their various products and asked if they make any industrial adhesives.  He found they may have an adhesive that will work for his latest project at work.  Then he was a happy camper.

I went  back to Jinger Adams’ booth to get some more information on her Over-the-Door Armoire.  Her booth was pretty busy this morning.  I found out the retail price — it is going to be $250.

I also asked where it will be available for sale.  Kristy told me tthat the initial plans are to sell it first on HSN and then have it available in stores.  She said to keep an eye on Jinger’s Facebook page and blog because they will make an announcement when they know for sure.

I found a couple of cool new tools today that I am excited about.  The first one I found at Craftwell’s booth.  I wanted to try their new eBosser machine and they had several out to demo.  The nice thing about the eBosser is that it is automatic — no handles to crank.  I got to run some cardstock through it with one of their embossing folders.  The machine makes a nice, deep impression.  Since the embossing folder I used makes a card, you can also see it makes the score line to fold it.

Card


Here’s a picture of the eBosser and some felt flowers that were cut with the machine using a die:

eBosser

After I did the demo with the eBosser, the lady showed me a prototype of Craftwell’s latest goodie — it’s an airbrush system for crafters, the eBrush.  The nice thing about this is that the air compressor is the base of the unit — and it’s very compact.  There is a spot in the top to hold the airbrush.  It will take up little space on your work area.  She mentioned a fun use for it — using food-safe colors to decorate cakes.

AirBrush

AirBrush2

My second fun discovery was in the Zutter booth — they make the Bind-it-All, among many other products.  They are introducing the Bow-it-All, a nifty tool to make bows of many styles and sizes.   It is a board with metal pegs that you move around to make the sizes and shapes.  The extra pegs and tools store in the sides of the board and it comes in a pink bag.

Here are 3 photos of the large display showing the Bow-it-All and many of the bows it makes.

BowItAll

Board

Board2

Stacy, the lady who did the demo, is also the designer of this neat tool and I’m sorry to say I didn’t get her face in the photo.  She is working with a black one —  the pink version is what is going to be for sale and it will come with a pink case.  The board measures 8″x 13″ and it comes with what she calls “helping hand” pegs.  They are for holding the piece of ribbon in the back, if you are going to wrap it around a card or scrapbook page.  There are little clips that go around the two “helping hand” pegs to secure the ribbon while you make your bow.

Oh, and the way you tie the bow off — Stacy said it forms a “C” shape in the back — ensures that the bow will not come untied.  You can tug on the tails and the bow stays tied.  That is a great feature.

Demo2

PinkBIA

BIACase

Stacy made two bows while I was there, a small one and a larger double loop one.  She made the small one with seam binding and it measures about 3/4″ — look at how pretty that tiny bow turned out.  She did not put the extra piece of ribbon in the back of this bow — you will notice on the larger bow that it has the extra piece to wrap around. The ribbon on the large bow is 1 1/2″ wide and the bow is about 3 1/4″ wide.  I got to bring both bows home with me so I photographed them on a piece of floral cardstock.

SmBow2

DoubleBow

The suggested price on the Bow-it-All is $24.95 and they will be available in the spring.  This is going to be another must-have tool for me.  I love pretty bows and while I think I do a decent job of tying a single bow, the ability to make such a variety really appeals to me.  And to be able to make such nice, tiny bows — that is exciting.  My arthritic hands won’t be struggling with tiny loops.

We ended our day back at Craftwell’s booth.  They were having drawing and were giving away an eBosser.  They started by giving away four embossing folders first.  These are large folders, 8 1/2″ x 11″.  The lady standing in front of me asked me what would a person do with the folder if they don’t have the machine and we both chuckled.  Then her name was called as a winner of a folder and my name was called next!  It must be a sign that I need to purchase an eBosser at some point.

Winter CHA 2013 – First Day of Exhibition


Today, CHA’s winter exhibition opened in Anaheim, California.  I do not believe the show is as large as previous years, but there is still so much to see and do.  I took a lot of pictures so I can share some of the excitement.

First up, I will show you Die Cut With a View’s booth.  They always have an outstanding booth — I can’t believe their display this year.  To sum it up, you certainly can’t ignore the elephant in this room:

Elephant

Elephant2

 I found out they made the elephant by using a topiary frame.  They covered that with newspapers and then added their own paper on top.  The blanket is gorgeous — it’s made of what looks like a turquoise quilted lame fabric and the embellishments are all done with beads.

Blanket

Beading

Beading2

I had to take a pic of the tail too:

ElephantTail

They also have a cobra in their booth — made of jewelry findings and chain.  He is just amazing.

Cobra

Here are some of the stacks that are featured:

Stacks2

And finally, some framed art on the outside of their booth:

Butterflies

Our next stop will be Jinger Adams’ booth.  She is in the new exhibitor’s section and it was good to see both her and Kristy today.

JingerBooth

JingerKristy

Display

And here is Jinger’s over-the-door Craft Armoire that is getting a lot of attention.  The first picture shows it closed and the second one shows it open.

Armoire

ArmoireOpen

As usual, Graphic 45 has a stunning booth:

G45Booth

One of their new collections, French Country:

FCCabinet

FCTop

FCMiddle

FCBottom

FCPapers

Another new collection, Secret Garden:

SGCabinet

SGTop

SGMiddle

SGBottom

SGPapers

I made it a point to stop at We R Memory Keepers’ booth to check out their new Envelope Punch Board.  I watched a demo of it and was even able to make one myself, along with a card.  This is a really neat tool and after using it, I will definitely be purchasing one.

Booth

This is what the Envelope Punch Board looks like:

EnvelopePunchBoard

Measurements for envelopes are listed right on the board and it tells you what size paper to cut and where to place your paper on the board.  There is a punch at the top that cuts out the little areas where the score lines meet.  It is so much easier than trying to snip that little piece out with a pair of scissors.  Once you score and snip it all the way around, you then fold and assemble your envelope.

FoldingEnvelope

ApplyAdhesive

It also has a corner rounder punch on the back of the board so you can round the corner on your flap.

CornerRounder

CompletedEnvelope

For the card, I got to use one of their Lucky 8 punches.   I used it in conjunction with a doily border punch and ended up with a fancy oval to attach to my card.  Sorry about the blurred hand in the background.

Lucky8Punch

DoilyBorderPunch

Doily

I folded the doily in half and added it, along with some embellishments, to my card.  I think it turned out cute.

Card

In the new exhibitor section I found another neat tool — it’s called a Laser Square.  It has a mat that is magnetic and you place your paper on it.  The paper is held in place by magnets.  They are strong magnets and can hold several layers of paper, so if you do a lot of matting your page will stay in place.  The laser is powered by a 9 v. battery and it enables you to line up all your work on your page.  They said it helps line up your paper for stamping too.  I think it will also work great with cards.

The company is called Kellycraft and the man said his wife came up with the idea at 2 in the morning — I guess she woke him up to share her idea.  They also make Laser Skins so you can customize your Laser Square.

LaserSquare

LaserSkins

The Copic booth and some of the cards on display:

CopicBooth

Card1

Card2

Card3

Card4

The Prima booth:

Booth

One of their new lines, Hello Pastel.

HelloPastel

HPDisplay

Another new collection, Sunrise Sunset:

SunriseSunset

Some layouts on display:

Display

Layout

Layout2

And look at this gorgeous work of art:

MixedMedia

Prima and Leeza Gibbons have teamed up and she has a collection called Wishes & Dreams.

LeezePoster

Wishes&Dreams

WDDisplay

WDDisplay2

WDDisplay3

WDLayout

Leeza was in Prima’s booth today.

Leeza

Another new exhibitor is Farm House Paper Co.  They have a great display and a nice product line.

FHBooth

Layout1

Layout2

Layout3

Layout4

BoBunny’s booth was very busy when we walked by.

BoothFront

This is the back of their booth, with close-ups of their displays:

BoothBack

Display

Display2

Display3

I spent a little time watching the demo in Purple Cow’s booth.  The lady was showing how to use their craft iron and encaustic wax paints.  She cut a piece from an old silk necktie and was coating it in wax on a piece of paper.

PCDemo

PCBegin

PCEncausticWax

PCTie3

PCDisplay

PCDisplay2

Here are a couple of finished pieces that were on display:

PCCover

PCCover2

This picture shows a napkin with a picture of Queen Elizabeth on it and how the lady incorporated it into her cover:

PCQECover

I plan on going back to Purple Cow’s booth so I can learn more about this technique.

I haven’t knitted in years, but this display using Bernat yarn caught my eye.  The afghan was so soft.

BunnyBear

Bernat

I have a lot more pictures to post, but for some reason it is taking forever to upload them onto my blog.  I have been working for several hours now just to get these up.  Since I want to be back at the show when they open in the morning, it’s time to call it a night.

My final picture will be of my one purchase today.  I hadn’t planned on buying this, just knew that I was going to at some point.  I had my dear hubby at the show with me today, and when we stopped in the booth to look at Klic-n-Kut’s Zing die cutting machine, he must have noticed me drooling because he said to go ahead and buy it.  The lady said they brought a machine with them and it is at their hotel.  She is bringing the machine to the show tomorrow and I can bring it home with me.  I am very excited!  It will be a week or two before I can play with it though — I have several embroidery orders I have to get out first.

Zing

Cricut Candy Corn Box and Totes


My goal this weekend was to make a candy corn box, but then I had an idea and soon had candy corn boxes all over my craft room.  I wanted to participate in two challenges, the 3D Halloween Treat Container challenge at Bitten by the Bug 2, and the 3D Treats challenge at Cooking with Cricut.

I have seen several versions of Cricut candy corn boxes using a cake box cut on the internet.  Using Cricut Craft Room, I chose the triangle box cut from Sweet Tooths cartridge.  I liked that it is a 2-piece box, with a separate top and bottom.  The paper is Michael’s Recollection brand.

I cut the bottom at 6″, from orange cardstock and cut the top from white cardstock.  Using George and Basic Shapes, I put a triangle on my mat and sized it to match the triangle on the top of the box.  I then cut that from white cardstock.

I laid out two more triangles in CCR, one in yellow and one in orange.  Using ovals from George and Basic Shapes to intersect the triangles, I got the shapes I wanted for the corresponding pieces.  I then glued the orange and yellow layers onto the white triangle.

Using my Cuttlebug and the spider web folder, I embossed the entire front piece after it was glued together.  I then adhered the piece onto the top of my box.

I sometimes forget about all the dies I have for my Cuttlebug, opting to cut with my Cricut instead.  But this time I remembered I had some cute Halloween dies and that is what I used for my spider and the tiny candy corns on the front of the box.  I used the 3″x3″ Cuttlebug Halloween die.

I painted the eyes on the spider and colored the candy corns using Copics.  Then then applied Glossy Accents on the candy corn to give them some shine.  I added pop-dots to the spider and candy corns and attached them on the top of the box.

The tags I used on all my candy corn boxes is a free printable I found on a website called HelloCuteness.com.  The printable is from their old website, but you can get to their new site with the link I am sharing.

I hand cut around the tags, glued them onto some orange cardstock and again hand cut around the orange cardstock. For the cake box candy corn, I tied some twine through the hole on the tag and pop-dotted it onto the top.

While I was working on the cake box version, I got an idea to create a different type of candy corn box —  one that is more like a tote.  Using CCR and George and Basic Shapes, I started laying out triangles and rectangles to get what I wanted.  It took a little time and several attempts, but I finally got it worked out.

Here is my final version, along with two of my better attempts.  They look pretty much the same — the main difference is in the tabs where they attach together and how I assembled them.  The base shape is cut from orange cardstock and then there is a yellow and white piece that attaches to the front and back.

I used a Peachy Keen face stamp, stamping just one side.  I thought about stamping both sides of the tote but decided I didn’t want any two-faced candy corns!  I used a black pen to add the stitch marks to the fronts and backs.

For the first tote, I put it all together and then realized it would be much easier to attach the white & yellow pieces, stamp the face, and punch the holes for the ribbon handle if the tote was still flat.  The next two totes were done flat and it was a lot easier.  I used Terrifically Tacky Tape to assemble the totes.

I used a Crop-A-Dile to punch the holes in the side and 12″ of ribbon for the handle.  After threading the ribbon through the hole, I tied a knot and used some hot glue to glue the ends down inside.  The tags are hung using 1/8″ ribbon and I threaded it through the same hole as the handle before using the hot glue.  Again, I did this on the first tote after it was assembled.  For the next totes I added the ribbon before assembling the them.

  • Cricut Craft Room
  • Cricut cartrideges:  George and Basic Shapes, Sweet Tooth Boxes
  • Copics
  • Glossy Accents
  • Ribbon

Spooky Halloween Pumpkin Card


This is a Halloween card I made for a couple of challenges.  The first one is Cooking With Cricut, and their challenge is to make a project using a pumpkin and circles or dots.  The second one is Fantabulous Cricut Challenge Blog, and their challenge is to make a Halloween project using the colors black and orange.

My card fits in a #10 business envelope — it’s approximately 9″ x 4″. The pattern paper is from a DCWV stack from a year or so ago.  I laid the design out in Cricut Craft Room and used my Expression to cut everything.

I used the Happy Hauntings cartridge for the sentiment and cut it at 1.75″.   The pumpkin is from Autumn Celebrations, cut at 2″.  The bats are from Holiday Cakes and were cut on shadow feature at 1″.  I bent their wings up and glued down just the bodies.

And here is the inside of the card.

The little bear posing with my card is my newest Disney Duffy Bear, the Halloween 2012 bear.  He is so cute with his little treat bag that is shaped like a Duffy bear.

  • Cricut Craft Room
  • Cricut cartridges:  Autumn Celebrations, Happy Hauntings, Holiday Cakes
  • DCWV holiday stack

Happy Thanksgiving Pumpkin Card


I made this card for the latest challenge at Cooking With Cricut.  The challenge was to make a Thanksgiving card for the I Feel the Love Project (IFTL).  Each month they select a different person, organization or group to receive handmade projects.  This month the cards are going to Surrey Place Care Center, a 60-bed skilled nursing facility.

I am getting my card in just under the wire.  In fact, I had better go link my card before time runs out.  Well, I got my card linked to Cooking With Cricut’s page, but for some reason the photo is not showing up.

I made my card in Cricut Craft Room.  I used the pumpkin card feature on Autumn Celebrations, cutting it at 5.75″. The solid color cardstock is from Core’dinations.  The patterned papers are from a paper pad I picked up at Joann’s called Cocoa Mint by Cloud 9 Design.

The leaves are cut at 3″ using two shades of green.  The sentiment is from the Thanksgiving cartridge and is cut at 1.35″.  I used orange vinyl for the sentiment .  I like using vinyl for smaller, more intricate cuts because it cuts so well and you don’t have to put adhesive on it.

The flower was made using my Cuttlebug and the Daisy quilling kit.  It is my first flower made using this kit and I am happy with the result.  I inked the edges of the petals before rolling them up.  I used some Glossy Accents and Martha Stewart crystal glitter on the flower petals.  I attached the leaves to the card using pop dots.

 The inside of the card is simple, mainly because I ran out of time.

Here is another picture where I was able to lighten it up and kill some of the glare so you can see the sentiment better.  I didn’t realize the first pic was so dark.

  • Cricut Craft Room
  • Cricut cartridges:  Autumn Celebrations, Thanksgiving
  • Cuttlebug Daisy quilling kit
  • Core’dinations cardstock
  • Orange vinyl
  • Glitter – crystal

Cricut Art Nouveau Hummingbird Birthday Card


I wanted to make a card to enter in a couple of challenges and this is what I came up with.  The first challenge is Things that Fly in Nature over at Bitten by the Bug 2. The second challenge is Texture at Cooking with Cricut.

I made a 5″ x 5″ card and the patterned paper was all printed on the Imagine using the Country Carnival cartridge.  I love the paper selection on this cartridge and have been wanting to use the design that is on the background of my card for some time.  The reason I bought this cartridge is because of the paper — and the very cool font that it has.

 I cut the hummingbird (at 3″) from watercolor paper using the Art Nouveau cartridge and colored him with Copics.  This is only my second time trying to color with Copics, and I have lots to learn.  I discovered I don’t have enough green markers — I didn’t have enough in the same color group to do any blending.

After I colored the hummingbird, I used a crystal glaze (something I got years ago) to go over sections of his body to try and simulate the iridescence you see in their feathers.

Oh, dear — after looking at the close-up I’m not too sure I should be posting it.  My coloring definitely leaves a lot to be desired!  The circle behind the hummingbird was embossed using the Forest Branches folder.

I recently got the Art Philosophy cartridge, mainly because of the flowers I have seen so many crafters make with it. The roses on this card represent my first time using this cartridge.  I cut them at 2″ and 2.5″ using some Recollections paper from Michaels.  I inked the edges with Tim Holtz Fired Brick Distress Ink.  I used a quilling tool from one of my Cuttlebug quilling kits to roll up the flowers.  I was surprised at how quickly they went together.  The greenery behind the roses is also from Art Philosophy.

I wanted the sentiment to be subtle, so I stamped it in the upper right hand corner (using distress ink) trying to make it look like it is part of the print on the paper.  I added a couple of pieces of lace across two corners and used my sewing machine to stitch around the card.

For the inside of the card, the white area is a shape cut using Art Philosophy.  The corners are a 2″ square of vellum, cut diagonally, embossed with the Swiss Dots folder, and trimmed with lace sewn across the top edges.  I then secured them to the card by stitching around the entire piece.

I originally planned on using the vellum corners on the front of the card, but when I laid everything out, I thought they hid too much of the paper on the front.  So they got moved inside, which worked out fine because I had no plans yet for the inside of the card.

  • Cricut cartridges:  Art Nouveau, Art Philosophy, Imagine Country Carnival
  • Cuttlebug embossing folders:  Forest Branches, Swiss Dots
  • Copics
  • Vellum, scraps of lace

Cricut Create a Critter 2 Owl Witch Card


I was able to use my new Create a Critter 2 cartridge last night to make a card to participate in the latest challenge at Cooking With Cricut,  their Card Outreach Challenge.  The challenge is to make fun Halloween cards (no scary ones) for the I Feel the Love Project.

The “I Feel the Love” Project for September is to make Halloween Cards to be given to the kids who live at Casa Pacifica.   Casa Pacifica serves abused and neglected children and adolescents, and those with severe emotional, social, behavioral, and mental health challenges on California’s Central Coast.  Each year the facility has an amazing Halloween party for the kids. It is IFTL’s goal to send a card to each of the 70 children who reside there. (For more information about Casa Pacifica please visit their website.)
I laid out my card in Cricut Craft Room, cutting the owl at 3″.  The owl’s body was printed and cut on my Imagine, using the Bubblegum Stripes cartridge for the small purple stripes.  I did not use CCR for this step, as it still is not compatible with the Imagine.  I embossed the small tummy piece with the Cuttlebug Swiss Dots embossing folder.
For the owl’s eye, I hid the cut that forms the pupil in CCR.  On the mat in CCR, the circles look perfectly round.  But when I cut the eyes with my Expression, they did not come out round.   I had what looked like a cross-eyed owl.  So I took black paint  and a stylus (you can also use the round end of a paintbrush), dipped the stylus into the paint and then formed black circles on the white part of the eye.  Once the paint dried, I put a white highlight on the black dot.
I added a moon behind the owl, which is a circle that I also cut at 3″.  I embossed the moon with a new Cuttlebug folder I recently got, the bat folder from the Midnight Hauntings set.  The phrase was cut at 1″.  Because of the small size of the phrase, I cut it out of vinyl.  The Cricut easily cuts vinyl.  Vinyl is great for small pieces because it already has adhesive, so you don’t have to fuss trying to put glue on them.
I added Stickles to the band and buckle on the hat.
For the inside of the card, I lined it with a couple of pieces of patterned paper.  I cut the pumpkin treat bag and candy piece, also from Create a Critter 2, at 1.5″.  I cut the shadow layer from cardstock and the black and orange layers from vinyl.
The background paper and print paper inside my card are from a K & Company Halloween collection that came out a year or so ago.  I picked it up on sale and don’t remember exactly when I bought it.
  • Cricut cartridges:  Create a Critter 2, Imagine Bubblegum Stripes
  • Cuttlebug:  Midnight Hauntings embossing folder set
  • K & Company Halloween paper pad
  • Stickles