Archives for August 2010

The Cuttlebug Spot Challenge: Oh Baby

Here’s another challenge card, and again I am getting it done just in time before the challenge ends.  This card is for this for The Cuttlebug Spot.

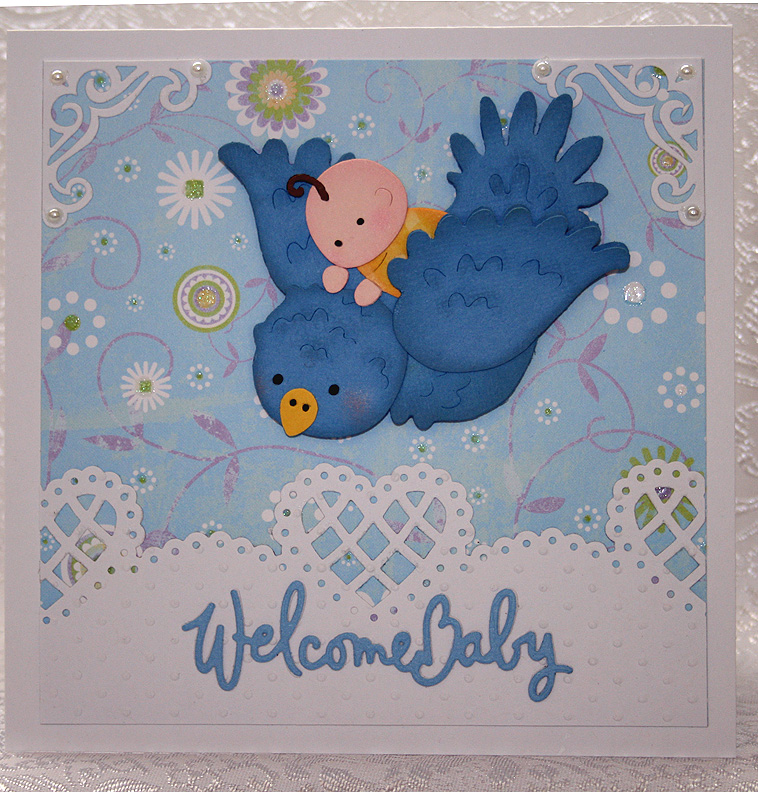
There is no Cricut on my card this time — it is all done on the Cuttlebug.  I was able to use up some scraps with this card.  The main cut, the bird and the joyriding baby, is made from a Boss Kut die.  The die is titled Joy Ride.  This was my first time using a Boss Kut die in my Cuttlebug and I was happy with how it cut — no problems at all.  I inked around the edges of the cut pieces. 

The trim at the bottom is done with the Martha Stewart Lattice Heart deep edger punch.  I ran the cardstock through the Cuttlebug using the Swiss Dot embossing folder before I cut it with the punch.  The sentiment is from Cuttlebug, the Welcome Baby Emboss Combo.  The corners are from Cuttlebug’s Vintage Die Set and I added some pearls to each one. 

This card went together pretty fast and I’m pleased with how it turned out. 

Front of Joy Ride

 The two small safety pins on the inside of the card with made with Cuttlebug’s Baby Die 2.

Joy Ride Inside

  • Boss Kut Joy Ride die
  • Cuttlebug Welcome Baby Emboss Combo, Vintage Die Set, and Baby Die 2 by Provo Craft
  • Cuttlebug Swiss Dot embossing folder
  • Martha Stewart Lattice Heart deep edger punch
  • Pearls and ink

Jitterbuggin Challenge: Sketch 14 — Born to Be Wild

For this week’s challenge over at Jitterbuggin, we were to follow the sketch, add a Cricut animal and use stripes somewhere on our card.  As I was looking through my Cricut cartridges to see which animal I wanted to use, I saw that on Animal Kingdom there is a bookmark cut — and I thought it might be fun making one.

I had to figure out how to follow the sketch and where I was going to put the bookmark, so I thought I’d try adding a pocket on the front of the card.  I made the card to fit a #10 envelope — the card measures about 8 1/2″ x 3 1/2″.  The cardstock I used is a stack by DCWV called Safari Kids.  The solid cardstock is from Core’dinations.

I made the pocket from striped paper and added a flap that I tied some twine around.  I cut the bookmark at 7 1/2″ and finished both sides of  it with the tiger.  I used Zooballoo for the grass and Life is a Beach for the “Adventure” title and the leaves.  Down the sides of the pocket I added some trim made from an EK Success  punch called Chain Link.  I like it because it creates a stand-alone chain. 

Front of Card With Bookmark in the Pocket

Front of Card Showing the Bookmark

I lined the inside of the card with the striped paper I used on the front and on the opposite side I used a contrasting print.  I added three leaves from Life is a Beach.

Inside of Card


  •  Cricut Animal Kingdom, Life is a Beach, and Zooballoo cartridges
  • DCWV Safari Kids paper stack
  • Core’dinations cardstock
  • EK Success Chain Link punch
  • Ink and Twine

The Cuttlebug Spot Challenge: Sympathy Cards

This week at The Cuttlebug Spot, the challenge is to make a sympathy or thinking of you card. 

I used some new paper from Core’dinations — it’s from their Cardmaker Series and is called Pearls.  The color I used is Baby Pink Pearl, although it is more of a peach color.  The contrast piece is called Starlight Pearl.  I bought it at Joann’s and it comes in a pad of 25 sheets.  I am impressed with this paper — it cut well and has a very pretty look to it.

I used my Cricut to cut the card base — the diamond lattice design — and added a piece of vellum behind the lattice.  All the rest of the card was done with my Cuttlebug. 

I used one of the cut and emboss die combos for the butterfly.   The contrast piece is embossed with the Textured Script Cuttlebug embossing folder.  The sentiment is from another cut and emboss combo, Everyday Greetings.  The flowers are from Michael’s wedding department and I colored them using chalk ink.  The flowers and butterfly are embellished with pearls. 

Thinking of You -- Front of Card

Inside of Card

This card went together rather quickly for me.  It is not uncommon for me to work longer than a day making a card, and I was able to put this one together in a couple of hours.  That really helped as the deadline for entering the card was getting close.  I managed to get it linked with about five minutes to spare!

  • Core’dinations Pearls cardstock
  • Cuttlebug Cut and Emboss Combos:  Butterflies, Everyday Greetings
  • Cuttlebug Embossing Folder — Textured Script
  • Flowers from Michael’s wedding department
  • Pearls from my stash

Jitterbuggin Weekly Challenge: Sketch 13 – Planes, Trains & Automobiles

I had fun with this week’s challenge over at Jitterbuggin.  We were to follow the sketch, use a Cricut vehicle on the card and also use a button. 

I was stumped at first and couldn’t decide which vehicle to choose.  My card started as something completely different and sort of evolved into the finished product.  I knew I wanted to do a card for breast cancer awareness, but I wasn’t quite sure how to go about it using a vehicle.    

I had the idea in my head of what papers I wanted to use, only I didn’t know where I could find them.  So one evening I surfed the web and downloaded free digital scrapbooking images and printed my own paper.  The solid cardstock is Bazill, but all the other pieces I printed.  I like the light pink piece in the middle — it reminds me of fabric.  The only issue I had with the printed paper is that when I cut it with my Cricut, the edges were white.  To remedy that, I used my Copics and colored the edges of the pieces I cut for the car.  

After going back and forth on several different vehicles, I decided on a cut from the Cricut Hello Kitty Greetings cartridge.  It was a bit of a challenge just to assemble the pieces as I cut it at only 2″.  I did a lot of gluing with the aid of tweezers.  I added a button to each tire and the car is attached to the front using 3D pop dots .

I used Nestabilities by Spellbinders for the two circle cuts.  I used my Cuttlebug and the Swiss Dot embossing folder to emboss the smaller circle behind the car.  The awareness ribbons on the front and inside of the card are from Stand & Salute.  I didn’t have any pink craft rhinestones to put on the awareness ribbons, so this card got some from my stash of the good stuff — they are Swarovski crystals.

Hello Kitty Greetings Breast Cancer Awareness Card

I found the road sign for the inside of the card on the web too.  I added the word “hope”,  printed it and then cut it out by hand.  I thought it was the perfect finishing touch for this card. 

Inside of Card

  • Cricut Hello Kitty Greetings and Stand & Salute cartridges
  • Cuttlebug Swiss Dots embossing folder
  • Nestabilities by Spellbinders — used in my Cuttlebug
  • Ribbon & buttons from my stash
  • Pink Swarovski crystals

Jitterbuggin’ Sketch 12 Challenge: Oh Baby!

This is my first time participating in Jitterbuggin’s weekly sketch challenge.  The challenge this week is to follow the sketch, make a baby card and add some ribbon.  Be sure and check out Jitterbuggin to see some fabulous cards.

This card is 5″ x 7″ and all the solid cardstock is from Core’dinations.  The white cardstock is from their Gemstones collection.  The baby shoe print paper is from me & my BIG ideas that was purchased at Joann’s. 

I used several Cricut cartridges to get all the cuts.  The lettering in the blocks came from Simply Sweet.  I did some faux stitching around the blocks with a black pen to make them stand out.  The rattles and the safety pins came from the new Sugar & Spice Cricut Lite cartidge (available only at Wal-Mart) and each are made of several layers.

I used My Community for the baby shoe.  I cut it out several times, glued two pieces together and added three white eyelets.  Then I threaded the ribbon through the eyelets and added two more layers.  I ran the contrast piece at the bottom of the shoe through my Provo Craft Cuttlebug, using the Swiss Dots embossing folder.  The shoe is mounted on the card using 3D Pop Dots. 

For the lacy square under the shoe, I used a Martha Stewart Punch-Around-the-Page Combo.  I made two layers, the top layer being vellum.  For a little added interest, I stamped a swirly design in white ink on the wrong side of the vellum

Baby Girl Card for Jitterbuggin's Sketch 12 Challenge

Inside of Card

The inside of the card is decorated to match the outside, again using the rattle and safety pin cuts from Sugar & Spice.

  • Core’dinations cardstock
  • me & my BIG ideas print paper
  • White vellum
  • Cricut cartridges:  Simply Sweet, My Community, and Sugar & Spice
  • Cuttlebug embossing folder, Swiss Dots
  • Martha Stewart Punch-Around-The-Page Combo
  • Eyelets, ink and black & white pens

New Basic Grey Embossing Folder Sets

Just wanted to share  my newest find– embossing folder sets designed by Basic Grey and made by Sizzix.  I bought 4 of the sets at Joann’s.  They come packaged with two embossing folders per set –and you get a free die with each one too.  I used the folders and dies in my Provo Craft Cuttlebug and love the way they came out.  

This is how the folders come packaged.

   I ran some scrap paper through my Cuttlebug and made samples of the folders and the dies.

Thin Ice & Phrases, Merry Christmas Set

Dearly & Frost Set

Evergreen & Snow Flowers Set

Snow Globe & Powdered Sugar Set

The Joann’s I visited had about 8 different sets of the embossing folders.  They also carry individual dies (larger than the free dies that come with the sets) that coordinate with the folders.  I’m looking forward to putting these new folders to work.