Embroidered Easter Towels and Easter Egg Baskets

I managed to make a couple of gifts for Easter this year.  I embroidered towels and made a matching Easter egg basket to go with them.

The egg basket is a cut file from svgcuts.com.  It went together very quickly.  I put names on the back side of the baskets, but I forgot to take a picture of the back.  I used vinyl for the names.  The baskets were a great size to hold some candy.

Towels&EggBaskets

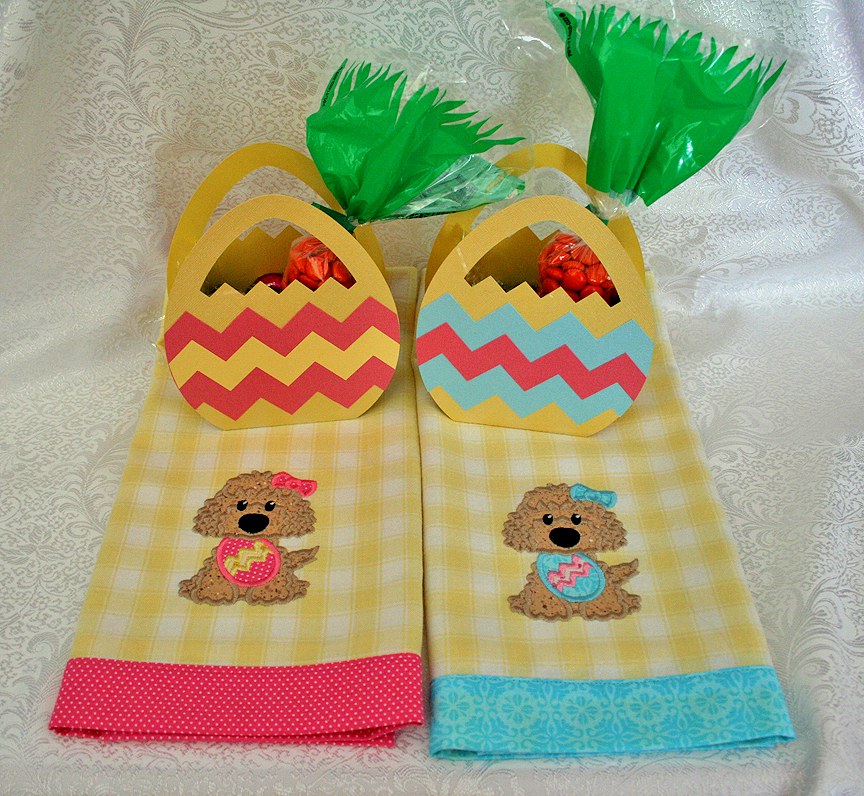
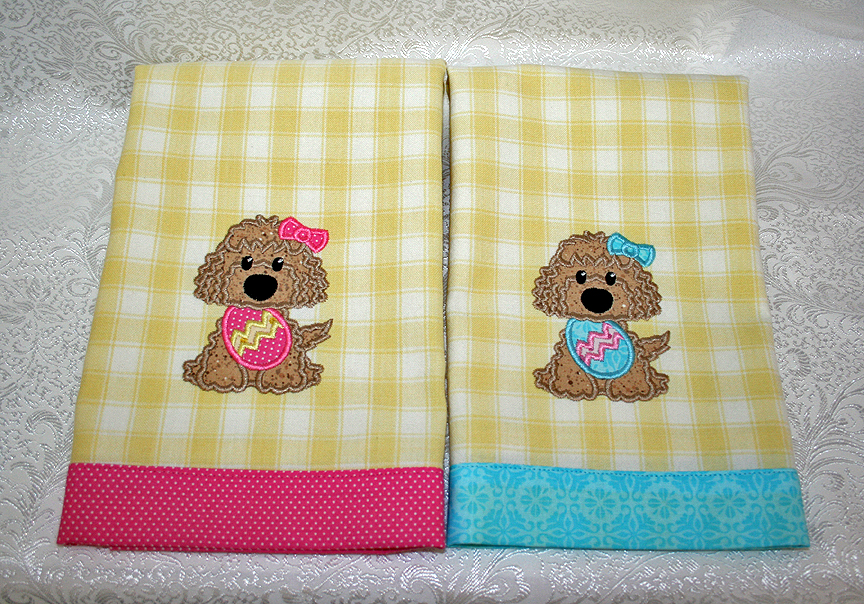
Since the towels were for our dog groomer and her assistant, I thought the design was perfect.  I got the embroidery file from digistitches.com and it stitched out beautifully.  I trimmed each towel with the contrast fabric I used on the egg appliques.

Towels3

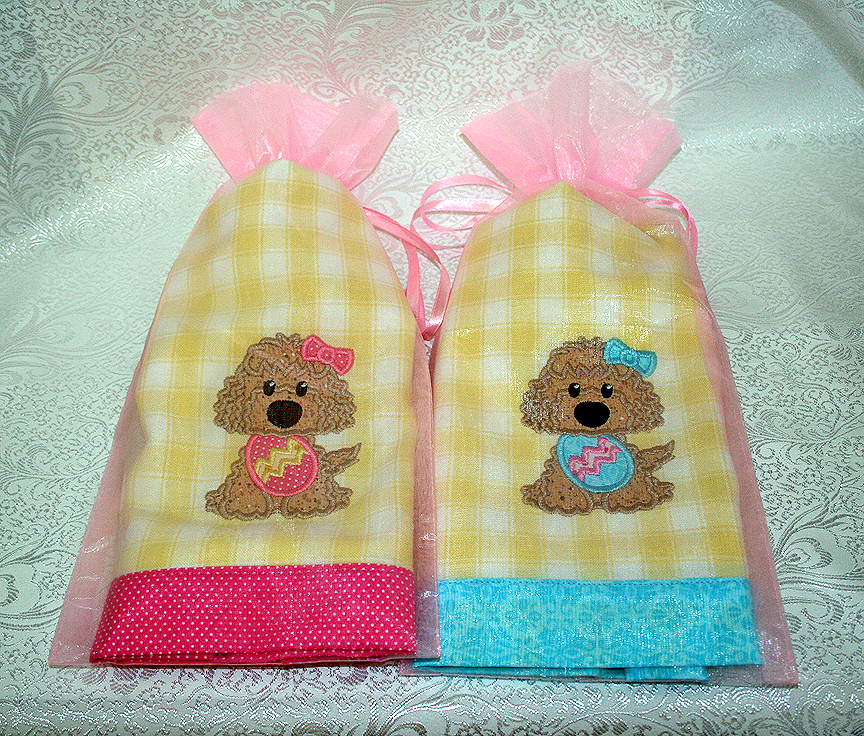
The towels were too large to fit inside the baskets, so I put them in some pink organza bags that I had on hand.

TowelsBag


Cupid Minion Valentine Treat Bag

I did a blog hop about a week ago that was put on by Svg Cutting Files and Jaded Blossom Stamps.  They usually have a monthly blog hop and share some really cute files along the way.  This minion was one of the files from their hop and I did a blatant copy of the project posted by Sara.  I thought her treat bag was so cute.  I bought some limited edition Twinkies made especially for Valentine’s Day — they are coated in chocolate and have cherry filling.

All supplies were from my stash — I’ve had the Valentine paper for some time.

2

The hearts were cut using Spellbinders dies and the topper is one of their label dies that I folded in half.  The stamped sentiment is from Jaded Blossom and it is on a tag from their Mini Tag 2 die.  I added the Twinkie and some Hershey kisses inside the gusset bag, also from Jaded Blossom.

3


  • Svg Cutting Files – Minion svg which was available only during the hop
  • Jaded Blossom Stamps – Sentiment, Mini Tag 2 die, and clear gusset bag
  • Spellbinder dies — Hearts and Label Eighteen

Valentine Mailbox

I bought some mailboxes at Target a couple of years ago and I finally got around to decorating one.  This is a Valentine gift for a young girl.

Everything I used was from my stash, so I’m not sure where the paper is from.

3I printed the girl’s name on a heart that I cut using a Spellbinders die and then attached the heart to the front.

5

I put some candy in a clear bag and added a topper I made using a Spellbinders label die.  The bag fits nicely inside the mailbox.

1

  • Metal mailbox from Target
  • Spellbinders dies – Hearts & Label Eighteen
  • Ribbon from Michaels


Paper Mache Quilt Shop

This is the quilt shop I made for a swap I participated in way back in August of 2014.  I altered a paper mache house from Hobby Lobby.  The porch and window I added in the front was made using a tutorial from Laura Denison Designs — I altered one of her Maple Street Shoppes (the Tea Shoppe) to fit my little house.

All the paper I used to cover it is from Graphic 45’s Secret Garden collection.  I used several doll house miniatures to add realism and I even added a little needle-felted robin on the roof.  I found the robin on etsy and he came all the way from Russia.

Front3

The sign is computer generated and mounted on a Spellbinders Label shape, but I don’t recall which one I used.  I named my shop Quilty Pleasures.  You can see some of the miniatures I used — the cat and package by the front door and the iron in the window. There is also a miniature quilt book in the window that I found on etsy — it even opens. In the next photo you can see the book a little better.  I made the bolts of fabric using fabric from my stash.

I used two different Martha Stewart border punches for trim on the shop.

WindowCUI handmade the rug that is on the front porch – a tedious and time consuming undertaking.  I used strands of embroidery floss that I braided together.  Once I had a long strand I started forming it into the shape of the rug.  I cut an oval from cardstock and glued on the back of the rug.

Rug

The next three pictures will be of the windows on the sides and the back of the shop.  I printed some cute bear quilting clipart I found on the internet and put them behind windows that I cut out with my Zing using a svg file.

RSide2

LSide

The roof is made from a piece of fabric that I printed a quilt design on using my Brother garment printer.

Back

The roof lifts off and I covered the inside of the house with paper – a mini album fits inside.

Inside

This was such a fun project and I love how the Secret Garden collection looks on the quilt shop.  I ended up making two mini albums, which I will post separately.

Front6

  • Paper mache house from Hobby Lobby
  • Graphic 45 Secret Garden collection
  • Laura Denison Designs Tea Shoppe pattern
  • Martha Stewart border punches
  • Spellbinders label die
  • Assorted purchased miniatures
  • Handmade braided rug
  • Scrap lace and fabric from my stash

Quilt Card With Graphic 45 Secret Garden

I am so late in adding this project to our blog.  Way back in August of 2014, I participated in a paper mache house swap on the Cricut Circle Message Board. I altered a paper mache house from Hobby Lobby, making it into a quilt shop. This is the card I made to go with my project.  The printed paper is all from Graphic 45’s Secret Garden collection and I used the hexagon cover plate die from Papertrey Ink to cut the quilt pattern. Card The sentiment was computer generated and the scalloped rectangle is a Spellbinders die.  I tied some baker’s twine towards the bottom.

  • Graphic 45 Secret Garden paper
  • Papertrey Ink hexagon cover plate die
  • Spellbinders scallop rectangle die

Frozen Christmas Cards

I made Christmas cards for three sisters and used the same theme throughout — characters from Disney’s Frozen.

The first two cards are shakers cards.  I got to try some of my Papertrey Ink shaker dies making these — love how the dies make shaker cards so easy.  I added Martha Stewart snow inside — and some sequins from Doodlebug Designs.  The banner and the sentiment are also from Papertrey Ink.

1

The snowflakes are from Martha Stewart border punches — I used two different punches to get the different sized flakes.

2

The third card is a scraplift — when CBC Scrapbooking posted her card on Facebook, I fell in love with it.  The card uses cut files from Little Scraps of Heaven Designs.  I used Warm Hugs and Ice Princess to make the card.

The tag is from a die by Jaded Blossom Stamps — the Tag 2 set.   The snowflake frame is from Spellbinders.  I again used some of the punched snowflakes on this card.

2

  • Papertrey Ink – Shaker dies, banner die and sentiment stamp
  • Little Scraps of Heaven Designs – Warm Hugs and Ice Princess cut files
  • Jaded Blossom Stamps – Tags 2 die
  • Spellbinders – Snowflake Frame
  • Martha Stewart – snowflake border punches
  • Doodlebug Designs – sequins

Birthday Cards

World Card Making Day was Saturday, Oct 4, and I actually got a couple of cards made. Well, I made one card on Saturday and the other one on Sunday, so it was a weekend endeavor.

First up is a birthday shaker card.  I love shaker cards and this one has a birthday cake on the front.  I used the Arched Top Card Base and Party Shaker Tags from svgcuttingfiles.com to make this card.  The stamps are from Jaded Blossom — Birthday Treat Tags and Birthday Candies.  I also used one of the  Mini Tag 2 dies to cut the sentiment circle.  I heat embossed the sentiments.

The pattern paper is from SEI and I used Doodlebug Design sequins inside the shaker.  I outlined the candle flames with Stickles.

1

The next card I made for our dog, Fifi, to give to Steve for his birthday in a couple of weeks.  Steve doesn’t look at our blog, so I don’t have to worry about him seeing the card.

I used the Dog Bone Shaped Card and the Pomeranian Pup files for this card.  Fifi is a mix of Pomeranian/Chihuahua, but she looks like a Pom.

I used the computer to generate the sentiment and cut it out with one of the Flag Dies from Jaded Blossom.

3


I am entering both cards in svgcuttingfiles.com’s monthly challenge, which is a Birthday Card Challenge.  I’m also posting them to the Cricut Circle Message Board, where Sara is hosting a challenge for World Card Making Day.

  •  SVG Cutting Files – Arched Top Card Base, Party Shaker Tags, Dog Bone Shaped Card, and Pomeranian Pup
  • Jaded Blossom Stamps – Birthday Treat Tags, Birthday Candies, Mini Tags 2 die and Flag dies
  • SEI paper pad
  • Embossing powder
  • Doodlebug Designs sequins
  • Stickles
  • Baker’s Twine

Caramel Apple Bear Card

I was able to join in the Anything with Fall Colors Challenge on svgcuttingfiles.com’s blog.  You can create anything, as long as it uses fall colors and one of their files as the main focus.

It wasn’t hard to choose what cut file I wanted to use — this cute bear is one of their newer files.  The file is called Candy Apples.  I also used one of their card bases to make the card — it is the Oval Card Base.

The stamp and the die that the tag is cut from are both from Jaded Blossom.  The stamp is called Caramel Apple and the die is Mini Tag Dies 2.

2

The background paper is from Doodlebug Designs and the collection is called Happy Harvest.  I added a twine bow to the tag.

1

  • svgcuttingfiles.com – Candy Apples and Oval Card Base
  • Jadedblossomstamps.com – Caramel Apple and Mini Tag 2 dies
  • Doodlebug Designs — Happy Harvest
  • Twine

Graduation Pop-Up Card

Our poor blog has really been neglected.  I have several projects to post but just haven’t gotten around to doing it.  So here is a card I made several months ago for a young man’s college graduation.  I used a cut file I purchased on etsy.com.  This was my first time making a pop-up card.

It was an easy card to make except I had trouble putting the folds in.  I kept ending up with creases where I didn’t want creases to be.  It took about 5 tries before I finally got it right.  I cut it on my Klic-N-Kut Zing.

FrontThe inside is where I had the problems folding the card.  I first cut it using a fairly heavy cardstock (110#) and found a lighterweight (80#) folded much easier.

InsideAnd here is a side view so you can see how it pops up.

InsideSideView

Paper Mache House, Mini Album & Chunky Charm Swap

I haven’t posted in such a long time.  I joined a swap on the Cricut Circle Message Board and we were to alter a paper mache house and make a mini album and a chunky charm to go with the house.  This is what my fabulous partner, Sis, sent me. She is so creative and I love it all!!

First the house — Sis couldn’t have chosen a more perfect theme.  If you look through the louvers on the front door you can see Betsy Ross inside stitching away on the flag.  When I first unwrapped the house, I was so engrossed in looking through the louvers that I didn’t even notice the door is a spool of thread.  A couple hours later I discovered the door opens!  Notice the shutters on the windows — and the curtains.  I also love the flag waving in the breeze.

House3

House2

The back of the house and a close-up of the flower box.

HouseBack


FlowerBox

Here is the mini album.  I love the Disney touches — I’m sure I will have to hide the album from Erin on her next visit or I will find it gone 🙂 There is a picture of Minnie Mouse on the front, sewing Duffy Bear for Mickey to take with him on his travels.  There is plenty of space inside this fun album — all sorts of cascading pockets holding lots of tags.

Album

AlbumOpen

AlbumSide

And the beautiful chunky charm hanging from the spine of the album.  Did you spot some Disney charms?  There is also a beautiful book locket.

AlbumCharm

Sis went above and beyond and sent me two extra special gifts.  The first one is a chunky necklace, with the charms hanging from a Betsy Ross thimble.  It’s beautiful with all the sewing themed charms (and yes, a Disney charm too).

Necklace

And here I get to introduce the little thread bear that Sis made.  Isn’t she precious? She is made from pink wool and has her threaded needle in her paw.  I named her Betsy (my hubby said I should call her Bear-tsy).

Betsy2

Thank you so much, Sis!!  You went way above and beyond and I love everything!!  You put so much detail in your work and I’m still sitting here looking at everything.  It makes me smile 🙂