It’s A Stamped Image Tag Swap 2


Sis on the Cricut Message Board held her second stamped tag swap and I was able to join in a swap for the first time.  I just received my package with all the tags and had to share all the goodness in that box.

Each participant made 12 Fall/Halloween tags and 12 Christmas/Winter tags, plus one tag for our secret swap partner.  The 24 tags were to have a stamped image and at least one embellishment.  For the secret tag we got to go all out and decorate it.

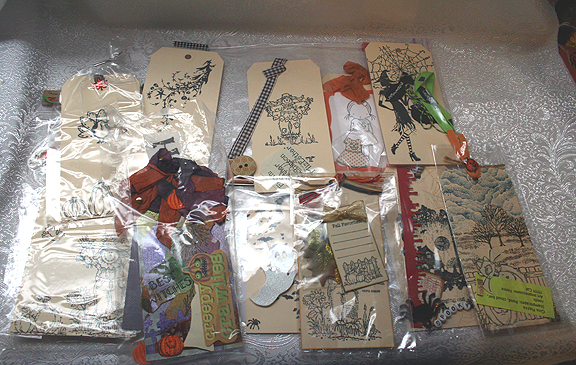
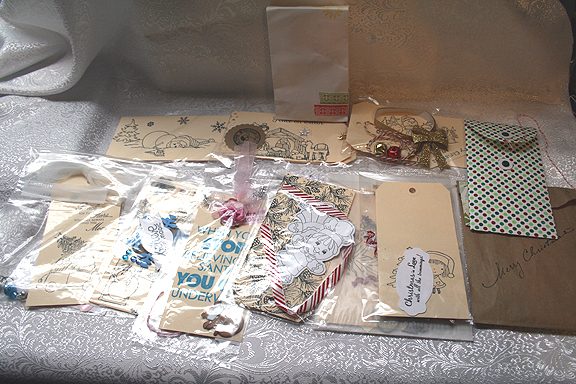
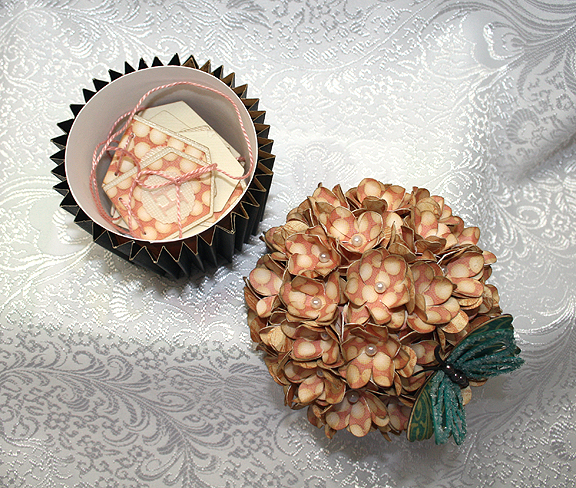
First I want to share pictures of all the stamped tags, each one bagged with the name of the sender and embellishments inside.

AllTags

AllTags2

My secret swap partner was Maria and I received two beautiful tags from her.  She said she couldn’t decide between Christmas and Halloween, so she made both.  I am sure glad she couldn’t make up her mind!  She put so much detail into both tags.

ChristmasMaria

HalloweenMaria

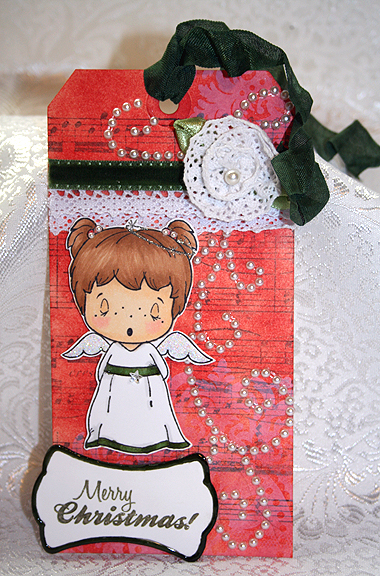
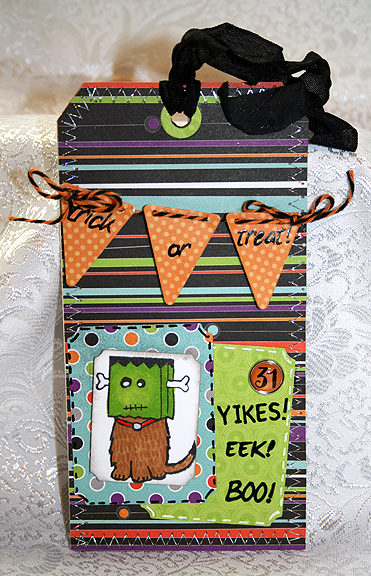
Thank you, Maria — I love both of my tags!!

I will take pictures of all the other tags individually and post them soon.  Right now I am working on my first mini album for another swap and need to finish it so I can get it in the mail.

Thanks to Sis for a wonderful swap — I had a lot of fun!!

Greetings From California Card


There is a challenge on the Cricut Circle Message Board to create a project using the new Circle cartridge, Charmed.  And the challenge has turned into a battle between the teddy bear image and the pig image. While the pig  is very cute, I had to do a teddy bear.

Since I am a native Californian, I decided to make a California bear.  We have a bear on our flag — a grizzly bear.  While we no longer have grizzly bears in California, I made this little brown bear greeting everyone from California.

Front


The background is printed from one of my clipart collections I got from PC Crafter.  It was a wonderful site that had lots of great clipart.  Unfortunately, it ceased operating a while ago and the website is no longer available.

The bear is cut from the Charmed cartridge at 2.5″.  I inked and chalked him.  Then I decided to give him a t-shirt, featuring two of my favorite characters — who just happen to be a bear and a pig.  It’s Pooh & Piglet!  I hand cut the t-shirt and inked the edges.

Here is a close up of the graphic on the t-shirt.

ShirtCloseUp

This was a quick and easy card to do — and it was fun.  Now to go post it before the midnight deadline hits.

  • Cricut Charmed cartridge
  • Kraft cardstock for card base, scraps for bear
  • Ink and chalk

Herd It’s Your Birthday


My hubby (Steve) has an uncle who will be celebrating his 95th birthday on Sunday.  His family is having a card shower for him and my SIL sent me an email asking if I would make Uncle Donald a birthday card.  I remembered stories Steve told me about visiting Uncle Donald on his farm.  He had dairy farm, so I thought I’d make a card with a cow on it.

When I asked Steve what he thought about my plan, he said a cow would be fine, but make it a Holstein as that is what Uncle Donald had.  OK, a Holstein?  I looked up Holstein and luckily it is the cow I had in mind — a black and white one.  Since I like whimsical critters, I wanted to use the cute cow on the Cricut Paper Doll Dress Up cartridge.

The pictures of the Holsteins that I saw showed the cows without horns.  I read that the horns are removed when they are young calves.  Since the cow on Paper Doll Dress Up has horns, I just did some trimming before assembling her.

CowSm

All of the cardstock is Michael’s Recollection brand.   I cut the cow at 4″ and did some inking and chalking on her. The spots are from the cow on the Animal Kingdom cartridge, along with the little top knot of hair.   The barn is from Create A Critter, cut at 2″.  The sun is also from Create a Critter cut at 1 1/2″.   The sunflower is from Walk In My Garden and the little patches of grass are from Create A Critter.

Cow3

Oh, I almost forgot the sentiment.  It is a stamp from Elzybells Art Stamps.  It came with some cute sheep stamps in a set called Jump for Joy.

Cow4

  • Recollection cardstock
  • Cricut cartridges:  Animal Kingdom, Create A Critter, Paper Doll Dress Up, Walk In My Garden

Chalkboard Birthday Card


I was inspired by chalkboard art on Pinterest to create this birthday card for my sister-in-law, using Cricut’s new Chalkboard Fonts cartridge. When I first saw this cartridge, I didn’t know that much about chalkboard art or how popular it is right now.  Now it is one of my favorite cartridges.

The solid  cardstock on this card is the Recollection brand from Michaels. The patterned paper on the banner was printed on my Imagine using the Blossom and Imagine More Cards cartridges.  The leaves are from a scrap of Graphic 45 paper.

FrontSm

The card is 5″ x 7″, matted with a white layer.  The black (chalkboard) layer is inked with white on the edges.  I also lightly smudged white ink on the front so it looks like an actual blackboard.  The lettering and swirls are all from the Chalkboard Fonts cartridge, cut from vinyl.

Front10

The banner is from the Birthday Bash cartridge, cut at 1.25″.  For the letters on the banner, I used a Cuttlebug Embossing Plus folder called Monogram Seals.  I inked the letters with black ink.  The banner is hung from the card with DMC Memory Thread.  I added some ribbons and bows and curled the ends of the Memory Thread by wrapping them around a chopstick.

Banner

 The flower is also made with the Cuttlebug, using the Daisy quilling kit.  The petals are light yellow, inked with pink on the edges.  I brushed Glossy Accents on the completed flower and sprinkled it with coarse, clear glitter to add some sparkle.

Flower

 I will make a box for this card, since it is a little bulky to place in an envelope, and send it to my sister-in-law.  I hope she likes it.

Front7

  • Cricut cartridges:  Birthday Bash, Chalkboard Fonts, Imagine Blossom and Imagine More Cards
  • Cuttlebug:  Monogram Seals Embossing Plus folder, Daisy quilling kit
  • Vinyl
  • DMC Memory Thread
  • Ink
  • Ribbon

Chalkboard Father’s Day Card


This is a quick and fun card I created for Father’s Day using the new Cricut Chalkboard Fonts cartridge.  I was inspired by some chalkboard art that I saw on Pinterest.

The card is a standard A2 size (4 1/4″ x 5 1/2″).  On the black cardstock, I inked the edges with white ink.  While doing so, I managed to smear the ink all over myself — and on the front of the cardstock, too.  So I took a sponge and lightly went over the front to make it look like a chalkboard that had recently been erased – which is the look I was going for anyway.


Front

The dad is from the Cricut Car Decals cartridge.  I like the way the Chalkboard Font looks with cuts from the decal cartridges.

The font I picked to use on “Father’s” has lots of very small pieces.  Because I knew I would never be able to glue all those small pieces of cardstock to the front of the card, I chose to cut everything from vinyl.  I still had to be very careful when weeding the vinyl to make sure those small pieces stayed in place.

Front3

  • Cricut cartridges — Car Decals, Chalkboard Fonts
  • Vinyl
  • Ink

Circleville NSD 2013 – Did-I-Mension? Challenge


Here is my project for the Circleville Did-I-Mension challenge hosted by Renee.  Be sure and check out her blog and see the beautiful boxes she made for this challenge.

Renee challenged us to created a 3D box, bag or some other project.  Since I had just finished making my cupcake for the previous challenge, I thought a box to put the cupcake in would be the ideal project to make.  I used Sweet Tooth Boxes to cut my box, using the Cube Box cut at 11.5″.  All the cardstock used to construct the box is from Bazzill.

Set8

It didn’t take too long until I realized I was faced with a challenge.  I could only make a box that would fit on a 12″ x 12″ piece of paper.  I needed a square box and I could get the size I need (barely) for the cupcake to go inside, but I couldn’t get  it tall enough.  I spent a good two hours going back and forth on what to do.  I was looking at making something completely different for my project, but I kept coming back to the cupcake because I really needed a box.

Box3

I finally decided to see if I could add a separate piece of cardstock to the top of the box without it looking too funky.  I cut 2″ strips and had to piece them together to get four 4″ sides.  I used a Martha Stewart punch on the bottom edge.  I think it is called Laurel Leaf.   This is what the box looks like without the lid.

Box

The added piece gave me the height I needed, but I’m not too sure on the overall appearance.  I think it looks OK.  I made a rosette to put on the lid, using the Graphic 45 paper from the cupcake.  I then added a bow to the rosette.

Set8

  • Cricut Cartridge – Sweet Tooth Boxes
  • Bazzill cardstock
  • Martha Stewart Laurel Leaf punch
  • Ribbon

Circleville NSD 2013 — On Pins Challenge


I just completed this cupcake for the On Pins Challenge that was hosted by Sis.  Be sure and check out her blog to see the beautiful mini album she made for her project.

The challenge was to make a pin-inspired project.  I had no trouble deciding which pin I was going to use.  It is the one here.   I wanted to make one of the cupcakes.  Miranda has some gorgeous projects on her blog and I was lucky because she had a video on how to make the cupcake.  You can find the link to her video on her blog here.

CC2

I followed Miranda’s directions, except that I cut the flower petals with my Cricut rather than using a punch.  I used George and Basic Shapes <Flower2>, cut at 1.125″ and I hid the center hole in CCR.  I ended up using more than one 12″ x 12″ sheet full of flowers.  I think I placed mine a little closer together than Miranda did.  I used pearl pins I got at Joann’s to place the pins on the stryofoam.  The paper is all from Graphic 45.

The cupcake opens and inside is a little banner that says “Happy Birthday.”

Open

I cut the banner from Birthday Bash at 1.5″ using the print Graphic 45 paper.  I cut the shadow layer from Bazzil cardstock.  I threaded it together using some DMC pearl cotton.  The letters are from a Cuttlebug Plus Embossing folder, Monogram Seals. I inked the letters with Distress Ink.

Banner2

I also made a box for the cupcake for a different challenge.  I will share a picture here, but will put the details for the box in my next post.

Set

The butterfly is from Martha Stewart Elegant Cake Art and was cut at 2″ from Graphic 45 paper.  I cut several layers and on the top layer I added some coarse crystal glitter.  I put brown pearls on the body.

CC3

  • Cricut cartridges used:  Birthday Bash, George and Basic Shapes, Martha Stewart Elegant Cake Art
  • Cuttlebug Plus Monogram Seals embossing folder
  • Graphic 45 paper
  • Bazzill cardstock
  • Pearl pins
  • Coarse crystal glitter
  • Distress Ink
  • 3″ stryofoam ball
  • 9 oz paper cup
  • Brown adhesive pearls
  • DMC pearl cotton

Circleville NSD 2013: It’s All About Perspective Challenge and E-I-E-I-O Challenge


On this project, I combined challenges.  I was making a card for the E-I-E-I-O challenge, hosted by Jenny.  She wanted us to make a project using a barnyard animal.  When I took a close look at the cut pieces, a light bulb went off — I thought this would also be a good project to do for Nadia’s challenge.  She has an excellent tutorial on how to add perspective to flat die cuts.  Be sure and check it out on Nadia’s blog.  Her challenge is to make a project using some of the techniques she shows in her tutorial.

So, I would like to present to you the premiere of………………

EXTREME MAKEOVER:  FDC EDITION

A flat die cut (FDC) is just that — flat.  This case presented itself when it landed on my desk after coming off the Cricut mat.  I looked at it and said to myself “this cut could definitely benefit from Nadia’s ideas.”  Something I really enjoyed in Nadia’s tutorial was her before and after photos.  So I took a photo of my die cut (from the County Fair cartridge), without any enhancement, as it went together after coming off the mat.

Before

It’s cute, but it could be so much more.  I began with the fence, which was cut at 2.25″.  I added some grass to it by welding the shapes in Cricut Craft Room.  The grass is also from County Fair, cut at 3″.  I cut several of the same fence shapes so I could cut them apart and use only the pieces I wanted.

FencePieces

 I took extras of the upright pieces and inked them.  Two of them, the second from the left and the far right, I inked darker because I wanted them to look like they are farther away.  I adhered them to the fence.

Then I began working on the cross pieces.  I inked the edges and ran them through the Cuttlebug using the Distress Stripes folder.  Because the paper was not real thick, I doubled the layers on these boards.  I then began attaching them to the fence.  I glued one end with liquid glue and put a piece of foam on the opposite end.  Where the boards attached to the uprights that were farther away, I adhered that edge with the liquid glue.  Where the boards are supposed to be closer to the viewer, I attached that end with the foam.  I ended up with sort of a zigzag effect.  When I finished gluing the boards on,  I inked the edges of the grass and adhered the pieces to the fence.

Fence

Next up was the little chick.  

PlainChic

He is cute as is, but this little guy wanted some major work done.  I began with several layers, as I knew I would be doing some nipping and tucking.  He was very happy when he started getting inked.  I cut a separate head from one of the layers and inked it.

He wanted a  beak job done, but I recommended a little tuck instead.  I creased his beak in the middle and folded it. Then I adhered it to his face  and he ended up with some nice dimension.

The comb (his topknot) was next.  I cut two slightly larger than the original piece and cut those into separate sections.  I then adhered the three layers of the comb.  This was a microscopic procedure, done under my lighted magnifying glass because the pieces were so small.

Now we came to what was perhaps the chick’s biggest issue — his wings.  In the original cut, he has no wings.  Just sort of an outline of wings.  This little guy had more than wing envy, he had a wing obsession.  He wanted me to do wing transplants, but in my opinion that would be too drastic.  Without ruffling his feathers, I explained that wing transplants aren’t what they’re cracked up to be.  I thought wing extensions would be a better solution, especially since the little guy is still a spring chicken.

I found some feathers from Paper Doll Dress Up and cut several of those.  I inked the edges and then attached them to the chick, gluing only the top of each feather.  The only procedure left to perform was attaching his new head.  I glued the head even at the top and popped up the chin area (do chickens have chins?) with a pop dot.

As for his new look, the chick is very pleased.  In fact, he happier than a rooster in a hen house.  So let’s pull those curtains back and take a look at the results………..

Chick

I photographed the chick alongside a ruler so you can see his size.  Altering small cuts and have a big effect.  He ended up being about three layers thick.  Here’s a before and after photo of the entire cut piece.

BeforeAfter2

Since the chick now has something to crow about, I decided to use that as the sentiment on my card.  Nadia explained in her tutorial about atmospheric perspective and how you can lose the effect you create in altering your cut by putting it on a background with a lot of detail.  I decided to go with a plain background.  I thought about embossing the background but decided I didn’t want that distracting from my fence and chick.  I used a pale blue and inked the edges.

Front

The sentiment is from Just Because Cards, cut at 5″.  The sun is from Pooh and Friends, cut at 1.5″ inches.  For the sun, I used another of Nadia’s ideas.  The orange layer was very bright and I thought it was distracting.  It seemed to draw my eye to that corner.  So I cut a piece of vellum and adhered it over the orange.  Although the orange still looks bright in the picture, it is actually more subdued.

Sun

I had a lot of fun with this project and I guess I should apologize for all the chicken puns.  Thank you, Jenny, for your fun challenge!

Front3

  • Cricut cartridges — County Fair, Just Because Cards, Paper Doll Dress Up, Pooh and Friends
  • Ink
  • Foam dots
  • Vellum

Circleville 2013 NSD – Oh The Places You’ll Go! Challenge


I just completed my second project for Circleville’s NSD Challenges.  This one is hosted by Marty (Eyelet on the message board) and she gave us a sketch to follow.  I made a card.

I used my Imagine again, printing the papers from the Floral Emporium cartridge.  It was my first time using this cartridge — it has some really pretty patterns on it.  I printed both the patterned and solid paper.

Front5

Here is the sketch:

card sketch.jpg

The blue flap (don’t know what else to call it) is from Elegant Edges <Eyelt1-s>.  I stretched it some in each direction in CCR to get it to the size of the card.  I then copied that shape and stretched it a bit more to get a shadow.  The circle of flowers is from Paper Trimmings <Flower8><Circle>, cut at 3″.  The sentiment is from Sentimentals <Letter2><Layer>, cut at 2.5″. Because the letters are so thin and small, I cut them from white vinyl.

The band on the card is two strips of cardstock, one 1″ wide, the other 1.25″ wide.  I used an EK Success border punch on them, Deco Scallops.

Front3

  • Cricut cartridges — Elegant Edges, Floral Emporium (Imagine), Paper Trimmings, Sentimentals
  • EK Success Deco Scallops border punch
  • White vinyl

Circleville NSD 2013: Go Big Or Go Home! Challenge


I made this card for one of  Circleville’s NSD Challenges.  The Go Big Or Go Home Challenge was created by Sara.  She challenged us to create a layout or card  using an oversized photo or title.

I made a card, since I needed one for my younger brother’s birthday today — he turned 64.  He recently bought a wood lathe and has been having a blast making some beautiful wood projects, so I wanted to use a wood theme for his card.  I pulled out my Imagine Snapshot: Nature cartridge and printed a bark pattern for the background and a lighter wood grain pattern for the letters.

Front10

The card itself is made from kraft paper.  Happy Birthday is from Something to Celebrate and is cut at 3.5″.  I inked and chalked all the pieces before gluing them together.  This card is simple, but I really like how it turned out.  I put some money inside so my brother can go to the wood store and get something he wants.

Front9

  • Cricut cartridges – Snapshot: Nature (Imagine), Something to Celebrate
  • Chalk
  • Ink
  • Stickles