Circleville NSD 2013: Go Big Or Go Home! Challenge


I made this card for one of  Circleville’s NSD Challenges.  The Go Big Or Go Home Challenge was created by Sara.  She challenged us to create a layout or card  using an oversized photo or title.

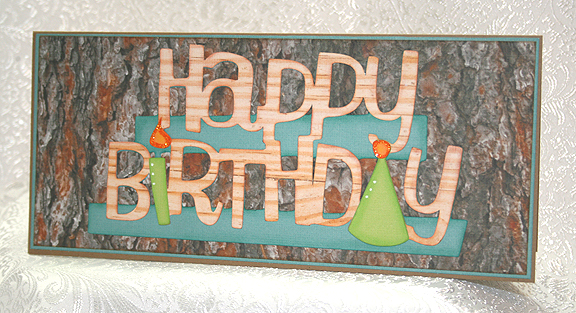
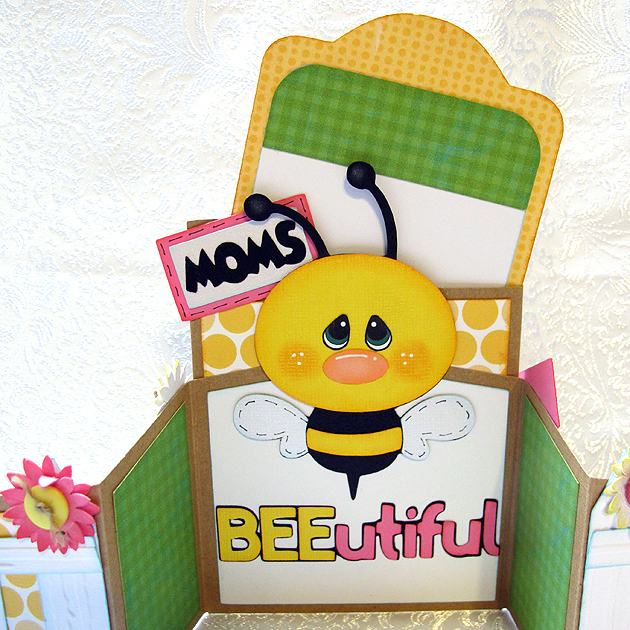
I made a card, since I needed one for my younger brother’s birthday today — he turned 64.  He recently bought a wood lathe and has been having a blast making some beautiful wood projects, so I wanted to use a wood theme for his card.  I pulled out my Imagine Snapshot: Nature cartridge and printed a bark pattern for the background and a lighter wood grain pattern for the letters.

Front10

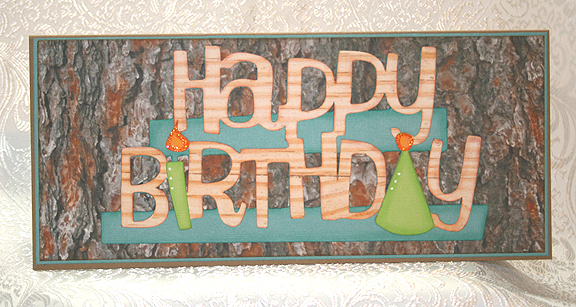
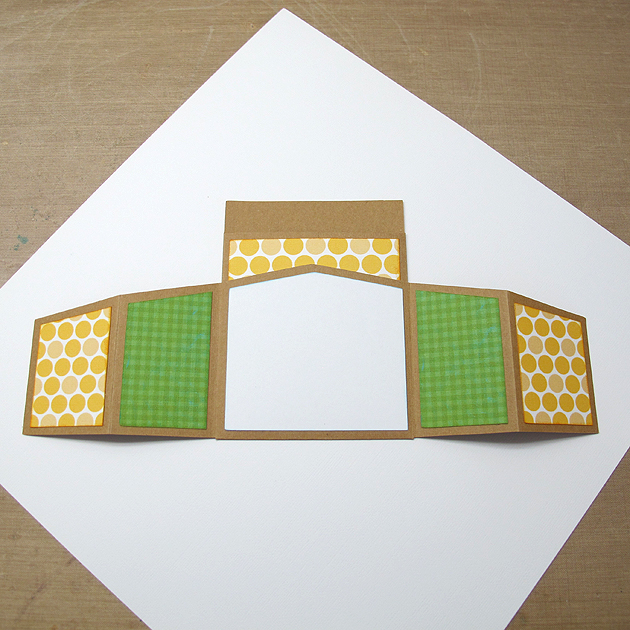
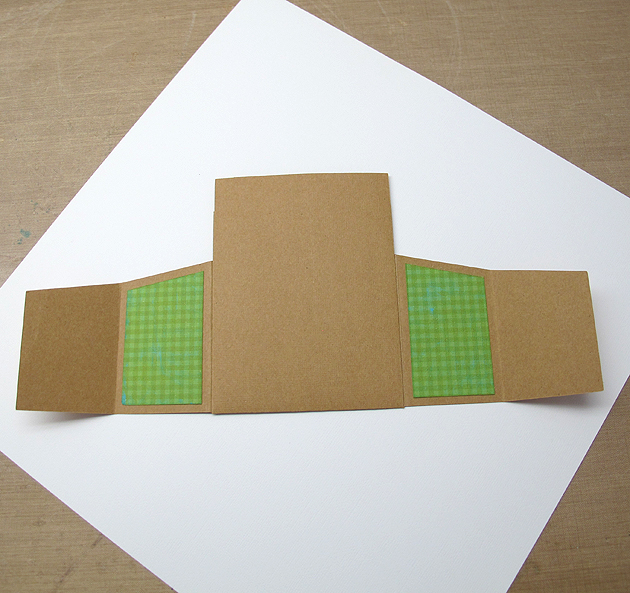
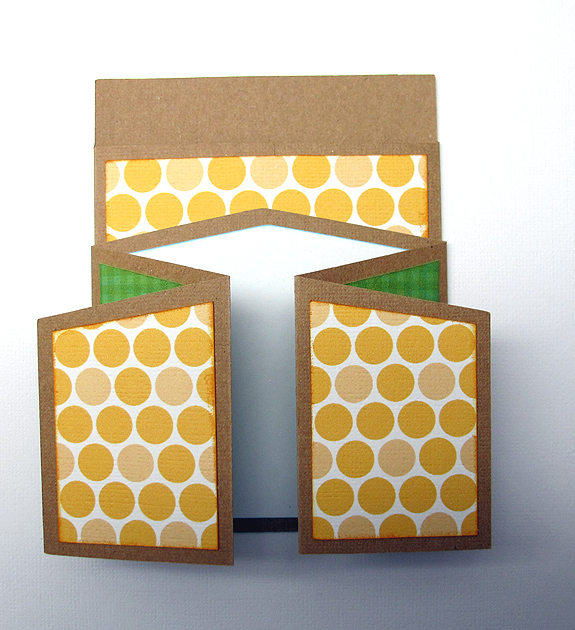
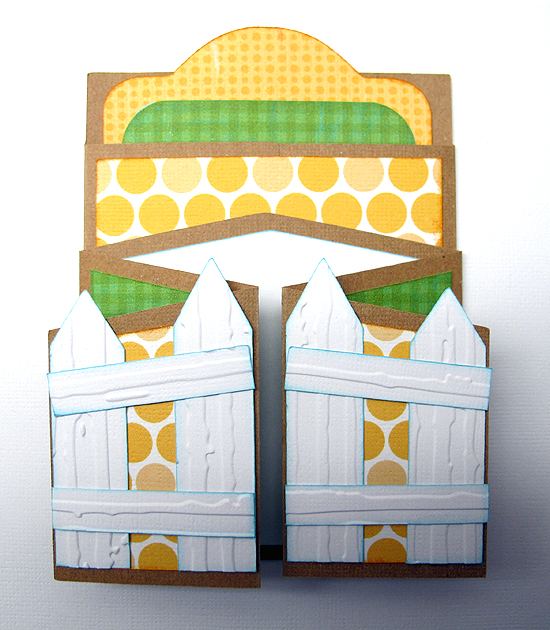
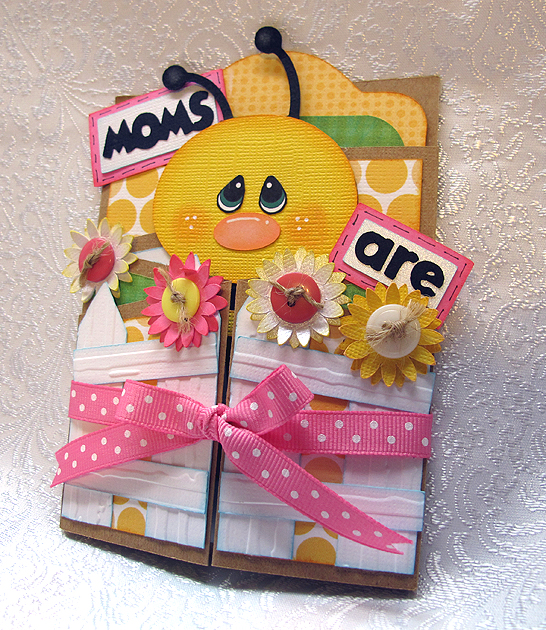
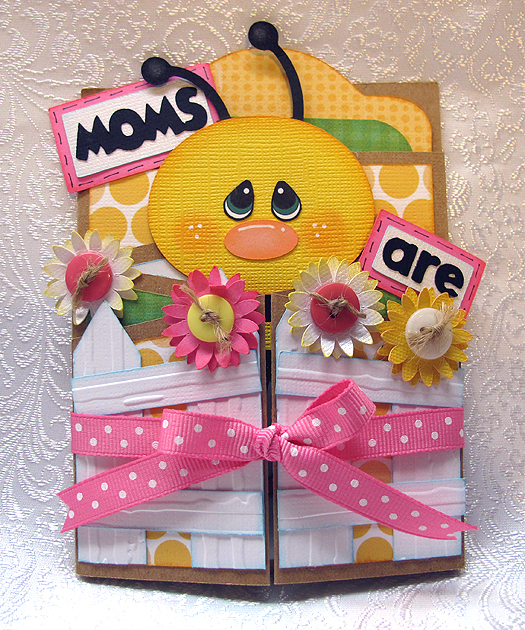
The card itself is made from kraft paper.  Happy Birthday is from Something to Celebrate and is cut at 3.5″.  I inked and chalked all the pieces before gluing them together.  This card is simple, but I really like how it turned out.  I put some money inside so my brother can go to the wood store and get something he wants.

Front9

  • Cricut cartridges – Snapshot: Nature (Imagine), Something to Celebrate
  • Chalk
  • Ink
  • Stickles

Cricut Circle Weekend Challenge Card


This is a quick card I did for a weekend challenge on the Cricut Circle message board.  Di challenged us to create a project using several tones of the same color.

I decided to go the easy route and went to my Imagine library for my papers, since it would have taken me hours to dig through my paper collection trying to decide what I wanted to use.  I used the Hey Diddle Diddle cartridge and printed out several different pink prints.

Front

The sentiment was cut from the Lacy Labels Lite cartridge at 2″.  The white letters at that size are very intricate, so I cut that layer from white vinyl.  I like using vinyl for intricate cuts because it is like making a sticker – I don’t have to apply any glue to the cut.  At that small a size, I would smear glue all over.  I do take a little stickiness off the transfer tape by sticking it a couple of times to a piece of cloth before applying it to the vinyl.  That way it doesn’t stick too tightly to my paper piece when I apply the vinyl.

Front4

I added some ribbon to two of the layers and then a bow to the top layer.  I also put three small pearls in the upper left corner.

The inside is another piece of the pink print paper with a white piece on top for writing.

Inside

  • Cricut cartridges used:  Hey Diddle Diddle Imagine and Lacy Labels lite
  • American Craft cardstock
  • White vinyl
  • Pearls
  • Ribbon

Cute Bee Card Created in Cricut Craft Room


I spent most of this weekend creating this card in Cricut Craft Room.  I found a cute paper piecing card from Treasure Box Designs and fell in love with it.  When I saw the card, I wondered if I could create it in Cricut Craft Room.  I thought the cute bee on the Create a Critter cartridge would be perfect for it.

When a challenge was posted on the Cricut Circle message board to create a project in conjunction with Circle Mania that was going on in Atlanta, I decided to get cutting.  I was so happy that my design for the base of the card worked the first time I cut it.  I’m not sure how to describe this card, maybe a gate-fold card with a pocket for a tag in the back.

Card

Open

I cut the card base from kraft cardstock.  This is what the piece looked like after cutting and scoring.  And maybe you can see why it took me so long to design this card — I was doing a lot of figuring!  I used George and Basic Shapes and Cricut Craft Room Basics to design the card base.

ScoredPiece

 After scoring, the first step was folding the edges of the pocket towards the center.

FoldPocket

 I printed all the patterned paper for this card on my Imagine.  I love that I can print the exact paper that I want when creating a project.  I used three cartridges for the paper, Bubble Gum Stripes for the gold circles, Blast Off for the green checks, and Hopscotch for the gold print on the tag.

I adhered the piece over the pocket, being careful to not glue the bottom.  I applied glue to the top and side edges only.

GluePaperPocket

Next I folded the bottom piece up towards the top.  I glued the center section of the bottom piece and attached it to the pocket.  Again, I only glued three sides — the top and two sides.  I did not glue the bottom.

FoldUpBottom

The next step was attaching the patterned paper to the panels on the card.  I cut two of the gold circles for the very front pieces and four of the green checked paper.  I attached a white piece of paper to the center panel.  It then looked like this.

GluePaperFront

I adhered two green checked pieces to the back of the panels, as they show on the front when the card is folded.  This is a view of the back of the card, showing the two panels.

GluePaperBackSide

And here is what it looks like from the front, with the panels folded up.

GluePaperNoTag

The tag was cut from Tags, Bags, Boxes & More.  The dimensions of the tag are roughly 3 3/8″ x 5 3/8″.  I adhered the white panel to the tag.  I also cut a piece of green checked paper for the top and rounded the upper corners with a punch.  I adhered that to the white panel on the tag, so the white didn’t show when the tag is in the pocket.

Tag

The fence posts are also from Tags, Bags, Boxes & More.  They are the pointed tag, just made skinny and with the hole hidden.  I cut four of the posts, with two of them being slightly taller.  Those I adhered to the center front of the card.  I ran the fence posts through the Cuttlebug using the Distressed Stripes folder before gluing them down.

GlueFence2

Next, I assembled the bee, flowers and letters.  The flowers were cut at 1″ using Flower Shoppe, using two layers for each flower.  I inked the edges and curled up the petals on the top layers.  I ran some twine through buttons and glued them to the center of the flowers.

The bee was cut at 4″ using Create a Critter.  I hid the facial features and used an oval that I made using Cricut Craft Room Basics (I squashed a circle until I got the shape I wanted) for his nose.  For his eyes, I printed out a free cut file I got at The Beary Scrap.  I don’t quite feel confident enough to try and paint my own eyes.  I did think about adding eyelashes but decided not to because I cut the bee’s face from textured cardstock.  I know my pen marks would have been all over heck and I would not have been happy.

The lettering was done using Craft Room Basics and Mickey Font.

BeeFlowers

All that was left was to adhere these pieces to the card.  I attached the bee first.   After he was adhered to the card, I glued the sentiment on and then the flowers.  My card looked like this.

GluingFlowers

To keep the front of the card closed, I tied a ribbon around it.

Card2

I’ll add a few more pictures, showing the card open and the tag part way out.  I am very happy with how it turned out — made me feel all the work was worth it.  I will cut this card base again — I can picture many uses for it.  And I will also make the bee again, but with a different sentiment.  My mom is no longer living and this is the first Mother’s Day card I have made since she passed away.  I will probably give it to a friend or relative.

GluingInside

TagPartOut

Card3

  • Cricut Craft Room
  • Cricut cartridges used:  Cricut Craft Room Basics, George and Basic Shapes, Create a Critter, Flower Shoppe, Mickey Font, Tags, Bags, Boxes & More
  • Cricut Imagine cartridges used:  Blast Off, Bubblegum Stripes, Hopscotch
  • Cuttlebug — Distressed Stripes folder
  • Ink
  • Chalk
  • Buttons
  • Ribbon

I’m going to add one last phot photo, which is a screen shot of my CCR file, to show what shapes I used to create the card base.  I hope this will help others wanting to re-create it.

ScreenShot

My First Mixed Media Canvas — Cricut Southwest Contest

I have been wanting to try my hand at creating a mixed media canvas for a while now.  Cricut’s latest contest for their new Southwest cartridge gave me the push to get started.  The inspiration for my project was a picture I pinned on Pinterest of a gorgeous white dream catcher.

I watched a lot of videos online trying to gather facts on what supplies I needed and how I wanted to proceed.  I made a run to Michaels for supplies before I started.  I needed a canvas and gesso, and I also picked up a few fun items to try.  I think my favorite was the modeling paste.

3


4

I laid my design out in Cricut Craft Room.  The first step was to paint the 8″ x 10″ canvas with gesso.  After it was dry, I cut out the dream catcher  at 7″ and border strips at .85″ from scrap cardstock so I could gauge where I wanted them on the canvas.  I lightly traced around the cuts with a pencil.

StepCanvasLayout

Then I added some cheesecloth to the canvas using a gloss medium.  When that was dry, I gave everything another coat of gesso.  Then I used two shades of Martha Stewart metallic craft paint to cover it.

StepCanvasPaint

For my borders, I cut the design using repositionable vinyl and made stencils.  I used the negative images for my stencils.  The stencils are the polka dot material in the pictures.  It is some vinyl I picked up on clearance.  Using the first stencil, I laid down some gunmetal metallic paint.  I would skip this step next time because I ended up covering that part of the design with some leather lacing.  I didn’t like the dark paint — it was too much of a contrast.

StepBorderDk1

In this picture you will notice the canvas looks different than the finished project. I had stamped some images on it that I decided to delete by covering with gesso and adding some more cheesecloth. I then painted the area to blend in with the background.

I laid down the turquoise color with the second stencil.  I put a layer of gesso first and then added two layers of color.  The final layer was a coat of Martha Stewart glitter paint.

StepBorderBlue

The third stencil is where I got to try the modeling paste.  I mixed some copper color into the paste and used a craft stick to smooth it over the stencil.

StepModelPaste1

I was so happy with how it turned out — the design is raised and after it dried it reminded me of pottery.

StepModelPaste


Before doing the last layer of the borders, I cut a stencil of the shadow of the dream catcher and stuck it on the canvas.  I mixed some glass bead gel with some glitter paint and spread it over the canvas.  This layer was pretty wet and it had to dry overnight.

StepGlassBeads


You can see the glass beads behind the web part of the dream catcher.  They give a really neat effect.

DCCloseup2


The final border stencil was a little tricky.  My first issue was weeding the correct vinyl — I kept pulling off the wrong areas.  The I had trouble getting it to stick on top of the modeling pasted.  It wanted to lift up, so I opted to add just a coat of copper glitter paint for the final coat, rather than changing colors completely.  I was afraid the paint would bleed and be noticeable if I went for a contrast.

StepBorderTopLayer


I was very pleased with the finished border.  The last layer added a subtle glitter design on the modeling paste.

BorderCloseup2

At this point I decided I did not like the stamped images I placed on the canvas earlier.  I painted over them with gesso and then added some more cheesecloth.  I went over the entire area with the metallic paint and blended the areas into the background.   I also glued some leather lacing along the edges of the border, covering the dark painted layer I had first stenciled on.  I was much happier with this look.

StepCheesecloth2

I used several layers to make the dream catcher.  I trimmed one layer so all I had was a circle and used that to tie on the trim and beads.  The top layer is also just the circle and I heat embossed it using a Fran-tage powder from Stampendous.  The web part is also heat embossed using a holographic powder.  I glued some small seed beads to it.  I added several layers of feathers and sketched in some lines using a marker.

StepDCLayers


This is what it looks like all put together.


DCCloseup

The flowers were cut at two sizes, 1.5″ and 1.25″.  I inked the edges and curled the petals under.  The flower centers are glass glitter from Stampendous.  I glued some feathers behind the flowers.  The owl was cut at 2″ and heat embossed with copper embossing powder.

Owl

The saying was printed using various fonts and cut apart into rectangles.  I inked the edges and glued them on the canvas.  It is actually a song lyric from Dream a Little Dream of Me, sung by Cass Elliott of the Mamas & Papas.

Here is a side view of the canvas, to give you an idea of all the texture and dimension it has.

SideView

While this project was very time consuming, I do want to try doing a canvas again.  With all the supplies I now own, I don’t have an excuse not to.

1

  •  Cricut Southwest cartridge
  • 8″ x 10″ canvas
  • Liquitex Gesso
  • Liquitex Modeling Paste
  • Liquitex Glass Beads
  • Golden Acrylic Glazing Liquid (used to blend background paints)
  • Martha Stewart acrylic craft paints:  Light Gold Metallic, Pale Bronze Metallic, Aquarium Pearl, Turquoise Glitter, Brownstone Glitter, Sunstone Glitter
  • Cheesecloth
  • Stampendous Fran-tage embossing powder
  • Stampendous Glass Glitter
  • Yarn
  • Beads
  • Feathers
  • Leather lacing (from Michaels)

Wild About You Onesie Gift Set Using Cricut Create a Critter 2


One of the more popular Cricut cartridges surely must be Create a Critter.  Provo Craft is giving users of Cricut Craft Room a sneak peak of one of their newest cartridges by making five cuts from Create a Critter 2 available for free. There is also a contest, which ends on September 5,  where you can enter your projects using these latest designs through the Cricut Project Center.

My project is a onesie gift set that includes a black onesie decorated with the lion and phrase designs from Create a Critter 2.  All were cut from heat transfer vinyl.  I constructed a box from Sweet Tooth Boxes and made a small gift card using the bird that is on the Icon tab of the lion feature on Create a Critter 2.

When using heat transfer vinyl, it is important to remember that you must mirror (flip) your images in Craft Room because you are cutting the back of the vinyl.  Then when you iron it on your garment everything is facing the correct way and you can read your phrases.

“Wild about U”  is cut from a holographic vinyl that I picked up years ago at a trade show — long before I knew what a Cricut was.   I fell in love with the sparkly rainbow colors and brought a roll home with me.  Unfortunately the vinyl did not come with application instructions, so I did some test runs before applying it on the onesie.  My first attempt at ironing it on produced negative results as I was getting it too hot.  I didn’t realize it and started increasing the time I was pressing, getting even worse results.  I finally dialed back on the heat and the time to get proper application.

The lion is cut from a vinyl that can be peeled hot or cold.  Because he has four layers, I applied him first.  I put down the first layer and pressed for only 4 seconds, immediately peeling off the backing.  I let that layer cool and then added the next.  Again, I pressed for 4 seconds and peeled.  I did this until all four layers were down.

When doing layers, you have to remember to cover up the vinyl that has already been applied and is no longer protected by the clear film.  I use a teflon sheet to cover my design before pressing each layer.

After the lion and the “about” from the phrase were in place, I then added the holographic phrase and applied it.

The gift box is from Sweet Tooth Boxes.  I cut the box that begins on page 10 of the handbook, using just the bottom and lid.  I hid the cut-out area in the lid and then added the shadow feature of the lion — so my box has a lion window to tie in with the theme of the onesie.

I printed the zebra paper for the box lid using my Imagine.  I used a bright purplish cardstock and printed the stripes using the Teresa Collin’s Black & White cartridge.  This put a lot of black ink on the paper, so I used a blow dryer on it and then I let it dry for over an hour.  When I rubbed my fingers on it, the black was still smudging, so I gave it a coat of clear matte spray.

Because Cricut Craft Room does not work with the Imagine, I used my Imagine only to print the paper.  I then transferred the paper to my Expression and cut the lid.  I scored all the lines on the box and lid and assembled them, adding a layer of clear acrylic to form the window of the box.

A gift card was created using the shadow feature and welding two shapes together at the top of the head.  I used two Cuttlebug folders on the bird, Charles (a chevron design) and Swiss Dots.   I did the layers on both the front and back of the card, as I wasn’t sure which way I wanted him facing.

I added a white layer to the inside of the card so there would be a place to write a message.

To finish off the box, I dyed some seam binding using Tattered Angels Glimmer Mist and Adirondak Color Wash.  I scrunched it up while it was wet and let it dry.  Then I tied a bow and made a couple of ribbon roses to add in the middle.

  • Cricut Craft Room:  Create a Critter 2, Sweet Tooth Boxes
  • Cricut Imagine:  Teresa Collin’s Black & White cartridge
  • Cricut Expression
  • Cuttlebug:  Charles and Swiss Dots
  • Tattered Angels Glimmer Mist
  • Adirondak Color Wash

Butterfly Kisses Baby Girl Card


The weekly challenge on the Cricut Circle Blog is a card sketch challenge and you must use at least two Cricut cuts.  I thought I’d make a card on my Imagine, since I haven’t made a complete project using the Imagine.

I decided to make a baby card,  even though I don’t know anyone who is having a baby right now.  But it will be good to have on hand.  Again, for no particular reason, I made the card for a baby girl.

I used the Cricut Imagine cartridge Nursery Tails for this card.  All the paper is from this cartridge, as are the pink socks and the Butterfly Kisses title.  I embossed the brown floral background and the pink contrast strip with my Cuttlebug.  I cut the images in layers and inked around all the edges.   I added some ribbon, attached the socks with foam pop-dots and added three pearls by the tag.

For the inside of the card, I used a Cuttlebug die for the “Welcome Baby” and the bib is from Nursery Tails.

This is a fairly simple card, but I like the way it turned out.

  • Cricut Imagine Cartridge Nursery Tails
  • Cuttlebug
  • Ribbon, pearls

Cricut Circle National Scrapbook Day Crop Color Challenge: Beach Pail Gift Card Holder


To celebrate National Scrapbooking Day ( May 5), the Cricut Circle blog hosted a two-day online event.  There were challenges, tutorials, games, question-and-answers sessions — all kinds of fun.   Unfortunately I was not able to “attend” much of the live portion, but I did manage to make a project for one of the challenges.

When the Circle blog event was posted, I had just finished making eight beach pail gift card holders for a Kelly doll convention (Kelly is Barbie’s younger sister).  So I decided to make another one for the Color Challenge.  The challenge was to create a project using the color inspiration that they provided, which is shown below.  You had to use at least two Cricut image cuts on your project.

This is the picture the Circle blog provided for the color inspiration:

I made this card so that the sand section pulls out of the pail, similar to the flower pot cards where the flowers pull out.  I laid out the entire design in Design Studio.  I used Life is a Beach cartridge for the pail and shovel.  I glued around the outside edges only, leaving the oval section at the top open so the pocket holding the gift card would slide in.  I welded a rectangle from George & Basic Shapes to the sand to form the holder.

All the solid cardstock is from Bazzill and the printed pattern paper is from Graphic 45’s Tropical Travelogue collection — such beautiful paper!  I made the trim on the rim of the bucket using the patterned paper and cut the handle from a darker shade of cardstock.  The sand is cut from some glittered cardstock I bought at my local Joann’s.

Here is a picture showing the sand pulled out of the pail — holding the gift card.

And another picture, showing  a close up of the gift card holder.

I decided to add a small tag to the card, so there would be a place for some writing.  I welded two shell shapes from Picturesque together to form the tag.  The top detail piece on the shell is cut from a piece of off-white glitter cardstock.  The shell flips open and there is a space on the top and bottom for some writing.

  • Cricut Cartridges:  Life is a Beach, Picturesque, George & Basic Shapes
  • Graphic 45 Tropical Travelogue paper
  • Bazzill solid color cardstock
  • Glitter cardstock


2nd Banner Entry for Cricut Expression 2 Design Challenge


The second banner that I made for the HSN design challenge does not use any paper or cardstock — I decided to create a banner using heat transfer vinyl and applique.    I “hung” my banner on a gray Bella sweatshirt.  This was my first time cutting heat transfer vinyl and fabric with the Cricut and I was so impressed with the results.

This was a last-minute entry.  I had been working on the layout and design for a couple of days, but it got down the the weekend before the challenge ended before I was able to start cutting.  I stayed up all night to finish the sweatshirt so I could get it to the post office in time to meet the deadline.   I wish I had better pictures of it.

Back6

The banner is cut from black twill using the B is for Boy cartridge.  And, yes, I cut it on my Cricut!  I then cut the banner pieces from heat transfer vinyl (love the lime zebra print) and applied the pieces on my black banner base.  The Cricut lettering is from the Cricut Everyday cartridge.  From there I embroidered two hearts and some strings on my sweatshirt and then appliqued the banner pieces onto the heartstrings using a heavy satin stitch.

I also cut a large sunburst design from Ornamental Iron 2 to apply above the banner.  I used two semi-circles and welded them together in Design Studio.  I cut this design from a metallic heat transfer vinyl.  Here are two close-up pictures of the back.


To decorate the front of the sweatshirt I again used Ornamental Iron 2.  I cut a scroll design for the right front and added the word “Create” using Paper Lace II.  They are cut from two different shades of metallic heat transfer vinyl but both look silver in the picture — probably from the flash.  I cut a winged heart design for the left front using the Rock Princess cartridge and the lime zebra print and silver metallic vinyls.

  • Cricut cartridges:  B is for Boy, Cricut Everyday, Ornamental Iron 2, Paper Lace II, Rock Princess
  • Heat transfer vinyl
  • Black twill