The Fall Mini Album I Received


I joined a Fall Mini Album Swap on the Cricut Circle Message Board.  We were to make a mini for our partner, as well as do some shopping for them.

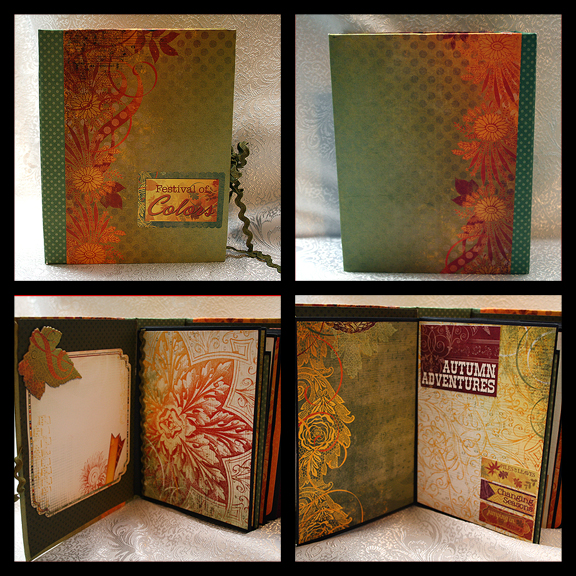
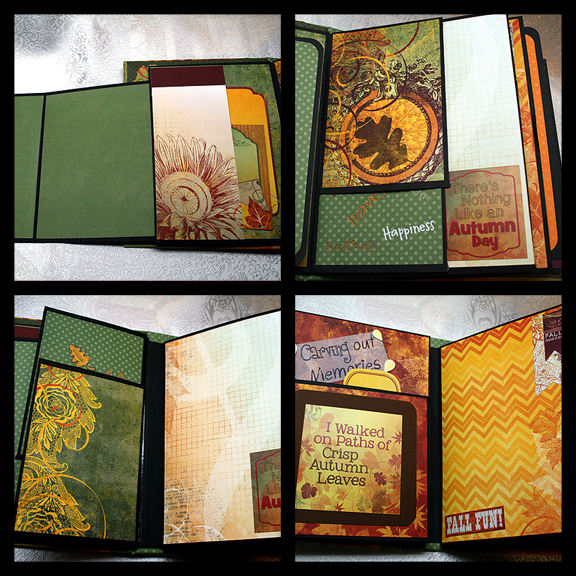
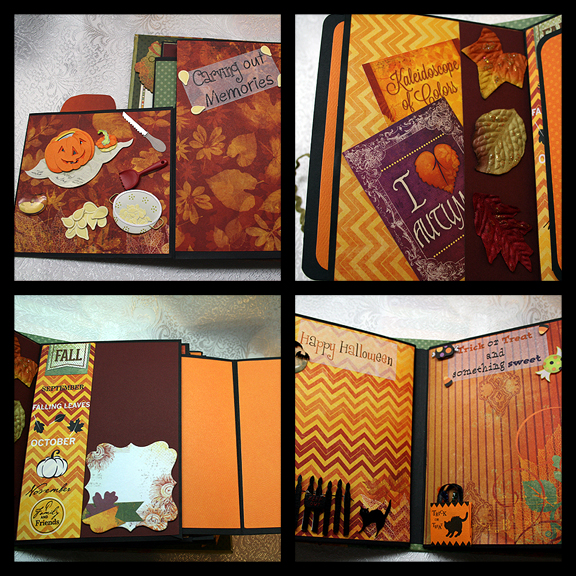
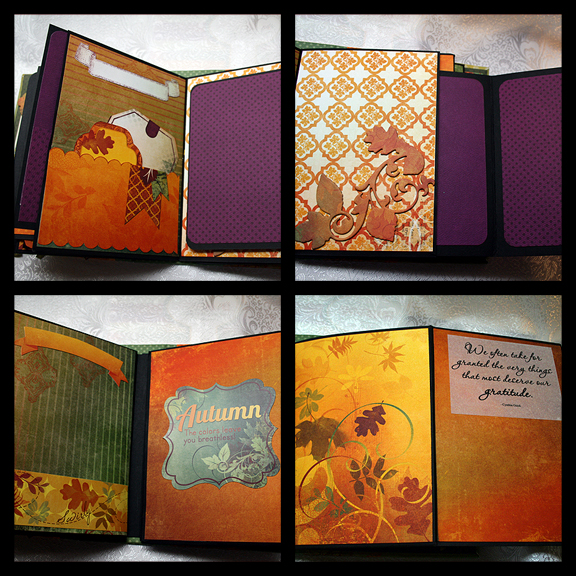
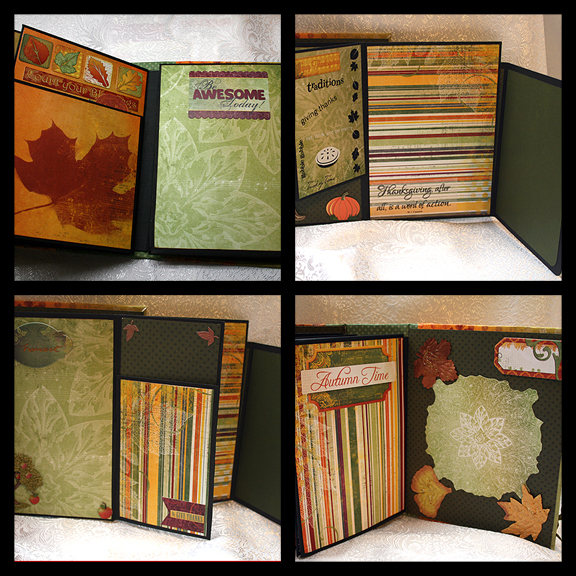
I want to share the beautiful mini album I received, plus a lot of goodies.  My swap partner was Barb, Oswaltb on the Message Board.  The album she made is not too mini — it’s pretty good sized.  She used BoBunny’s new Autumn Song collection.  I took a lot of pictures — so I can show each page.


1


2


3


4


5


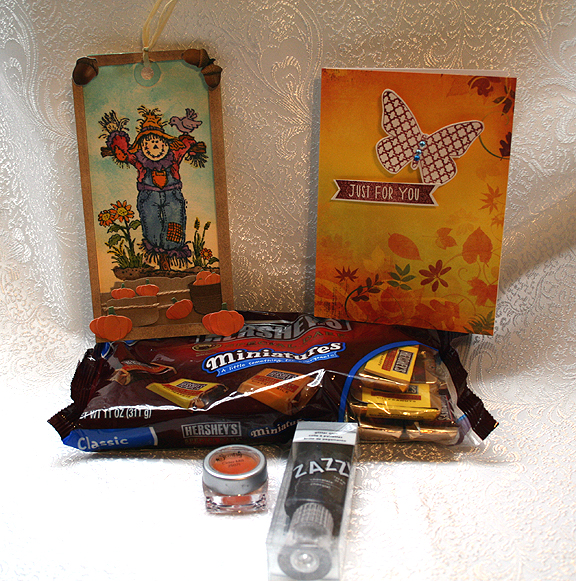
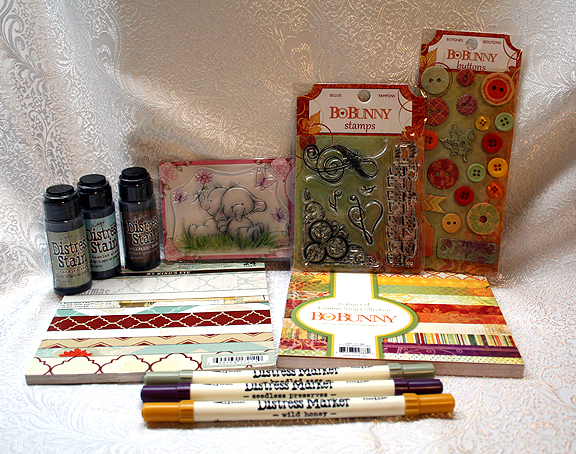
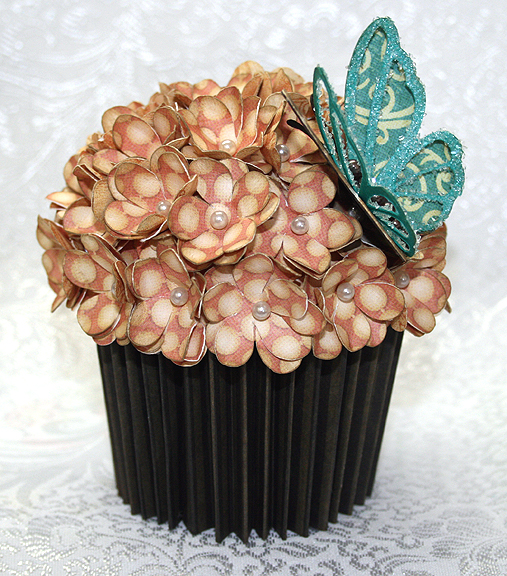
And here are a couple of pictures of the goodies Barb sent me.  She made a card and a tag, too!

CardTag

Gifts 

Thank you so much, Barb.  I love my mini and all my gifts.

Open Book Easel Card


I made this card a while ago to send to a lovely lady on the Cricut Circle Message Board who was celebrating her 65th birthday.  I wanted to create a special card for her and first set out to make one using a Bookatrix Board.  I picked one up on eBay a long time ago and have yet to use it.  It’s basically an embossing board and you emboss the edges of the pages for the book and then cut them out by hand.

As I sat reviewing videos on YouTube on how to use the Bookatrix Board, I couldn’t help but wonder why I couldn’t do something similar with my Cricut and not have to cut everything by hand.   So this is my attempt at “Cricut-izing” a Bookatrix card. And I have to say I am very happy with how it turned out.

Thumb

The solid cardstock is Bazzill and the printed papers are all from Graphic 45’s Secret Garden collection.  And because I want to remember how I made this card, I am posting a little tutorial.

Front4 

The book is from the Summer Celebrations Cricut cartridge and is the card feature.  I put it on my mat in Cricut Craft Room (CCR) and made the measurements 8″ wide by 5.5″ high.  I took two lower case “v”s from Cricut Craft Room Basics, turned them upside down and welded one into each upper corner to hide the notches that are in this particular cut.  I also hid the score marks that are in the center of the book.  This is layer one (the back layer on the card) — I guess you would call it the cover.

Next is the middle layer.  I copied and pasted the first (cover) layer onto another mat and made it 7.75″ wide by 5.25″ high.  I did the top (third) layer the same and it measures 7.5″ wide by 5″ high.  I cut out all three of the layers.

I laid the top and middle layers (the pages) on my scoreboard along the width and found the center.  Then I scored a line 1/4″ on both the left and right side of center.  This enables you to fold the pages up slightly and have them sit away from the cover. It is also the area that you will be gluing to attach the layers together.  I distressed the edges of the pages only (the middle and top layer) and then inked them.  I took a dowel about 1” in diameter (from Lowe’s) and curled the pages under, curling one layer at a time.

Dowel

The base for the easel card is a piece of solid cardstock that measures 7″ wide by 10″ high.  Lay the 10″ side on a scoreboard and score at 2 1/2″ and at 5″.  It should look like this unfolded.

BaseUnfolded

And here is how it looks folded.

BaseFolded2

Cut the remaining pieces.  The frames on the pages (for the owl and verse) are from Elegant Edges and cut at 3″.  The label where I heat embossed “Happy Birthday” is from Cricut Craft Room Basics and I fiddled with the dimensions to get something that would fit in the area I had to work with on the base of the card.  The bottom layer measures 5″ wide by 2.75″ high.  The middle layer is 4.75″ wide by 2.5″ high.  And the top layer is 4.5″ wide by 2.25″ high.

The mat for the easel card base is 6 3/4″ wide by 4 3/4″ wide.  I used a corner punch on the front two edges.  This is what your pieces should look like.

Pieces

To assemble the card, I first attached the book cover (layer one) to the easel base.  I centered it across the width and had the bottom edge of the book even with the edge of the base.

Adhere the middle and top layer together, putting the adhesive in the 1/2″ center area created by the two score marks. Before attaching the pages to the cover, lay ribbon down the middle and attach it on the back of the pages at the top and bottom. Adhere the pages to the book cover in the center only.

Assemble the frames, using whatever cuts/designs you wish in the middle.   I used the dowel to curve the frames just a little so they would conform to the pages.  The computer-printed verse is a layer of the frame.  I adhered the frames to the pages before adding the owl.  I used the owl from Disney’s Happily Ever After, cut at  2″, and attached it with foam dots.

The daisies are from the Flower Shoppe, cut at 1″.  The roses are from the Paisley cartridge.  I posted a card here where I give the measurements and a link to a tutorial on how to make the roses.  Both are cut from cream-colored cardstock and I inked the edges with distress ink to add color.  The center of the daisies are Stickles.

This is what it looks like up to this point, lying flat and minus the owl.

Unassembled

The “Happy Birthday” label is popped up on foam dots and is what holds the easel card up.  I added a bow at the top of the ribbon in the center.

The greenery around the flowers is from a Martha Stewart punch, as are the butterflies.  I attached a little gold key charm on the “Happy Birthday” label, which you can barely see in this picture.  Oh, I also added a pearl to each corner in the front.

Front2

This is a side view of the card, so you can see how it stands.

Side

And this is what the completed card looked like folded flat.

FoldedFlat

Because my card would not fit into a standard envelope, I made a little box for it to sit in.

InBox


Boxed

At some point I will probably post this in Cricut’s Project Center and will attach the file.  In the meantime, I hope you enjoy this little tutorial.

Front5

  • Cricut cartridges used:  Cricut Craft Room Basics, Disney’s Happily Ever After, Elegant Edges, Flower Shoppe, Summer Celebrations
  • Bazzill cardstock
  • Graphic 45 Secret Garden collection
  • Martha Stewart punches
  • Ribbon
  • Key charm
  • Stickles

Greetings From California Card


There is a challenge on the Cricut Circle Message Board to create a project using the new Circle cartridge, Charmed.  And the challenge has turned into a battle between the teddy bear image and the pig image. While the pig  is very cute, I had to do a teddy bear.

Since I am a native Californian, I decided to make a California bear.  We have a bear on our flag — a grizzly bear.  While we no longer have grizzly bears in California, I made this little brown bear greeting everyone from California.

Front


The background is printed from one of my clipart collections I got from PC Crafter.  It was a wonderful site that had lots of great clipart.  Unfortunately, it ceased operating a while ago and the website is no longer available.

The bear is cut from the Charmed cartridge at 2.5″.  I inked and chalked him.  Then I decided to give him a t-shirt, featuring two of my favorite characters — who just happen to be a bear and a pig.  It’s Pooh & Piglet!  I hand cut the t-shirt and inked the edges.

Here is a close up of the graphic on the t-shirt.

ShirtCloseUp

This was a quick and easy card to do — and it was fun.  Now to go post it before the midnight deadline hits.

  • Cricut Charmed cartridge
  • Kraft cardstock for card base, scraps for bear
  • Ink and chalk

Bee Towing Banner Thank You Card


I made this whimsical card for the weekend challenge on the Cricut Circle Message Board.  The challenge is to make a project using a sun.

The card measures 6″ x 6″ and the background is printed from a graphic I purchased when I was a member of the PC Hug Club.   Unfortunately, that site no longer exists — I wish it did because they had some really cute clipart.

FrontSm

The sun is cut from Gypsy Wanderings at 2″ and embellished with some Stickles.   The bee is from Creative Critters 2 and it is cut at 1.75″.  I trimmed the hearts off the ends of the antennae and added pompoms.   I added some Stickles around the edge of the wing.  The bee’s face is a Peachy Keen stamp.   I inked and chalked the face.

The banner is cut from New Arrival (it is the banner with the plane) and it is cut at 1.5″.  I inked the banner and added a stamped sentiment from one of the many Studio G $1 stamps that are in my collection.   I used DMC Memory Thread for the banner’s tow ropes.

Front5

For the inside of the card, I used another graphic from my clipart collection.

Inside

  • Cricut cartridges:  Create a Critter 2, Gypsy Wanderings, New Arrival
  • Provo Craft clipart
  • American Craft cardstock
  • DMC Memory Thread
  • Stickles
  • Ink, chalk
  • Peachy Keen stamp
  • Studio G stamp
  • Pompoms

Herd It’s Your Birthday


My hubby (Steve) has an uncle who will be celebrating his 95th birthday on Sunday.  His family is having a card shower for him and my SIL sent me an email asking if I would make Uncle Donald a birthday card.  I remembered stories Steve told me about visiting Uncle Donald on his farm.  He had dairy farm, so I thought I’d make a card with a cow on it.

When I asked Steve what he thought about my plan, he said a cow would be fine, but make it a Holstein as that is what Uncle Donald had.  OK, a Holstein?  I looked up Holstein and luckily it is the cow I had in mind — a black and white one.  Since I like whimsical critters, I wanted to use the cute cow on the Cricut Paper Doll Dress Up cartridge.

The pictures of the Holsteins that I saw showed the cows without horns.  I read that the horns are removed when they are young calves.  Since the cow on Paper Doll Dress Up has horns, I just did some trimming before assembling her.

CowSm

All of the cardstock is Michael’s Recollection brand.   I cut the cow at 4″ and did some inking and chalking on her. The spots are from the cow on the Animal Kingdom cartridge, along with the little top knot of hair.   The barn is from Create A Critter, cut at 2″.  The sun is also from Create a Critter cut at 1 1/2″.   The sunflower is from Walk In My Garden and the little patches of grass are from Create A Critter.

Cow3

Oh, I almost forgot the sentiment.  It is a stamp from Elzybells Art Stamps.  It came with some cute sheep stamps in a set called Jump for Joy.

Cow4

  • Recollection cardstock
  • Cricut cartridges:  Animal Kingdom, Create A Critter, Paper Doll Dress Up, Walk In My Garden

Chalkboard Birthday Card


I was inspired by chalkboard art on Pinterest to create this birthday card for my sister-in-law, using Cricut’s new Chalkboard Fonts cartridge. When I first saw this cartridge, I didn’t know that much about chalkboard art or how popular it is right now.  Now it is one of my favorite cartridges.

The solid  cardstock on this card is the Recollection brand from Michaels. The patterned paper on the banner was printed on my Imagine using the Blossom and Imagine More Cards cartridges.  The leaves are from a scrap of Graphic 45 paper.

FrontSm

The card is 5″ x 7″, matted with a white layer.  The black (chalkboard) layer is inked with white on the edges.  I also lightly smudged white ink on the front so it looks like an actual blackboard.  The lettering and swirls are all from the Chalkboard Fonts cartridge, cut from vinyl.

Front10

The banner is from the Birthday Bash cartridge, cut at 1.25″.  For the letters on the banner, I used a Cuttlebug Embossing Plus folder called Monogram Seals.  I inked the letters with black ink.  The banner is hung from the card with DMC Memory Thread.  I added some ribbons and bows and curled the ends of the Memory Thread by wrapping them around a chopstick.

Banner

 The flower is also made with the Cuttlebug, using the Daisy quilling kit.  The petals are light yellow, inked with pink on the edges.  I brushed Glossy Accents on the completed flower and sprinkled it with coarse, clear glitter to add some sparkle.

Flower

 I will make a box for this card, since it is a little bulky to place in an envelope, and send it to my sister-in-law.  I hope she likes it.

Front7

  • Cricut cartridges:  Birthday Bash, Chalkboard Fonts, Imagine Blossom and Imagine More Cards
  • Cuttlebug:  Monogram Seals Embossing Plus folder, Daisy quilling kit
  • Vinyl
  • DMC Memory Thread
  • Ink
  • Ribbon

Chalkboard Father’s Day Card


This is a quick and fun card I created for Father’s Day using the new Cricut Chalkboard Fonts cartridge.  I was inspired by some chalkboard art that I saw on Pinterest.

The card is a standard A2 size (4 1/4″ x 5 1/2″).  On the black cardstock, I inked the edges with white ink.  While doing so, I managed to smear the ink all over myself — and on the front of the cardstock, too.  So I took a sponge and lightly went over the front to make it look like a chalkboard that had recently been erased – which is the look I was going for anyway.


Front

The dad is from the Cricut Car Decals cartridge.  I like the way the Chalkboard Font looks with cuts from the decal cartridges.

The font I picked to use on “Father’s” has lots of very small pieces.  Because I knew I would never be able to glue all those small pieces of cardstock to the front of the card, I chose to cut everything from vinyl.  I still had to be very careful when weeding the vinyl to make sure those small pieces stayed in place.

Front3

  • Cricut cartridges — Car Decals, Chalkboard Fonts
  • Vinyl
  • Ink

And The Winner Is……

After numbering the comments, I used random.org to pick a number for the winning comment on the What’s It Owl About? challenge. And the winner is……

#1 — Beth

Congratulations, Beth!!  Please email me at mrstrid@aol.com and I will get your Graphic 45 goodies to you.

Thank you all for your wonderful comments!!

Circleville NSD 2013 – Did-I-Mension? Challenge


Here is my project for the Circleville Did-I-Mension challenge hosted by Renee.  Be sure and check out her blog and see the beautiful boxes she made for this challenge.

Renee challenged us to created a 3D box, bag or some other project.  Since I had just finished making my cupcake for the previous challenge, I thought a box to put the cupcake in would be the ideal project to make.  I used Sweet Tooth Boxes to cut my box, using the Cube Box cut at 11.5″.  All the cardstock used to construct the box is from Bazzill.

Set8

It didn’t take too long until I realized I was faced with a challenge.  I could only make a box that would fit on a 12″ x 12″ piece of paper.  I needed a square box and I could get the size I need (barely) for the cupcake to go inside, but I couldn’t get  it tall enough.  I spent a good two hours going back and forth on what to do.  I was looking at making something completely different for my project, but I kept coming back to the cupcake because I really needed a box.

Box3

I finally decided to see if I could add a separate piece of cardstock to the top of the box without it looking too funky.  I cut 2″ strips and had to piece them together to get four 4″ sides.  I used a Martha Stewart punch on the bottom edge.  I think it is called Laurel Leaf.   This is what the box looks like without the lid.

Box

The added piece gave me the height I needed, but I’m not too sure on the overall appearance.  I think it looks OK.  I made a rosette to put on the lid, using the Graphic 45 paper from the cupcake.  I then added a bow to the rosette.

Set8

  • Cricut Cartridge – Sweet Tooth Boxes
  • Bazzill cardstock
  • Martha Stewart Laurel Leaf punch
  • Ribbon

Circleville NSD 2013 — On Pins Challenge


I just completed this cupcake for the On Pins Challenge that was hosted by Sis.  Be sure and check out her blog to see the beautiful mini album she made for her project.

The challenge was to make a pin-inspired project.  I had no trouble deciding which pin I was going to use.  It is the one here.   I wanted to make one of the cupcakes.  Miranda has some gorgeous projects on her blog and I was lucky because she had a video on how to make the cupcake.  You can find the link to her video on her blog here.

CC2

I followed Miranda’s directions, except that I cut the flower petals with my Cricut rather than using a punch.  I used George and Basic Shapes <Flower2>, cut at 1.125″ and I hid the center hole in CCR.  I ended up using more than one 12″ x 12″ sheet full of flowers.  I think I placed mine a little closer together than Miranda did.  I used pearl pins I got at Joann’s to place the pins on the stryofoam.  The paper is all from Graphic 45.

The cupcake opens and inside is a little banner that says “Happy Birthday.”

Open

I cut the banner from Birthday Bash at 1.5″ using the print Graphic 45 paper.  I cut the shadow layer from Bazzil cardstock.  I threaded it together using some DMC pearl cotton.  The letters are from a Cuttlebug Plus Embossing folder, Monogram Seals. I inked the letters with Distress Ink.

Banner2

I also made a box for the cupcake for a different challenge.  I will share a picture here, but will put the details for the box in my next post.

Set

The butterfly is from Martha Stewart Elegant Cake Art and was cut at 2″ from Graphic 45 paper.  I cut several layers and on the top layer I added some coarse crystal glitter.  I put brown pearls on the body.

CC3

  • Cricut cartridges used:  Birthday Bash, George and Basic Shapes, Martha Stewart Elegant Cake Art
  • Cuttlebug Plus Monogram Seals embossing folder
  • Graphic 45 paper
  • Bazzill cardstock
  • Pearl pins
  • Coarse crystal glitter
  • Distress Ink
  • 3″ stryofoam ball
  • 9 oz paper cup
  • Brown adhesive pearls
  • DMC pearl cotton