Herd It’s Your Birthday


My hubby (Steve) has an uncle who will be celebrating his 95th birthday on Sunday.  His family is having a card shower for him and my SIL sent me an email asking if I would make Uncle Donald a birthday card.  I remembered stories Steve told me about visiting Uncle Donald on his farm.  He had dairy farm, so I thought I’d make a card with a cow on it.

When I asked Steve what he thought about my plan, he said a cow would be fine, but make it a Holstein as that is what Uncle Donald had.  OK, a Holstein?  I looked up Holstein and luckily it is the cow I had in mind — a black and white one.  Since I like whimsical critters, I wanted to use the cute cow on the Cricut Paper Doll Dress Up cartridge.

The pictures of the Holsteins that I saw showed the cows without horns.  I read that the horns are removed when they are young calves.  Since the cow on Paper Doll Dress Up has horns, I just did some trimming before assembling her.

CowSm

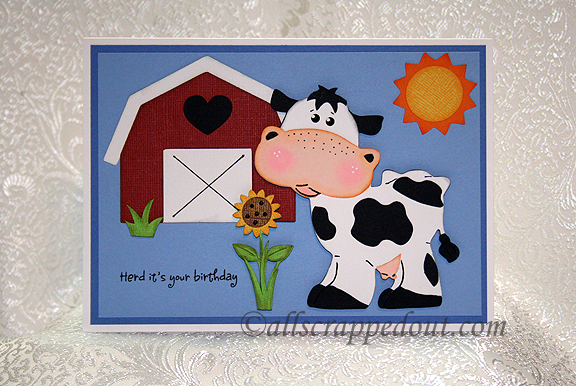
All of the cardstock is Michael’s Recollection brand.   I cut the cow at 4″ and did some inking and chalking on her. The spots are from the cow on the Animal Kingdom cartridge, along with the little top knot of hair.   The barn is from Create A Critter, cut at 2″.  The sun is also from Create a Critter cut at 1 1/2″.   The sunflower is from Walk In My Garden and the little patches of grass are from Create A Critter.

Cow3

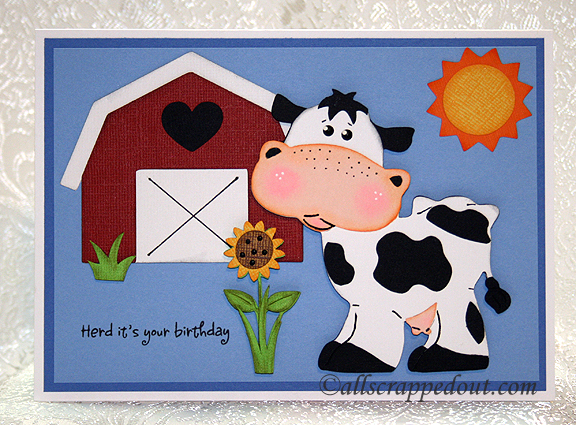
Oh, I almost forgot the sentiment.  It is a stamp from Elzybells Art Stamps.  It came with some cute sheep stamps in a set called Jump for Joy.

Cow4

  • Recollection cardstock
  • Cricut cartridges:  Animal Kingdom, Create A Critter, Paper Doll Dress Up, Walk In My Garden

Circleville NSD 2013: It’s All About Perspective Challenge and E-I-E-I-O Challenge


On this project, I combined challenges.  I was making a card for the E-I-E-I-O challenge, hosted by Jenny.  She wanted us to make a project using a barnyard animal.  When I took a close look at the cut pieces, a light bulb went off — I thought this would also be a good project to do for Nadia’s challenge.  She has an excellent tutorial on how to add perspective to flat die cuts.  Be sure and check it out on Nadia’s blog.  Her challenge is to make a project using some of the techniques she shows in her tutorial.

So, I would like to present to you the premiere of………………

EXTREME MAKEOVER:  FDC EDITION

A flat die cut (FDC) is just that — flat.  This case presented itself when it landed on my desk after coming off the Cricut mat.  I looked at it and said to myself “this cut could definitely benefit from Nadia’s ideas.”  Something I really enjoyed in Nadia’s tutorial was her before and after photos.  So I took a photo of my die cut (from the County Fair cartridge), without any enhancement, as it went together after coming off the mat.

Before

It’s cute, but it could be so much more.  I began with the fence, which was cut at 2.25″.  I added some grass to it by welding the shapes in Cricut Craft Room.  The grass is also from County Fair, cut at 3″.  I cut several of the same fence shapes so I could cut them apart and use only the pieces I wanted.

FencePieces

 I took extras of the upright pieces and inked them.  Two of them, the second from the left and the far right, I inked darker because I wanted them to look like they are farther away.  I adhered them to the fence.

Then I began working on the cross pieces.  I inked the edges and ran them through the Cuttlebug using the Distress Stripes folder.  Because the paper was not real thick, I doubled the layers on these boards.  I then began attaching them to the fence.  I glued one end with liquid glue and put a piece of foam on the opposite end.  Where the boards attached to the uprights that were farther away, I adhered that edge with the liquid glue.  Where the boards are supposed to be closer to the viewer, I attached that end with the foam.  I ended up with sort of a zigzag effect.  When I finished gluing the boards on,  I inked the edges of the grass and adhered the pieces to the fence.

Fence

Next up was the little chick.  

PlainChic

He is cute as is, but this little guy wanted some major work done.  I began with several layers, as I knew I would be doing some nipping and tucking.  He was very happy when he started getting inked.  I cut a separate head from one of the layers and inked it.

He wanted a  beak job done, but I recommended a little tuck instead.  I creased his beak in the middle and folded it. Then I adhered it to his face  and he ended up with some nice dimension.

The comb (his topknot) was next.  I cut two slightly larger than the original piece and cut those into separate sections.  I then adhered the three layers of the comb.  This was a microscopic procedure, done under my lighted magnifying glass because the pieces were so small.

Now we came to what was perhaps the chick’s biggest issue — his wings.  In the original cut, he has no wings.  Just sort of an outline of wings.  This little guy had more than wing envy, he had a wing obsession.  He wanted me to do wing transplants, but in my opinion that would be too drastic.  Without ruffling his feathers, I explained that wing transplants aren’t what they’re cracked up to be.  I thought wing extensions would be a better solution, especially since the little guy is still a spring chicken.

I found some feathers from Paper Doll Dress Up and cut several of those.  I inked the edges and then attached them to the chick, gluing only the top of each feather.  The only procedure left to perform was attaching his new head.  I glued the head even at the top and popped up the chin area (do chickens have chins?) with a pop dot.

As for his new look, the chick is very pleased.  In fact, he happier than a rooster in a hen house.  So let’s pull those curtains back and take a look at the results………..

Chick

I photographed the chick alongside a ruler so you can see his size.  Altering small cuts and have a big effect.  He ended up being about three layers thick.  Here’s a before and after photo of the entire cut piece.

BeforeAfter2

Since the chick now has something to crow about, I decided to use that as the sentiment on my card.  Nadia explained in her tutorial about atmospheric perspective and how you can lose the effect you create in altering your cut by putting it on a background with a lot of detail.  I decided to go with a plain background.  I thought about embossing the background but decided I didn’t want that distracting from my fence and chick.  I used a pale blue and inked the edges.

Front

The sentiment is from Just Because Cards, cut at 5″.  The sun is from Pooh and Friends, cut at 1.5″ inches.  For the sun, I used another of Nadia’s ideas.  The orange layer was very bright and I thought it was distracting.  It seemed to draw my eye to that corner.  So I cut a piece of vellum and adhered it over the orange.  Although the orange still looks bright in the picture, it is actually more subdued.

Sun

I had a lot of fun with this project and I guess I should apologize for all the chicken puns.  Thank you, Jenny, for your fun challenge!

Front3

  • Cricut cartridges — County Fair, Just Because Cards, Paper Doll Dress Up, Pooh and Friends
  • Ink
  • Foam dots
  • Vellum

Easter Bunny Inside His Jelly Bean Seed Packet Card


This was a fun card to make.  I wanted to make an Easter card so I could enter it in Jitterbuggin’s Spring Fling contest.  We had extra time to complete this challenge, but I waited until the last minute and am getting this in just under the wire.  It took a while for me to take my concept and come up with a finished project.   This time the challenge is open to voting, so that part is new to me. 

I was inspired by the movie Hop — I loved it and can’t wait for it to come out on DVD.  But my little bunny has to use seeds for his beans as he does not have the talent EB does when it comes to producing jelly beans.

I was a member of PC Hug Club for many years and received some very cute clip art each month.  Because I have such a large collection and never use it, I decided I was going to print my own paper to make this card.  All the background prints are images that I printed on an inkjet printer.  I really like using the clip art because I can resize it — so a 12″ x 12″ background can be reduced to 6″ x 6″ to make a card.  The size of the print becomes smaller too, so it is perfect for cardmaking. 

Fantabulous Cricut has a challenge called Do the Bunny Hop! this week that I will enter this card in.  You have to create a project using a rabbit or chick.

Also, at Cooking With Cricut, their challenge is called Cash in Your Stash and you are supposed to use things in your stash — items that you have had for at least a year.  My clip art collection certainly qualifies, and I also used scraps that I have had for ages to make the bunny and the grass.

I made the seed packet in Adobe Illustrator.  I am such a beginner using that program and was thrilled when I actually made something with it.  I made it a complete packet so I could slip the bunny inside. 

Making the jelly beans was probably the most time-consuming aspect of the card.  I first did an online search to see if I could find a Cricut cut file for a jelly bean as I was pretty sure there were no jelly beans on any of the Cricut cartridges.  I found a post where someone said they made a jelly bean using the George and Basic Shapes cartridge, using the crescent and heart shapes.    I used the same shapes and laid the beans out in Design Studio.  I cut the jelly beans from white cardstock and then colored them with Copic markers.  I applied two layers of Glossy Accents to give the beans their shine. 

The bunny is from the Paper Doll Dress Up cartridge — he’s the bunny from the magician’s costume.  I made a bow for him from seam binding that I spritzed with Glimmer Mist.  The grass is from Create a Critter.  I cut two layers of the grass for each clump so the jelly beans could be seen growing between the layers.  After I placed the bunny inside the seed packet, I pop dotted the entire piece on the front of the card.

Side view showing some of the dimension of the card.

For the inside of the card, I used a stamp from a clear set that I picked up at a scrapbooking expo several months ago.  It came with the rhinestones that I put inside the stamped flowers.  I added another clump of grass with some more jelly beans.


  • Cricut cartridges:  George & Basic Shapes, Create a Critter, Paper Doll Dress Up
  • Cricut Design Studio
  • PC Hug Club clip art
  • Copic markers
  • Glimmer Mist
  • Rayon seam binding

Challenges:

Jitterbuggin — Follow the sketch, make an Easter card and use a Cricut cut somewhere on your card.

Cooking With Cricut — Use stuff in your stash, items that you have had for a year or more.

Fantabulous Cricut — Use a bunny or chick in your project.

Speedy Turtle – Fantabulous Cricut Challenge Blog – Challenge #36 Achoo!

Here is my card for the current challenge at the Fantabulous Cricut Challenge Blog, which is to make a project that has something to do with being sick.  I don’t know why, but this challenge stumped me.  I couldn’t think of anything exciting that I wanted to make.  I started several different projects before the light bulb finally went off and I had a clear vision of what I wanted to make.

The card base is Bazzill cardstock, the patterned paper is Basic Grey, and the solid that the turtle is cut from is Stampin’ Up.  I cut the turtle using my Cricut and the Create a Critter cartridge.  Since I am wishing the recipient a speedy recovery, I figured I needed to give my turtle some running shoes so she could speed things up a bit.  I cut the shoes from My Community and laced them up with some white cording that I found in my stash.  I used the Cuttlebug embossing folder Swiss Dots to emboss the bottom edge of her shoes.  I also gave her a hat, which I cut from Paper Doll Dress Up.  The label that the sentiment is printed on is from a Lite cartridge, Lacy Labels.  I used Create a Critter for the flowers and the tufts of grass.  I added pearls to the centers of the  flowers. 

The flowers on the inside of the card are also from Create a Critter. 

  • Bazzill cardstock
  • Stampin’ Up cardstock
  • Basic Grey designer paper
  • Cricut cartridges:  Create a Critter, Lacy Labels (Lite), My Community, Paper Doll Dress Up
  • Cuttlebug Swiss Dots embossing folder
  • Pearls
  • Cording from my stash