2nd Banner Entry for Cricut Expression 2 Design Challenge


The second banner that I made for the HSN design challenge does not use any paper or cardstock — I decided to create a banner using heat transfer vinyl and applique.    I “hung” my banner on a gray Bella sweatshirt.  This was my first time cutting heat transfer vinyl and fabric with the Cricut and I was so impressed with the results.

This was a last-minute entry.  I had been working on the layout and design for a couple of days, but it got down the the weekend before the challenge ended before I was able to start cutting.  I stayed up all night to finish the sweatshirt so I could get it to the post office in time to meet the deadline.   I wish I had better pictures of it.

Back6

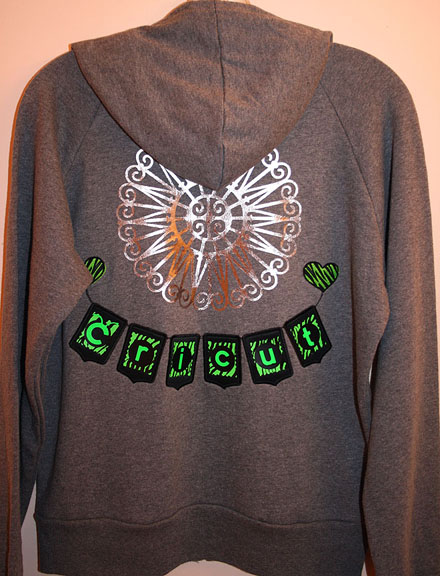
The banner is cut from black twill using the B is for Boy cartridge.  And, yes, I cut it on my Cricut!  I then cut the banner pieces from heat transfer vinyl (love the lime zebra print) and applied the pieces on my black banner base.  The Cricut lettering is from the Cricut Everyday cartridge.  From there I embroidered two hearts and some strings on my sweatshirt and then appliqued the banner pieces onto the heartstrings using a heavy satin stitch.

I also cut a large sunburst design from Ornamental Iron 2 to apply above the banner.  I used two semi-circles and welded them together in Design Studio.  I cut this design from a metallic heat transfer vinyl.  Here are two close-up pictures of the back.


To decorate the front of the sweatshirt I again used Ornamental Iron 2.  I cut a scroll design for the right front and added the word “Create” using Paper Lace II.  They are cut from two different shades of metallic heat transfer vinyl but both look silver in the picture — probably from the flash.  I cut a winged heart design for the left front using the Rock Princess cartridge and the lime zebra print and silver metallic vinyls.

  • Cricut cartridges:  B is for Boy, Cricut Everyday, Ornamental Iron 2, Paper Lace II, Rock Princess
  • Heat transfer vinyl
  • Black twill

1st Banner for Cricut Expression 2 Design Challenge


On Monday, September 26 at 12:01 a.m. EST, Provo Craft is going to launch their newest machine — the Cricut Expression 2 on HSN.  They posted a challenge to design and make a banner and they are going to give away five new Expression 2’s to some very lucky winners.  You were able to make two banners to enter, so this is the first banner I made.

I knew the competition was going to be tough because there are so many talented Cricut users, so I tried to think a little “outside the box.”  For some reason, hanging a mini banner on a glass block was my first idea.   I originally planned on using etching cream to frost the glass, but because I was using a small string of LED lights I ended up putting glass marbles inside to help hold the lights in place.

The banner is made using Bazzill and Core’dinations cardstock.  I used the Birthday Bash cartridge for my banner base.  The green frame was cut from Lacy Labels, the scalloped circles from Mini Monograms, the regular circles from George and Basic Shapes, and the black valances were cut from Straight from the Nest.  The Cricut lettering is from Cricut Everyday and I cut it out of a glitter cardstock from DCWV.  I used two Swarovski crystals on the antennae.  I added some small flowers punched from a Martha Stewart Punch Around the Page combo called Flower Shower and used lime green Stickles for the centers.

The pieces on the glass were cut from vinyl — the white fancy scroll frame is from Ornamental Iron 2 and the Bug head is from Cricut Everyday.  I was impressed with how well the Cricut cut the vinyl.  Here is a picture of the block all lit up.

FrontLit4

I decided to decorate the back of the block too and I used the same frame that I put on the front, cut from Ornamental Iron 2.  I recently bought this cartridge and I am lovin’ it!  It has some beautiful designs on it and I think they look great cut out of vinyl.

The phrase and Bug head on the back are both cut from Cricut Everyday.  And here is a picture of the back of the block with the lights on.

To hang the banner on the glass block, I glued some black & white dotted ribbon around the edges using Terrifically Tacky Tape.  I strung the banner together using DMC’s Memory Thread.  I sewed and glued the ends of the Memory Thread on the banner.  To cover up my stitches, I punched some more flowers and glued them on top.  I also scattered a few flowers on the front and back of the block.  I tied some wide Cricut green organza ribbon around the entire block and made a big bow using my Bowdabra.

The last picture is of the side of the block.

  • Cricut cartridges used:  Birthday Bash, Cricut Everyday, George and Basic Shapes, Lacy Labels, Mini Monograms, Ornamental Iron 2 and Straight from the Nest
  • Cardstock:  Bazzill, Core’dinations, DCWV
  • Cricut vinyl
  • DMC Memory Thread
  • Terrifically Tacky Tape
  • Martha Stewart Flower Shower punch
  • Lime green Stickles
  • Swarovski crystals