Snow Bird


Here’s another card that I made for several challenges and I had a lot of fun making it.  Unfortunately it will be my last card for a while.  The next couple of weeks are going to be filled with embroidery and trade shows.  CHA is coming up at the end of the month and Erin is flying home from Taiwan to attend with me. 

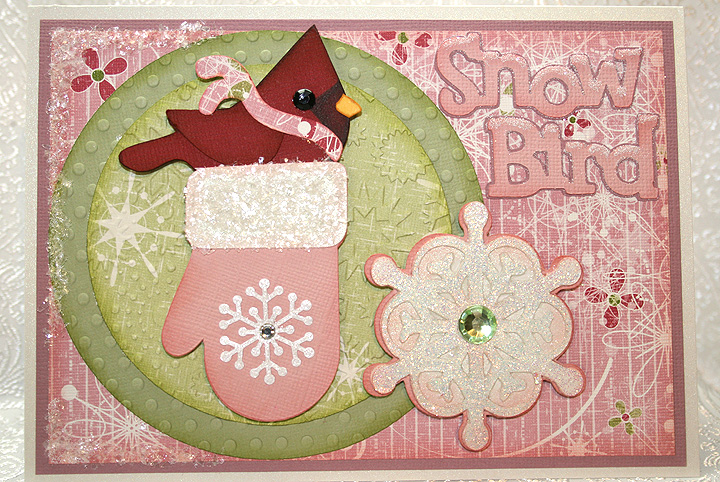
There’s lots of sparkle on this card as the little snow bird makes his winter home in a warm mitten.  The solid cardstock is from Bazzill and the patterned paper is called Snowflake Waltz and is from Daisy Bucket Designs.

I wanted to do a cardinal for my bird, but I wanted a chubby little guy and I couldn’t find one on any of my Cricut cartridges.  I found a cute bird on Straight from the Nest and decided to use him.  As I was laying out the card in Design Studio, I kept trying to figure out how to make the bird into a cardinal shape.  My solution was to use a lower case “v” from the Mickey Font cartridge.  I turned it upside down and welded it to the top of the bird’s head.  I used Copic markers to color the dark spot on his face.  I’m pleased with how he came out.

The circles are cut from the George and Basic Shapes cartridge and I used my Cuttlebug to emboss both of them.  The mitten is from Simply Charmed, the large snowflake is from Joys of the Season, “Snow Bird” is from Straight from the Nest, and the bird’s scarf is from 3 Birds on Parade. 

I added lots of bling to this card.  I heat embossed the large snowflake on the front using holographic embossing powder.  I put some fine snow on the sentiment using Martha Stewart glitter.  The coarser snow is also from Martha Stewart.  The small snowflake on the mitten is a Martha Stewart punch.  I added rhinestones to the centers of the snowflakes.

While I was working on this card, the song “Snowbird” by Anne Murray kept running through my head.  I printed part of the chorus and put it on the inside of the card.   The snowflake on the inside is from Joys of the Season.

 Here are the challenges I am entering and the requirements for each:

Jitterbuggin – For the Birds Challenge – follow the sketch, add a Cricut bird and use something pink.

Fantabulous Cricut – Challenge #42 Winter Warmies – create a project using some type of winter clothing or accessory.

Cooking With Cricut – Glittermania! – glitz up your project.

The Cuttlebug Spot – Inspired by a Song – find inspiration for your project in a song.

  • Bazzill cardstock
  • Designer paper – Snowflake Waltz from Daisy Bucket Designs
  • Cricut cartridges:  3 Birds on Parade, George and Basic Shapes, Joys of the Season, Mickey Font, Simply Charmed, and Straight from the Nest.
  • Cricut Design Studio
  • Cuttlebug
  • Copic markers
  • Ranger holographic embossing powder
  • Martha Stewart punch
  • Martha Stewart glitter
  • Rhinestones from stash


Bring It On — 1st Card of 2011!!


I haven’t posted in a quite a while.  I’m still busy with the business, so that is a good thing.  I decided to take a little down time and make a card.  The nice thing is that this card fits so many challenges that are starting off the new year. 

I made a whimsical snowman, who is looking up and telling Mother Nature to “bring it on!”  He is all prepared — he has his snow shovel at the ready.

The patterned paper is by Die Cuts With a View (DCWV) — from one of the holiday stacks that I picked up at Jo-Ann’s.  I cut the snowman with my Cricut using the Doodlecharms cartridge.  I used Design Studio to hide his face so I could move his nose to the top in order to have him looking up into the sky.  I sure hope this is what he looks like, and not some strange looking snowman/unicorn creature.

The snow shovel is cut from the Sesame Street Friends cartridge, the snowman’s scarf from 3 Birds on Parade, the large snowflakes from Accent Essentials, and the snow flurry swirls are from Calligraphy.  I printed the sentiment on the computer using a free font that I downloaded.  It has little snowmen faces peeking out of the letters.  I colored the letters using Copics.

I cut the flurry swirls from a transparency sheet (acetate) so they would be clear.  I then took some white paint and dabbed on them to give them a little opacity, but not too much.  I wanted them to remain in the background when I glued on all the small snowflakes, which I made using a Martha Stewart snowflake border punch.  I used the negative cuts (the part that usually gets thrown away).  Gluing those little snowflakes was a tedious job.

The finishing touches include a small metal star charm hanging from the snowman’s scarf and some rhinestones in the centers of the large snowflakes.  The charm was gold but I thought it looked too stark on the card, so I took my Copics and changed the color. 


I placed three of the large snowflakes on the inside of the card:

Here are the challenges that I am entering :

Circle Blog Weekly Challenge #15:  Feeling Frosty!  The requirements are to use white paint, a snowflake and something metal.  I think I covered all of those bases with this card.

Jitterbuggin’ Challenge – Sketch 29 – Let It Snow!:  The requirements are to follow the sketch, use blue somewhere on the card, and include something snow related.

Fantabulous Cricut – Challenge Me Monday #41 – Snowy Delights:  The requirements are to create a project using snow or snowflakes.

Cooking With Cricut – Snow Fun!:  The requirement for this challenge is any project with snow or winter-time activities.

Made By Momo:  Make something with a snow theme.

My Sheri Crafts Challenge #39 – Winter:  What winter means to you. 

  • DCWV patterned paper
  • Cricut cartridges used:  Accent Essentials, 3 Birds on Parade, Calligraphy, Doodlecharms, and Sesame Street Friends
  • Clear acetate (transparency)
  • Martha Stewart snowflake border punch
  • Charm from stash
  • Rhinestones
  • Copics